| “This site contains affiliate links for which OEMDTC may be compensated” |
REPAIR PROCEDURE
DATE: 03/05/13
| APPLICABILITY: | 2014 Forester, 2.5 NA CVT Models ONLY |
| SUBJECT: | CVT Fluid Level Adjustment Procedure |
IMPORTANT: The following CVT fluid level adjustment procedure MUST be performed as soon as possible after receipt of the subject vehicle(s) by your dealership.
Once the adjustment procedure has been completed, we request your Warranty claim for the adjustment be submitted immediately. Your cooperation in this matter will help insure all the affected vehicles are corrected and ready for sale / delivery as quickly as possible.
PART INFORMATION
| PART NUMBER | DESCRIPTION |
|---|---|
| SOA635043 | CVT Fluid (quart) |
| 803918060 |
Filler Plug Gasket |
SERVICE PROCEDURE
IMPORTANT: The ATF temperature must be within the specified temperature range to eliminate false readings when performing the fluid level inspection procedure. If fluid is added when the CVT is cold, the unit will be overfilled once it warms up resulting in reduced fuel economy and possible driveability concerns if driven for extended periods of time.
- Raise the vehicle on a lift and remove the transmission’s front under cover.
- Lower the vehicle, connect the Subaru Select Monitor III (SSMIII) then start the engine.
- Using the SSMIII, select “All Other Models”, “Each System Check”, “Transmission Control System”, “Current Data Sampling” then view the PID for “ATF Temperature”.
- Allow the ATF Temperature to rise to 35 – 45 degrees C (95 – 113F).
- With the engine idling, operate the shifter from P > R > N > D then back from D > N > R to Park. This will insure the transmission fluid has circulated thoroughly.
- With the engine idling, shifter in the Park position and ATF temperature within the specified range, raise the vehicle and remove the filler plug shown in the illustration below.
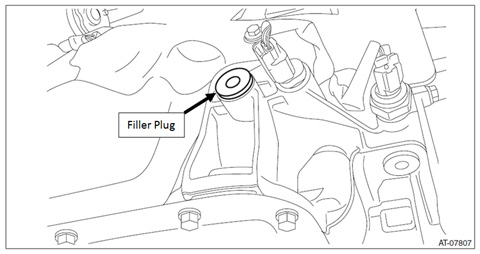
CAUTION: Remove the filler plug SLOWLY while taking precautions to catch any fluid which may be released. There may be up to 2 liters of hot fluid released so, be sure to prepare accordingly.
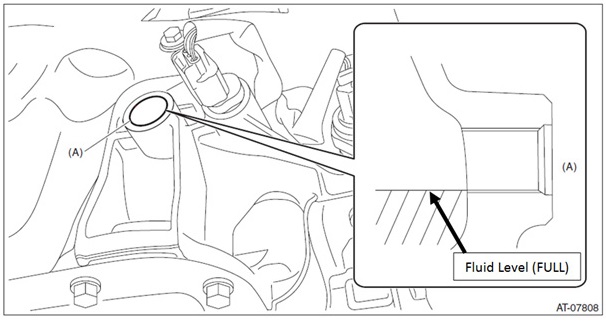
- If no fluid leaks out once the plug is removed, add the proper amount of CVT fluid to bring the fluid level up to the bottom of the filler plug hole as shown in the illustration below.
- Once the fluid is adjusted to the proper level, install the filler plug using a NEW filler plug gasket.
- Torque the filler plug to 50 Nm (36.9 ft. lbs.).
- Put a paint mark on the filler plug to indicate the procedure has been completed.
- Wipe clean any fluid that may have spilled onto the exhaust or surrounding components.
- Reinstall the transmission front under-cover and torque the bolts to 18 Nm (13.3 ft. lbs.) to complete the repair procedure.
WARRANTY / CLAIM INFORMATION
| LABOR DESCRIPTION | LABOR OPERATION # |
FAIL CODE |
LABOR TIME |
|---|---|---|---|
| 2014 Forester CVTF Overfill Repair | A303-502 | MTG-48 | 0.4 |
 Loading...
