| “This site contains affiliate links for which OEMDTC may be compensated” |
NUMBER: 12-177-14
DATE: 12/23/14
REVISED: 10/28/15
| APPLICABILITY: | 2015MY Legacy and Outback Models |
| SUBJECT: | Service Procedure to Address a Wind Rushing Sound from the Rear Door Sash Area |
INTRODUCTION
This bulletin provides a service procedure to address customer concerns of a wind rushing-type sound which seems to come from the rear door glass sash area. Customers may report a concern with one or both rear doors. It is only necessary to address the side with the confirmed condition. The door glass sash separates the main door glass from the small partition glass at the rear of each door. The procedure involves replacement of the rear door glass run channel (weatherstrip), partition glass weatherstrip, and both the inner and outer door glass weatherstrips (sweeps). In addition, 3 pre-cut pieces of self-adhesive EPT foam, 1 piece of non-woven tape (will be cut into 2 pieces) and a 320mm section of butyl tape will be added in specific locations. To address a customer concern of a fluttering-type noise coming from the B-pillar area at highway speeds, see TSB 12-185-15 for installation of the 320mm section of butyl tape only.
COUNTERMEASURE IN PRODUCTION
Countermeasures were incorporated into production on October 10, 2014 starting with the following VINs: F3028031 (LEGACY) and F3243546 (OUTBACK).
PART INFORMATION
| PART NAME | PART NUMBER |
|---|---|
| REPAIR KIT LEGACY R RH | 62099AL00A |
| REPAIR KIT LEGACY R LH | 62099AL01A |
| REPAIR KIT OUTBACK R RH | 62099AL04A |
| REPAIR KIT OUTBACK R LH | 62099AL05A |
| 320MM SECTION OF BUTYL TAPE | SOA635138** |
| **included with all kits with a Pack Date after May 1, 2015 | |
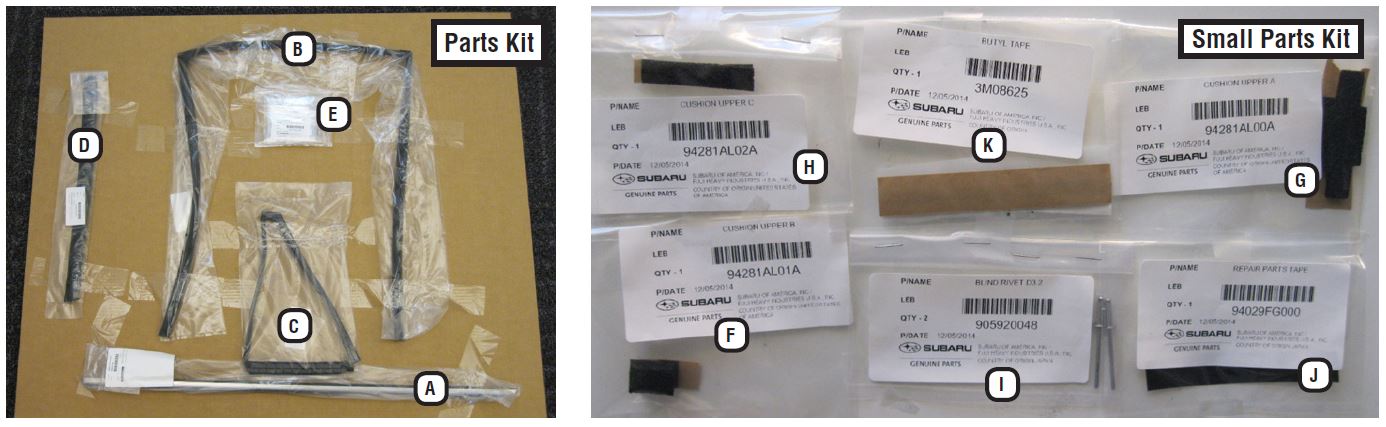
The parts kit will consist of the following components: (p.n. 62099AL00A , a Right Rear kit (Right Rear Kit is shown on the next page).
| ID | DESCRIPTION | QUANTITY |
|---|---|---|
| A | Weatherstrip Outer | 1 |
| B | Glass Run Channel | 1 |
| C | Partition Glass Weatherstrip | 1 |
| D | Weatherstrip Inner | 1 |
| E | “Small Parts” Kit Bag (Detail / Table below) | 1 |
Small Parts Kit Bag Detail
| ID | DESCRIPTION | QUANTITY |
|---|---|---|
| F | EPT Foam Piece #1 | 1 |
| G | EPT Foam Piece #2 | 1 |
| H | EPT Foam Piece #3 | 1 |
| I | Rivets | 2 |
| J | Non-Woven Tape | 1 |
| K | Butyl Tape | 1 |
NOTE: If you have in stock or receive a repair kit with an 80mm section of butyl tape included (item “K” in the photo below), a much longer, (320mm) section, p.n. SOA635138 must be ordered to properly complete these repairs. All repair kits with a Pack Date after May 1st, 2015 will include the longer 320mm section of butyl tape. The repair kit part numbers will remain unchanged.
SERVICE PROCEDURE / INFORMATION
VERY IMPORTANT: Always verify the customer’s concern and read through this procedure completely BEFORE proceeding with any repairs.
STEP 1 – Disassembly
VERY IMPORTANT: Always take proper precautions to protect the door panel interior trim surfaces from becoming scratched / damaged throughout this procedure.
- Open the door glass fully then “bump” the switch to raise it back up approximately ½”.
- Disconnect the battery ground (-) cable from the battery sensor.
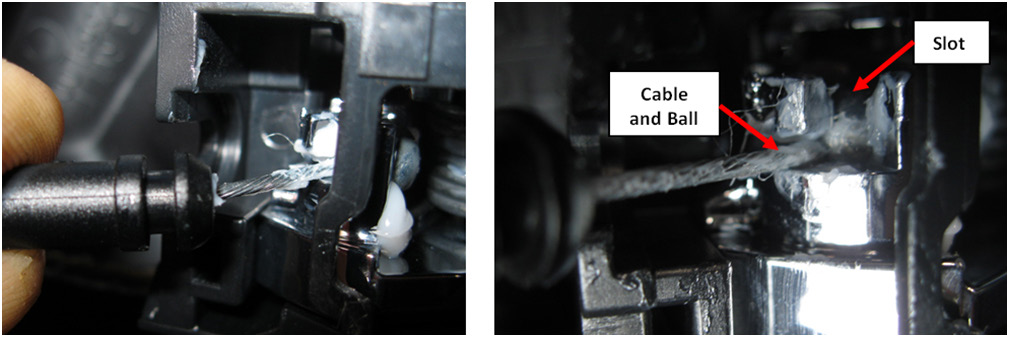
- CAREFULLY remove the affected door trim panel following the procedure outlined in the applicable Service Manual. Release the control cables from the inner door handle as shown in the photos below. Align the cable with the slot then lift it up and out of the lever to disengage it.
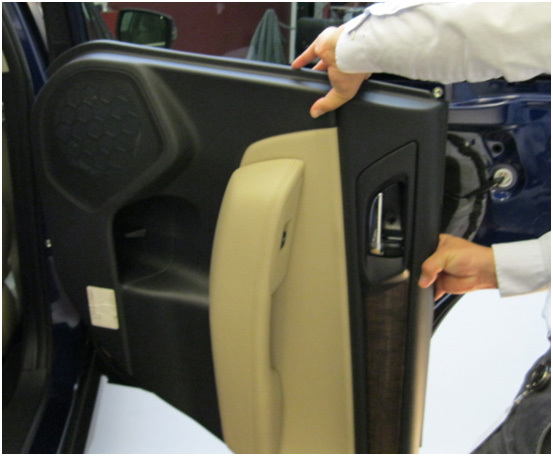
TIP: After disconnecting the control cables from the door handle, rotate the door panel 90 degrees clockwise as shown below. This will allow for much easier access to disconnect the power window switch harness connector.
- After disconnecting the wiring harness connector for the power window and the speaker, put the trim panel in a safe place to protect it until needed.
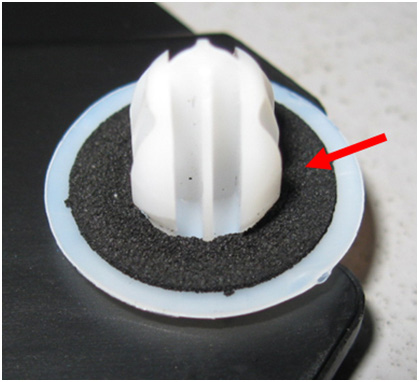
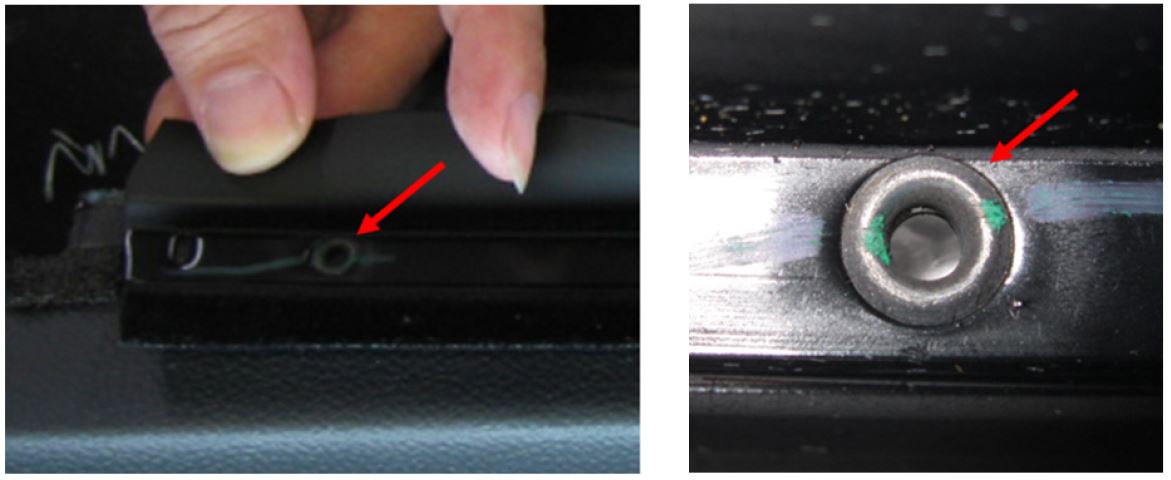
NOTE: Pay close attention to the small sealing gaskets used on the door trim. These gaskets must be in place as shown below before reassembly to properly seal their respective component and help eliminate the possibility of a rattling sound.
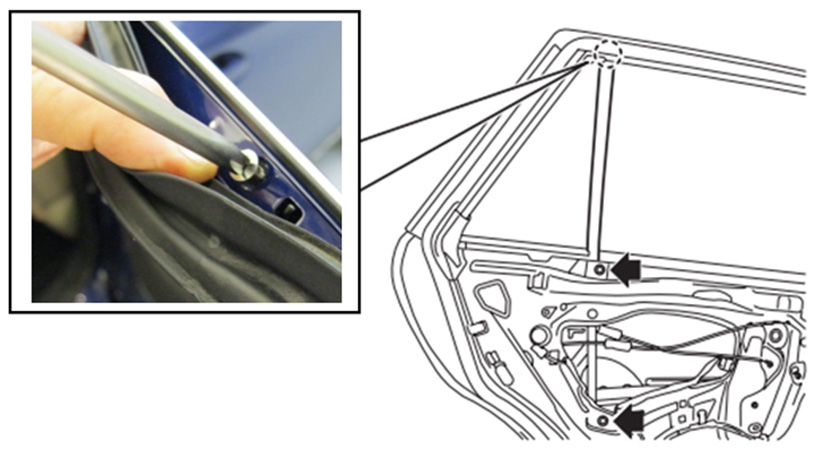
CAREFULLY release the vapor barrier from the bottom only as much as is required to access the window glass and the 2 sash retaining bolts. Use the control cable through a round retaining clip hole already in the vapor barrier to hold it up and out of the way as shown below. Use a Philips screwdriver to remove the door speaker.
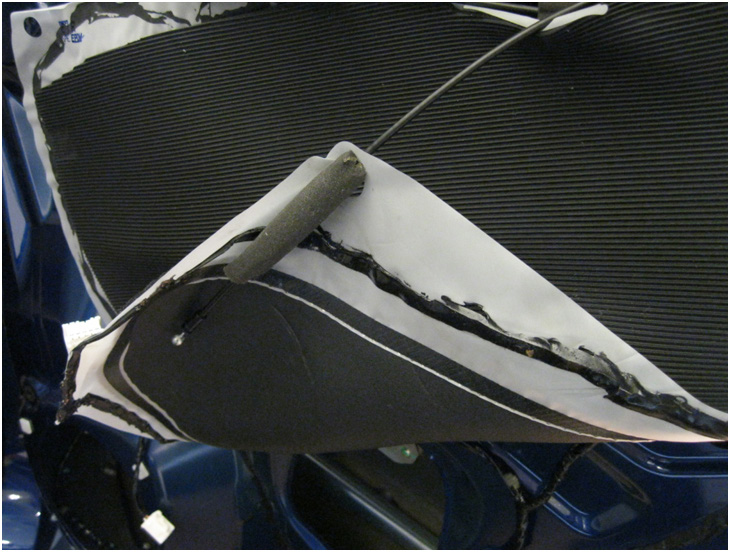
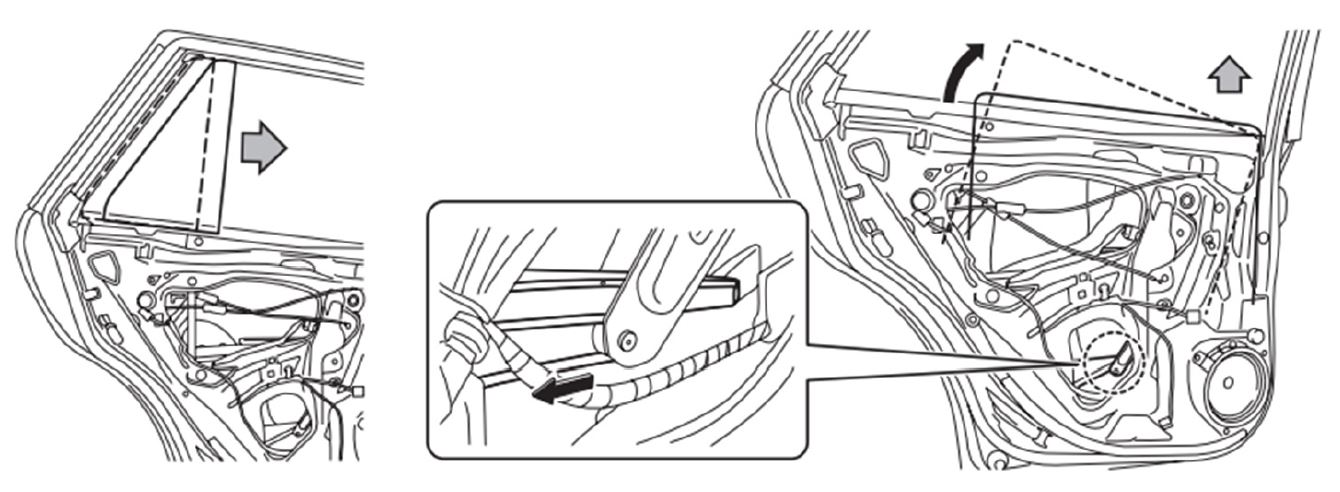
- Remove the #2 Philips screw securing the partition glass sash to the door frame. The screw is accessed by partially removing the outer door seal directly above where the sash meets the door frame. Remove the 2- 10mm hex bolts securing the sash to the inner door structure. Remove the sash, partition glass and the run channel as shown in the illustrations below.
- Once the sash, partition glass and glass run channel have been removed, CAREFULLY tilt / rotate the glass clockwise as shown. Disengage it from the regulator lift arm roller then lift it out of the door and set aside in a safe place. Do not remove the window regulator assembly.
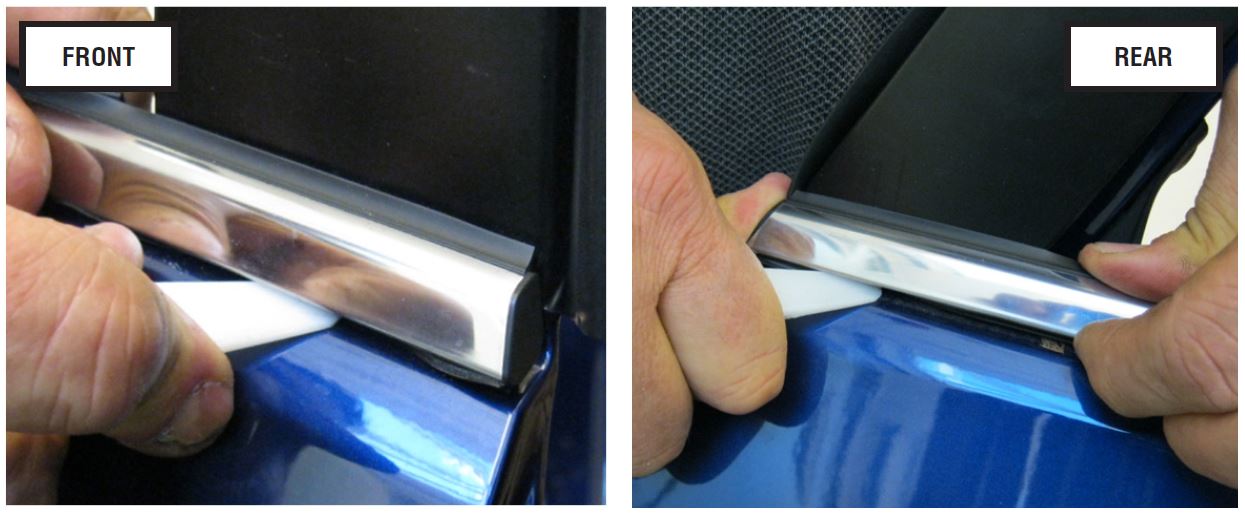
STEP 2 – Using a plastic trim tool under each end, CAREFULLY unseat the retaining clips and remove the outer door glass weatherstrip / chrome trim.
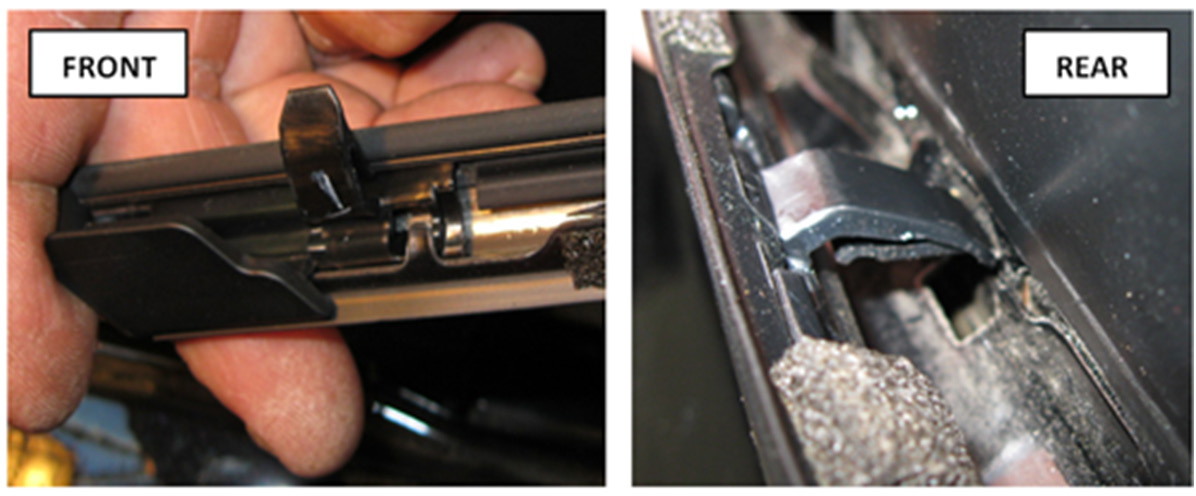
STEP 3 – Place the door trim panel on a clean surface (e.g. a blanket or cloth fender cover) and access the inner weatherstrip mounting claws. Use a small flat-blade screw driver to lift and straighten the retaining claws which along with “pop” rivets, secure it to the door trim panel. Note the direction of the metal retaining claws as the claws on the replacement part must be folded in the same direction as the originals. Example: on the rear doors, 3 point toward the rear and the other 2 point toward the front.

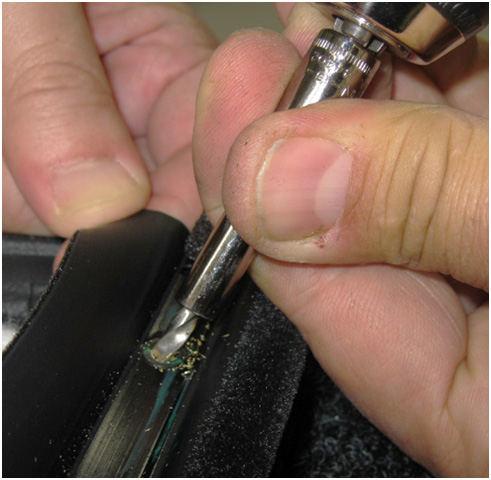
CAUTION: Wear Safety Glasses. Using an electric drill with a 5/32” drill bit turning at LOW SPEED, CAREFULLY drill out the two retaining rivets found between the “flaps” of the weatherstrip.
The photo below shows the drill being held at an angle to minimize the tendency for the rivet to spin. A ¼” drive, 5mm deep-well socket was used as a drill stop and an additional “grip” to provide extra control of the drill bit while drilling out the rivets. Always make sure to vacuum away any remaining metal chips after drilling is complete.
Fit the replacement inner weatherstrip to the trim panel. “Clamp” the new part to the door trim panel with your thumbs and fingers as shown below then bend the retaining claws over in the same direction as the originals (referenced earlier in this step) using your forefinger. The metal used for the backing and retaining claws of the weatherstrip is relatively pliable and easily bent into position.

Once all the new claws are bent over and holding the weatherstrip tight against the door panel, install the new retaining rivets using a pop rivet installation tool.
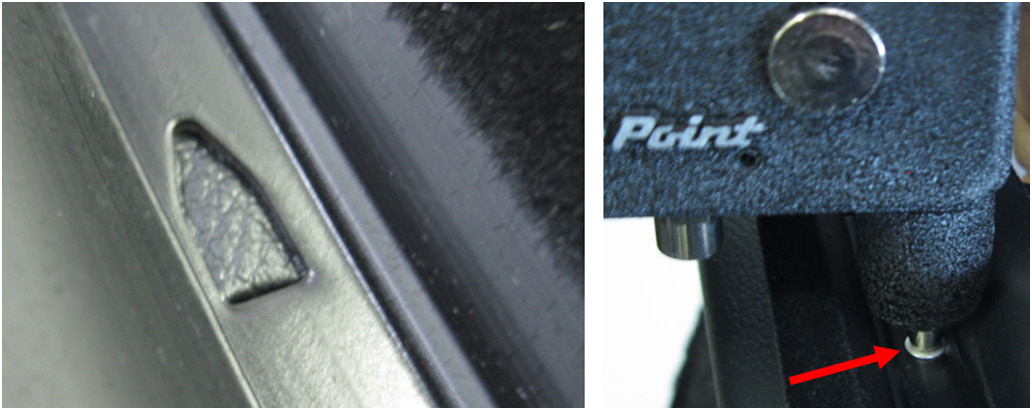
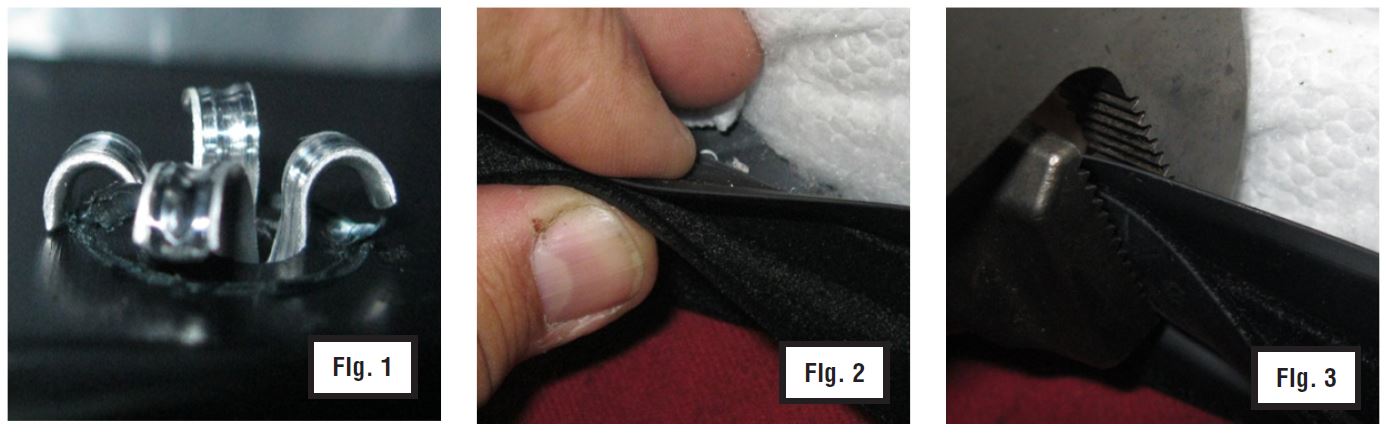
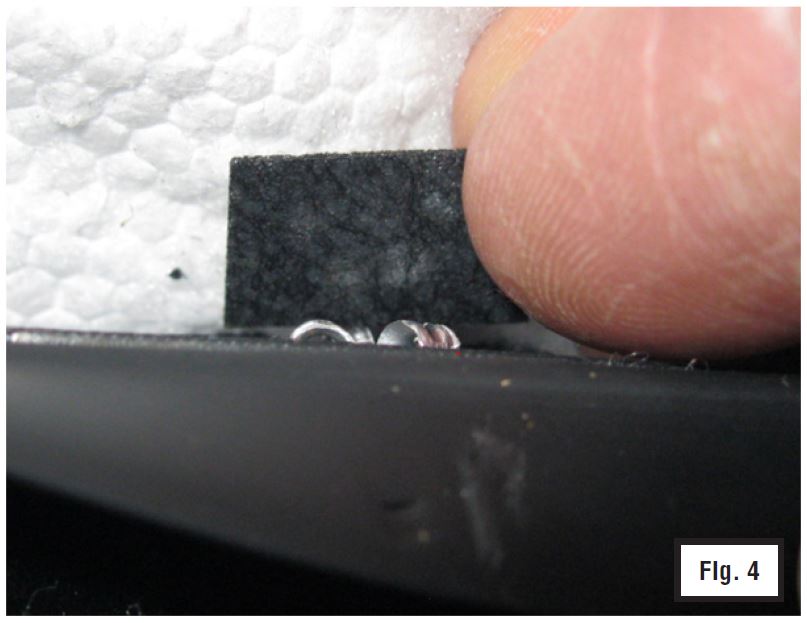
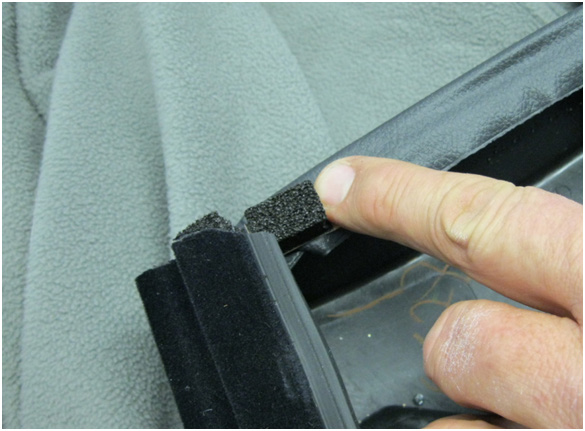
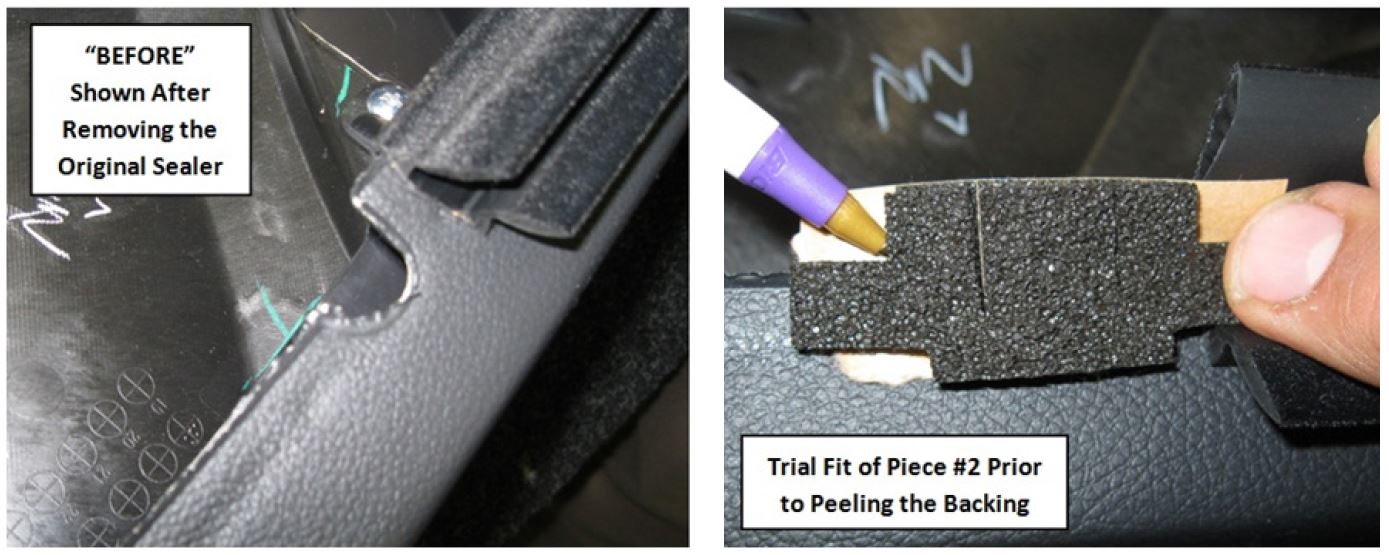
After installation, the back side of each new rivet will mushroom or “bloom” as shown at the top of the next page (Fig. 1). CAUTION: The rivet will have sharp edges. Pinch the inside flap of the weatherstrip and the lower glass-side flap together (Fig. 2). Using a pair of slip-joint pliers, CAREFULLY crush the bloom, one part at a time. The new rivet material is aluminum so, only a small amount of clamping force is needed to achieve the desired result (Figs. 3 and 4). They do not need to be crushed flat. Maximum height is 3mm. Using the supplied piece of non-woven tape, cut it in half and apply one piece for each rivet (Fig. 4). Smooth the tape for proper adhesion..
STEP 4 – Application of the EPT Foam Sealing Material
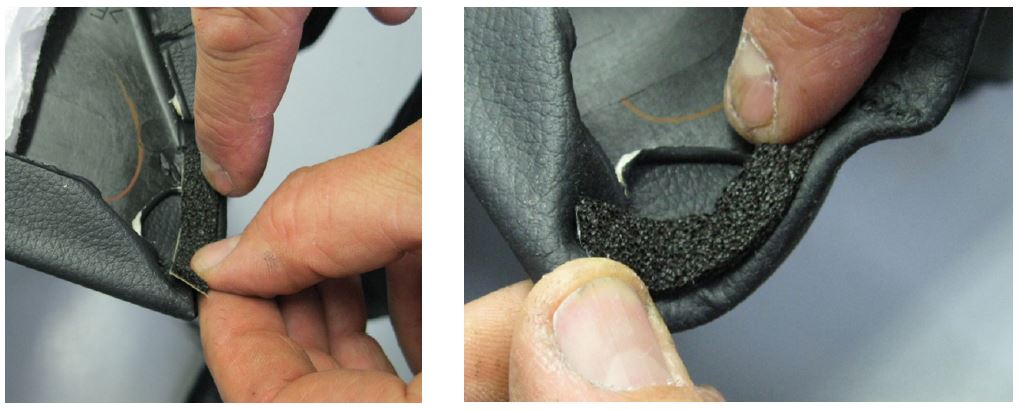
- EPT Foam Piece #1 is applied to the door trim panel at the top front corner where the trim material wraps around the front edge as shown in the photo below.
- EPT Foam Piece #2 is applied to the top front of the door trim panel at the front edge of the inner door glass inner weatherstrip. This piece seals the inside face of the sash and has been pre-cut so it can be properly folded into position as shown in the illustration and photos below.
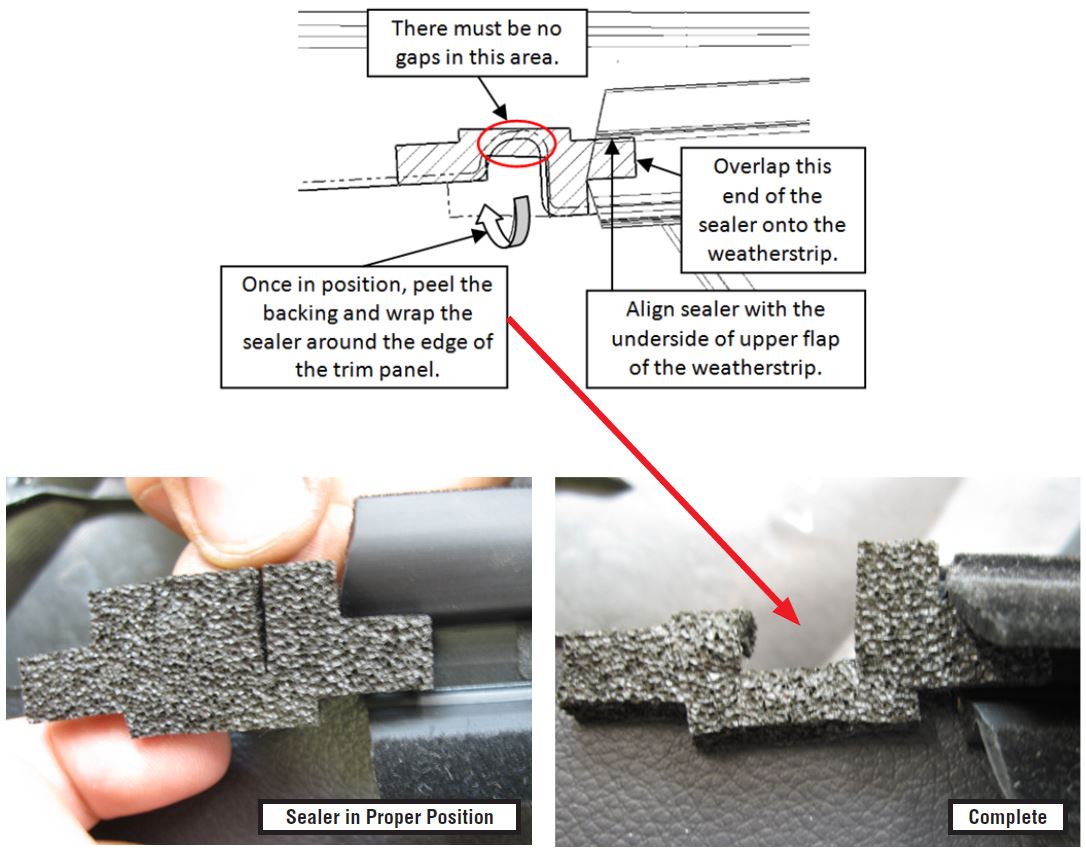
- EPT Foam Piece #3 is applied to the top rear of the door trim panel at the rear edge where the trim material wraps around the rear edge as shown in the photo below.
STEP 5 – Application of Butyl Tape
- To better secure the upper front corner of the door frame weatherstrip to the door frame, release the plastic retaining clip and pull back the weatherstripping to gain access to the area where the 320mm section of butyl tape will be applied. Be sure to clean the area where the butyl tape will be applied with a mild solvent on a clean shop cloth. After drying the area completely, apply the 320mm long piece of butyl tape to the door frame as indicated in red in the illustration and indicated in the completed installation photo below.
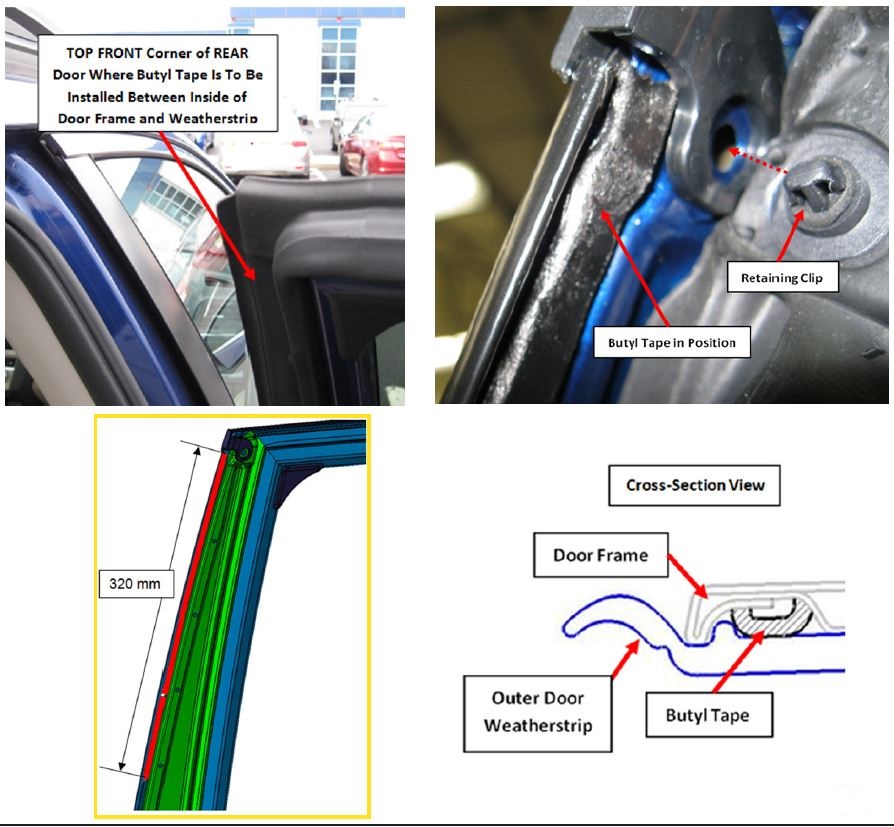
After the butyl tape is applied, refit the weatherstrip and make sure the retaining clip “clips” back into the hole as shown to properly secure and position it. Work the weatherstrip onto the butyl tape with your thumbs making sure it is smooth and any bumps or high spots have been worked out.
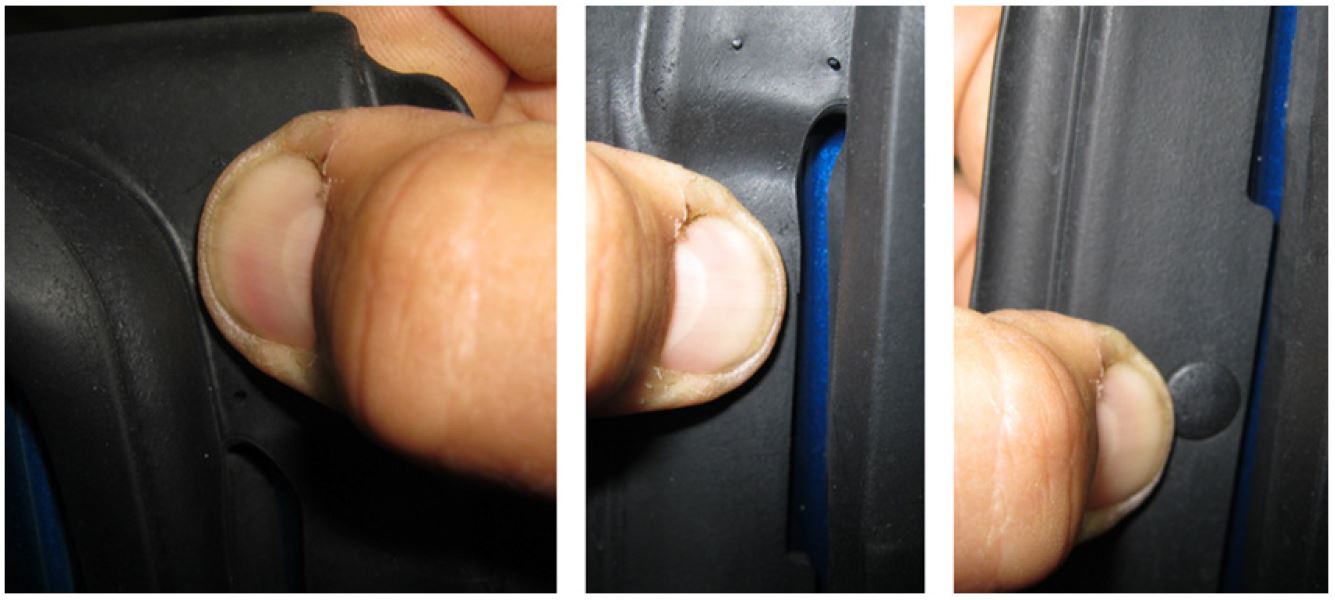
To complete this step, make sure the front of the weatherstrip is properly tucked in behind the chrome outer molding as shown below.
STEP 6 – Reassembly
- Install the original partition glass into the new partition glass weatherstrip. Make sure the weatherstrip is fully seated all the way around the glass.
- Install the glass run channel into the door frame and sash in reverse order of removal.
TIP: Use a soapy water solution to act as a lubricant to aid with the reassembly.
NOTE: At this point, do not secure the sash into the door. Leave it loose until after the partition glass assembly and door glass are back in place. When reinstalling the door glass, rotate it slightly counterclockwise while engaging the guide back onto the regulator lift arm roller. Once the glass is back on the roller push it forward and seat it into the vertical (front) portion of the glass run channel. Work the sash into position on the back edge of the glass and install the Philips screw and the 2- 10mm mounting bolts.
IMPORTANT: While applying substantial rearward pressure on the sash, fully torque the top Philips retaining screw to 1.6 ft. lbs. (19 inch pounds) then torque the 2- 10 mm hex sash retaining bolts to 5.5 ft. lbs, (66 inch pounds) top bolt first.
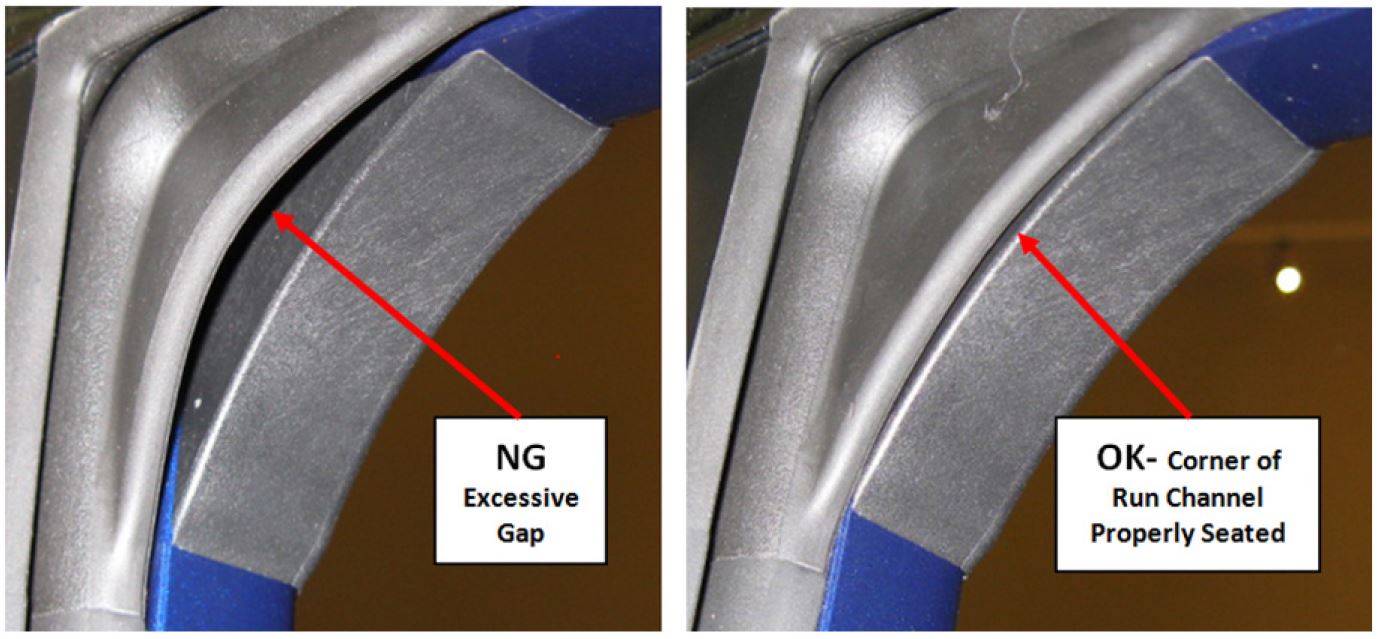
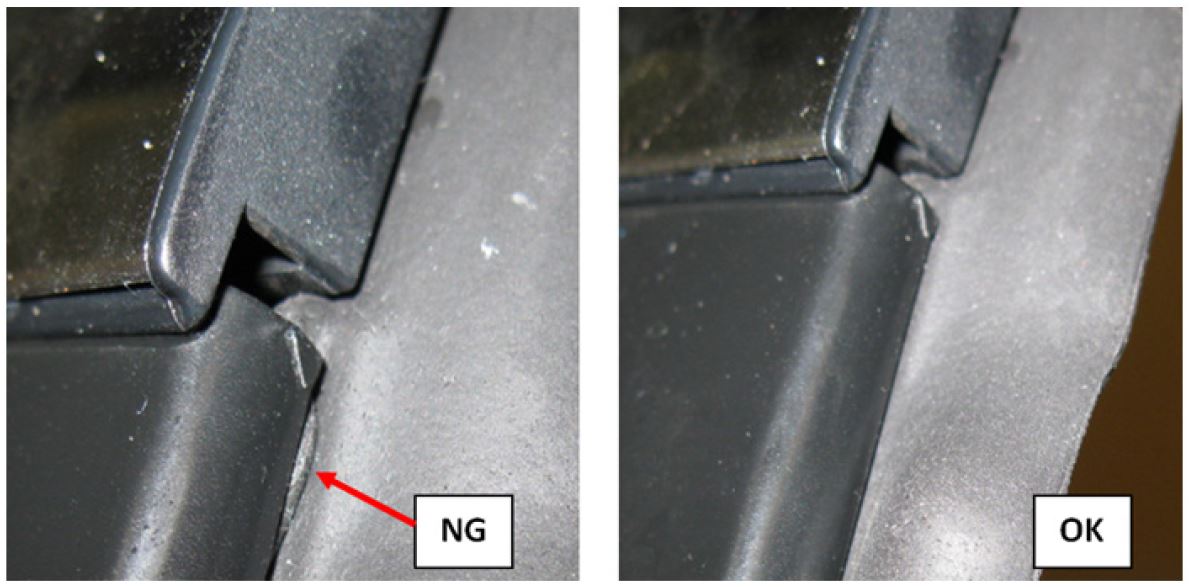
- When installing the new glass run channel, make sure it is fully seated into the door frame. It is also important to confirm the run channel is completely seated all the way to the bottom in both the sash (rear) and the channel it fits into at the front edge of the glass.
- Reinstall the door speaker.
- Reconnect the door lock and latch control cables and all removed wiring harness connectors.
IMPORTANT: When reinstalling the door lock and latch control cables, always make sure the outer casings are fully locked back into place in their respective retaining grooves.
- Always verify proper power window, power door lock, door latch and speaker operation before final installation of the door trim panel.
- Once proper operation is confirmed, complete the installation of the door trim panel in reverse order of removal.
IMPORTANT: To prevent EPT Foam Piece #1 from binding or “bunching up”, hold the lower part of the door trim panel away from the door while sliding it down into position.
STEP 7 – Install the new replacement outer door weatherstrip / chrome trim in reverse order of removal as outlined previously in STEP 2.
STEP 8 – Reconnect the negative battery cable and torque the 12mm nut to 7.5 Nm (5.5 ft. lbs).
NOTE: For the power window Auto Up / Down feature to operate, since the negative battery cable was disconnected, the system will need to be re-initialized on BOTH front doors. Follow the steps below to complete the re-initialization procedure:
- Begin with the window fully closed. Push the switch down to open the window about halfway.
- Pull the switch up to close the window fully in steps (it will only close about 2” each time the switch is operated).
- Once the window is fully closed, pull up and hold the switch again for 1 second to complete the initialization procedure.
STEP 9 – Road test the vehicle to confirm the repair has been successful to complete the procedure.
WARRANTY / CLAIM INFORMATION
For vehicles within the Basic New Car Limited Warranty period, this repair may be claimed using the following information:
| LABOR DESCRIPTION | LABOR OPERATION # |
FAIL CODE |
LABOR TIME |
|---|---|---|---|
| 2015 Legacy and Outback Rear Door Wind Rushing Sound Repair- 1 Side | A912-513 | WBF-48 | 1.2 |
| 2015 Legacy and Outback Rear Door Wind Rushing Sound Repair- Both Sides | A912-514 | 1.9 |
REMINDER: SOA strongly discourages the printing and/or local storage of service information as previously released information and electronic publications may be updated at any time.
Always refer to STIS for the latest service information before performing any repairs.
NHTSA ID Number: 10233085
Manufacturer Communication Number: 1217714
Summary
Service Procedure to Address a Wind Rushing Sound
1 Associated Document
Manufacturer Communications
NUMBER: 12-177-14
DATE: 12/23/14
https://www.nhtsa.gov/recalls?nhtsaId=10233085
MC-10233085-9999.pdf 3120.571KB
 Loading...
NHTSA ID Number: 10068679
Manufacturer Communication Number: 12-177-14
Summary
SUMMARY TO BE PROVIDED ON A FUTURE DATE.
1 Associated Document
Service Bulletin Document
NUMBER: 12-177-14
DATE: 12/23/14
https://www.nhtsa.gov/recalls?nhtsaId=10068679
SB-10068679-0699.pdf 3120.571KB
Loading...


- Other Names: Roof Weather-Strip Clip, Door Weather-Strip Retainer Clip, Clip Weatherstrip
- Positions: Left Lower, Left Rear, Right Lower, Right Rear
- Replaces: 909120022, 909120030, 909120031
- Fits Into 6mm Hole
- Fits Subaru Baja 2003-2006; Impreza 2002-2007; Impreza STI 2004-2007; Impreza WRX 2002-2007; Legacy 2010-2013, 2000-2007; Outback 2010-2013, 2000-2007; Tribeca 2006-2008; BRZ 2013-2019; Forester 2003-2008

- 【High Quality Material】: Our door seal is made of high quality rubber, elastic and flexible, to protect the door and prevent the edge of the door from wear and tear due to collision. Great double-sided adhesive bonding, fit tightly and firmly. High temperature and cold resistance, can be used for a long time.
- 【Dustproof Sound Insulation】: Protect your car, effectively prevent the wind and dust from entering the car, to avoid the car dirty. Highly tight fit, has a very good sound insulation effect, for you to block the intrusion of external noise when driving at high speed. Seal the door to strengthen the cooling and heating effect of the air conditioner.
- 【5 Holes Design】: This door seal is upgraded from the original B-Shape seal, the thickness is increased from 0.24 inch to 0.35 inch, and the holes are increased from two to five, which gives a stronger sealing performance and sound insulation.
- 【Easy to Install】: ①Wash off the stains, dust and oil from the door frame installation with neutral detergent. ②Stick the seal with the double-sided adhesive that comes with this product. ③Tear off the protective film at one end of the seal and paste it on the door frame, then tear off the protective film synchronously according to the line of the installation, and press with appropriate force to ensure that the installation contact is tight.
- 【Widely Applicable】: We have four lengths of car door seals for you to choose from, 26.2 FT, 32.8 FT, 52.5 FT and 65.6 FT, you can cut them according to your needs. This seal can also be attached to car hood, trunk, storage box, suitable for most models, such as sedans, trucks, SUVs, etc.

- [High Quality] The edge trim strip of rubber sealing strip is made of high-quality soft rubber and contains stainless steel clips inside. It can be used around the installation site without falling off easily.
- [Soft] The car weatherstrip is very soft. It can be easily bent along the installation contour or cut at will.
- [Durable] The rubber sealing strip of the car door can protect your car from wear and tear in extreme weather, cold and heat resistance, noise, dust and wind, and has better noise reduction, dust prevention and wind resistance.
- [Easy to Install] The rubber sealing strip of the door with side bulb is easy to install, and it can be quickly installed without adhesive, just by pushing and pressing the decorative seal, which is very convenient.
- [Wide Application] Our U-shaped car door sealing strip has two sizes to choose from: 10 feet and 20 feet. It is applicable to the sealing of various ships, cars, RVs and trucks, as well as various doors, windows and buildings; Sealing strips for various electrical cabinets, generators and metal plates.

- 🚘【Material】Car seal strip is durable rubber and self-Adhesive, non-toxic, thick and flexible, plyable to hold up to compression.
- 🚘【Durable】Automotive weather stripping has good flexibility and compressive deformation resistance, no cracks or deformation in long-term use. Remove the weatherstripping without leaving sticky residue and damaging the original paintwork.
- 🚘【New Upgraded Design】 Rubber sealing strip is optimized and upgraded on the basis of B-type sealing strip. Double-thickness sealing strip sealing performance is stronger, fits the original car better, and will not affect the opening and closing of the door. Suitable for sealing front and rear lids, doors, pillars and boots of various models.
- 🚘【Increased Airtightness】The car door seal has good elasticity and can better fit the gap of your car and improve the sealing degree of your car. Efficiently save fuel consumption, fast cooling, and reduce wear. It can also reduce the noise when driving on the highway, making your journey more comfortable and enjoyable for you and your family.
- 🚘【Package Include】You can get 10M/32.8 feet automotive weather strip. The tailgate weather stripping with durable tape, which is easy to install in any clean and flat place. When using, just need to push the stripping foam on the rubber sealant above the installed place.(Please wash the car more than 3 days after installation)

- 🚗【Material】The car front windshield strip is made of rubber material, good elasticity and toughness, easy to fold and bend, safe and non-toxic, durable and sturdy, not easy to deform, which has good sealing effect, can serve you for a long time.
- 🚚【Size Detail】 Two widths,14MM/0.55inch and 19MM/0.75inch in one package. Different area needs diffrent width,please see our instruction on the picture.Length: 9.8ft and 23ft, you need to cut the strip to fit the car.
- 🚓【Wide Range of Application】This rubber stripping strip is suitable for most cars, trucks, SUVs, etc., and can be used in windows, front and rear windshields, sunroofs, etc. Makes the interior of the car quieter and more comfortable, and improves driving comfort when driving on the highway.
- 🚑【Weather Stripping】The T-shaped design of the weather stripping can better fit your windows and body, sealing the windows and body, front windshield, rear windshield, sunroof, and frame gaps. Prevent dust, water leakage, air leakage, reduce noise, make the car more quiet and comfortable.
- 🚒【Easy to Install】 1. Wipe with a cloth, make sure the surface is clean, if you wipe with a damp cloth, make sure to install it in a dry condition, you can use a tackifier to increase the viscosity if necessary. 2. Tear off the red protective film, press it smoothly on the edge of the door and window, and then cut the adhesive strip. 3. Do not let it enter water within 3 days.

- 👍【Sealer Design Upgrade】 Upgraded five hole design universal car sealer weather striping used to replace other Type D, L, B and O stripe. The sealing strip has stronger sealing performance and better fit.
- 👍【Apply】Apply to seal the front and back covers, car doors, pillar, trunk of various vehicles series.One roll specification:length 10M/32.8Ft.
- 👍【Improved sealing performance】The door sealing strip has good elasticity, which can better fit your car gap and improve the sealing degree of your car. Reduce the noise when driving on the expressway, and make your journey and your family more comfortable and enjoyable. It can effectively save fuel consumption, fast cooling and reduce wear.
- 👍【High Quality】Automotive weather stripping is durable rubber and self-Adhesive, non-toxic, thick and flexible, plyable to hold up to compression.
- 👍【Easy Install】The car door window seal with durable tape, which is easy to install in any clean and flat place. When using, just need to push the stripping foam on the rubber sealant above the installed place.

- [Upgraded Car Door Seal Strip]: Upgraded Double Layer 5 Holes Self Adhesive Sealing Stickers to prevent abnormal noise and eliminate wind noise. The upgraded rubber car door seal strip has better fit and sealing performance, and better sound insulation.
- [Increase air tightness] : Upgraded 5 holes design car door window seal strip can not only better fit car gaps, increase air tightness, effectively save fuel consumption, cooling fast, reduce wear.It can also reduce the noise when driving on the highway.
- [Wide range of application]: Car Door Rubber Seal Strip suitable for car door sealing (all kinds of car series front and rear cover, door, hood, column, trunk sealing, etc.) can also be used for RV compartment sealing, hatch sealing, door sealing, storage container sealing, tool box sealing, etc.
- [Easy Installation]: Auto Door Soundproofing Weatherstrip long 5M, No tools required. Clean where you need to paste and keep dry, then measure the length of the car seal and DIY cut the length you need. Remove the protective adhesive on the back, and the installation is complete.
- [High quality]: This Car Door Seal Strip is made of premium durable rubber with good elasticity and flexibility, and is wind, water, noise, heat and durability.

- Genuine OEM
- High quality
- Dependability
- Fit type: Universal Fit
Last update on 2024-03-31 / Affiliate links / Images from Amazon Product Advertising API
This product presentation was made with AAWP plugin.