
Accessory Installation Guide
| 2020-2022MY Legacy Pet Friendly Padded Seat Protector | F411SAN030 |
Installation Instructions
Installation Instructions – Legacy / Instructions d’installation – Legacy
PART NUMBER: F411SAN030 / NUMÉRO DE PIÈCE: F411SAN030
DESCRIPTION: Pet-friendly Padded Seat Protector / Housse de siège matelassée pour animaux de compagnie
Kit Contents / Contenu de la trousse
Pet-friendly Padded Seat Protector / Housse de siège matelassée pour animaux de compagnie
TOOLS / MATERIALS REQUIRED: / OUTILS/MATÉRIEL REQUIS: /
None / Aucun
1a
Press the rear seatback lock release button on both ends of the rear seat.
Appuyez sur le bouton de déverrouillage du dossier de siège arrière aux deux extrémités du siège arrière.
1b
Fold down the rear seatback and then press the button to remove the headrest.
Rabattez le dossier de siège arrière, puis appuyez sur le bouton pour retirer l’appuie-tête.
1c
Completely remove rear left and right headrests. Refer to Owner’s Manual for detailed instructions under “Head restraint height adjustment” section. Leave rear seatback unlocked and slightly leaned forward.
Retirez complètement les appuis-tête arrière gauche et droit. Reportez-vous au manuel du propriétaire pour obtenir des instructions détaillées à la section « Réglage de la hauteur des appuis-tête ». Laissez le dossier de siège arrière déverrouillé et légèrement penché vers l’avant.
2
Raise but do not remove rear center headrest by pulling it upward.
Relevez l’appui-tête arrière central sans le retirer en le tirant vers le haut.
3
If needed, expose LATCH anchors by unfolding cover flaps.
Au besoin, exposez les ancrages du système LATCH en dépliant les rabats de la housse.
4
Find center headrest hole in Pet-friendly Padded Seat Protector and hang it over the raised center headrest by passing it through the hole.
Press the rear seatback lock release button on both ends of the rear seat.
Trouvez le trou pour l’appui-tête central sur la housse de siège matelassée pour animaux de compagnie, puis suspendez la housse en faisant passer l’appui-tête central surélevé par le trou.
5
Open Velcro® strip along the right side seatbelt opening and pass the right side of the cover under the center seatbelt.
Détachez la bande Velcro® le long de l’ouverture de la ceinture de sécurité droite et passez le côté droit de la housse sous la ceinture de sécurité centrale.
6
Wrap the cover around and over the top of both sides of the rear seat.
Recouvrez les deux côtés du siège arrière de la housse.
7
Align all headrest holes as shown and then lower center headrest. Push rear seatback and lock in place.
Alignez tous les trous de l’appui-tête comme illustré, puis abaissez l’appui-tête central. Poussez le dossier de siège arrière et verrouillez-le en place.
8
Once the top of the seat cover is aligned, wrap seat cover around the seatbelt and mate the Velcro® strip along the seatbelt opening.
Une fois le haut de la housse de siège aligné, enroulez la housse de siège autour de la ceinture de sécurité et attachez la bande Velcro® le long de l’ouverture de la ceinture de sécurité.
9
Locate the 4 inserts on the back of the Pet-friendly Padded Seat Protector. [Note: Seat cover is folded to show inserts.]
Repérez les 4 languettes à l’arrière de la housse de siège matelassée pour animaux de compagnie. [Remarque : La housse de siège est repliée pour montrer les languettes.]
10
Position the seat cover and tuck bottom center inserts between the seat back and seating surface.
Mettez la housse en place, et insérez les languettes centrales du bas entre le dossier et le siège.
11
Tuck side edge of the seat cover into the plastic trim of the seat. Starting at the front and working your way to the back. (Repeat for the other side)
Insérez le bord latéral de la housse dans l’habillage en plastique du siège, en allant de l’avant vers l’arrière. (Répéter de l’autre côté.)
12
Locate Velcro® sections at the bottom of the seat.
Repérez les bandes Velcro® au bas du siège.
13
Attach Velcro® sections at the bottom of the seat.
Fixez les bandes Velcro® au bas du siège.
14
Locate the fabric tabs on the sides of the Pet-friendly Padded Seat Protector. Gently insert the fabric tab between the seat and the door weatherseal. Slide it back and forth until it settles into the opening and push it in until it disappears. Repeat for the second tab and then repeat for the other side. Note: There is one fabric tab above and below the door-open sensor. While inserting tabs, do not push into sensor.
Repérez les languettes en tissu de chaque côté de la housse de siège matelassée pour animaux de compagnie. Insérez délicatement la languette en tissu entre le siège et le caoutchouc d’étanchéité de la porte. Faites-la glisser d’avant en arrière jusqu’à ce qu’elle se place dans l’ouverture, puis poussez-la jusqu’à la faire disparaître. Répétez l’opération pour la deuxième languette, puis répétez l’opération pour l’autre côté. Remarque : Il y a une languette de tissu au-dessus et en dessous du capteur d’ouverture de porte. Lors de l’insertion des languettes, ne les poussez pas dans le capteur.
15
Ensure seatbelt is accesible, unobstructed and next to the seat cover. Repeat for the other side.
Assurez-vous que la ceinture de sécurité est accessible, dégagée et à côté de la housse de siège. Répéter de l’autre côté.
16a
Press the rear seatback lock release button on both ends of the rear seat.
Appuyez sur le bouton de déverrouillage du dossier de siège arrière aux deux extrémités du siège arrière.
16b
Fold down the rear seatback and then press the button to reinstall the headrest.
Rabattez le dossier de siège arrière, puis appuyez sur le bouton pour réinstaller l’appuie-tête.
16c
Reinstall rear left and right headrests. Refer to Owner’s Manual for detailed instructions under “Head restraint height adjustment” section.
Réinstallez les appuis-tête arrière gauche et droit. Reportez-vous au manuel du propriétaire pour obtenir des instructions détaillées à la section « Réglage de la hauteur des appuis-tête ».
16d
Push rear seatback and confirm that it is in the locked position.
Poussez le dossier de siège arrière et vérifiez qu’il est en position verrouillée.
CLEANING INSTRUCTIONS
1.Using a large washer without agitator, wash the cover in COLD, using a mild all-purpose
cleaner (suitable for fabrics). DO NOT USE BLEACH or HARSH DETERGENTS.
2. Rinse the cover twice (2x) in COLD to remove any residual cleaner.
3. Hang and allow to air dry.
INSTRUCTIONS DE NETTOYAGE
1.Dans une grande laveuse sans agitateur, laver la housse À L’EAU FROIDE à l’aide d’un nettoyant tout usage doux
(convenant aux tissus). NE PAS UTILISER DE JAVELLISANT OU DE DÉTERGENTS CORROSIFS.
2.Rincer la housse à deux(2) reprises À L’EAU FROIDE pour enlever toute trace de nettoyant.
3. Suspendre et laisser sécher à l’air.
SPOTCLEANING INSTRUCTIONS
1 -Mix one ounce of a mild all-purpose cleaner (suitable for fabrics) per quart of warm water.
2 -Spray or sponge onto cover.
3 -Rinse with water (until no suds remain) and allow to air dry.
INSTRUCTIONS DE NETTOYAGE DES TACHES
1–Mélanger une once d’un nettoyant tout usage doux (convenant aux tissus) à une pinte d’eau chaude.
2–Vaporiser le mélange sur la housse ou l’appliquer à l’éponge.
3–Rincer à l’eau (jusqu’à ce qu’il n’y ait plus de mousse) et laisser sécher à l’air.
F411SAN030
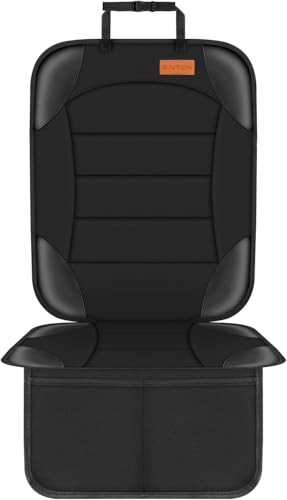
- Thick & Durable Protection – Keep Your Car Seats Looking New: Siivton car seat protector is made of extra-thick, high-density padding that provides excellent cushioning and prevents indentations, scratches, and wear caused by child car seats, booster seats, or heavy gear
- Secure & Stable – Triple Anti-Slip Design: Designed with a non-slip mesh backing, anti-slip tab that tucks into seat creases, and an adjustable headrest strap, this seat protector stays firmly in place — even during bumpy rides or frequent in-and-outs
- ISOFIX Compatible – Smart Design for All Car Seats: Features convenient cutouts on both sides to ensure seamless installation of ISOFIX or LATCH-equipped child safety seats without interfering with seat anchors or safety features
- Kid-Friendly Storage – 2 Mesh Pockets for Easy Access: Built-in mesh pockets at the bottom offer handy storage for toys, snacks, bottles, or wipes — keeping your back seat organized and your child entertained on long drives
- Fits Most Vehicles – For Leather & Fabric Seats: Universal fit for most car, SUV, or truck seats. Compatible with both leather and fabric interiors, offering full back seat coverage while maintaining your car’s clean, premium look

- Compatible Models:Front car seat covers fit Subaru( Outback Forester Crosstrek Legacy Impreza)
- 2026 New Edition: Featuring thicker foam padding and heavier faux leather seat covers, delivering a smoother surface and enhanced support for the same premium look as pictured
- Easy Installation:Innovative quick-install design allows most users to complete cover installation in approximately 3 minutes. Ensures no shifting during driving or getting in/out of the vehicle
- Durable & Protective Leatherette:Effortlessly handles seat scratches, daily wear and tear, pet claw marks, and liquid spills. Simply wipe away everyday stains to keep it looking as good as new
- Classic Style Design:Ideal for protecting new car seats or restoring old ones. Effectively prevents wear and fading of original upholstery while giving your older vehicle a fresh new look

- ✓ All-Time Protection - Our Back Seat Protector will ensure that your seat remains in perfect condition by protecting leather or upholstery from muddy little feet that bring along with them dirt and mud! Gone will be the days of traveling with a less than perfect car interior.

- 【Protect Seat from Infant Booster Imprint】- Carseat seat protectors is made of 600D fabric and PVC leather.Thickened padding, good resilience. Installed under the baby safety seat to protect back seat against wear and tear, effectively extend the life of the car seat
- 【Waterproof and Easy to Clean】- Meolsaek seat protector carseat made of high-quality Oxford fabric, can use a damp cloth to wipe off dirt caused by food spills or pet saliva. Protect the leather and cloth fabric car sea, save worry and effort
- 【Dense Non-slip Back Dots, Won't Slip】- with Adjustable straps, Car seat protector is very firmly fixed on the car seat, , which can firmly tie the seat cover to the headrest. This car seat cover has anti-dense non-slip points on the back for better grip, whether it is the back seat or front seat of the car, it can fit well
- 【Not Easy to Fade & Not Stain the Seat】- After careful comparison and selection, the back anti slip dots the car seat protectors are made of light-colored bumps, which are safe and heat-resistant, not easy to fade, No need to worry about soiling the light leather seats in summer
- 【Carseat Protectors for Vehicles】- Large car seat protective comfortably covers front and back car seats . The backrest: 23.6 x19 inch, the seat:18.5 x 19 inch, the mesh is 15 x 8.5 inch. The pockets in the bottom for storing your child’s toys, books, and treats. It is a good product for the whole family to travel or people's daily essentials

- Rear Seat Back Protector
- Genuine Subaru Part Number: J501SFN240
- Crosstrek (non wilderness) (non-hybrid) 2024 2025 2026
- Provides additional protection to the rear seatbacks when lowering the seats to transport larger cargo
- Use in conjunction with the Cargo Tray (Sold Seperatly).
SEOCONTENT-START
DATE 04/20/2021 PAGE 1 OF 6 SUBARU OF AMERICA Kit Contents / Contenu de la trousse None / Aucun TOOLS / MATERIALS REQUIRED: / OUTILS/MATÉRIEL REQUIS: / Pet-friendly Padded Seat Protector / Housse de siège matelassée pour animaux de compagnie DESCRIPTION: Pet-friendly Padded Seat Protector / Housse de siège matelassée pour animaux de compagnie KIT CONTENTS: / CONTENU: PART NUMBER: F411SAN030 / NUMÉRO DE PIÈCE: F411SAN030 Installation Instructions – Legacy / Instructions d’installation – Legacy Form #1350082 1a 1b 1c 2 3 4 DATE 04/20/2021 PAGE 2 OF 6 SUBARU OF AMERICA Fold down the rear seatback and then press the button to remove the headrest. If needed, expose LATCH anchors by unfolding cover flaps. Au besoin, exposez les ancrages du système LATCH en dépliant les rabats de la housse. Find center headrest hole in Pet-friendly Padded Seat Protector and hang it over the raised center headrest by passing it through the hole. Press the rear seatback lock release button on both ends of the rear seat. Trouvez le trou pour l’appui-tête central sur la housse de siège matelassée pour animaux de compagnie, puis suspendez la housse en faisant passer l’appui-tête central surélevé par le trou. Completely remove rear left and right headrests. Refer to Owner’s Manual for detailed instructions under “Head restraint height adjustment” section. Leave rear seatback unlocked and slightly leaned forward. Retirez complètement les appuis-tête arrière gauche et droit. Reportez-vous au manuel du propriétaire pour obtenir des instructions détaillées à la section « Réglage de la hauteur des appuis-tête ». Laissez le dossier de siège arrière déverrouillé et légèrement penché vers l’avant. Raise but do not remove rear center headrest by pulling it upward. Relevez l’appui-tête arrière central sans le retirer en le tirant vers le haut. Appuyez sur le bouton de déverrouillage du dossier de siège arrière aux deux extrémités du siège arrière. Rabattez le dossier de siège arrière, puis appuyez sur le bouton pour retirer l’appuie-tête. Form #1350082 5 6 7 8 DATE 04/20/2021 PAGE 3 OF 6 Once the top of the seat cover is aligned, wrap seat cover around the seatbelt and mate the Velcro® strip along the seatbelt opening. Une fois le haut de la housse de siège aligné, enroulez la housse de siège autour de la ceinture de sécurité et attachez la bande Velcro® le long de l’ouverture de la ceinture de sécurité. SUBARU OF AMERICA Wrap the cover around and over the top of both sides of the rear seat. Open Velcro® strip along the right side seatbelt opening and pass the right side of the cover under the center seatbelt. Recouvrez les deux côtés du siège arrière de la housse. Align all headrest holes as shown and then lower center headrest. Push rear seatback and lock in place. Détachez la bande Velcro® le long de l’ouverture de la ceinture de sécurité droite et passez le côté droit de la housse sous la ceinture de sécurité centrale. Alignez tous les trous de l’appui-tête comme illustré, puis abaissez l’appui-tête central. Poussez le dossier de siège arrière et verrouillez-le en place. Form #1350082 9 10 11 12 DATE 04/20/2021 PAGE 4 OF 6 Locate the 4 inserts on the back of the Pet-friendly Padded Seat Protector. [Note: Seat cover is folded to show inserts.] Repérez les 4 languettes à l’arrière de la housse de siège matelassée pour animaux de compagnie. [Remarque : La housse de siège est repliée pour montrer les languettes.] Position the seat cover and tuck bottom center inserts between the seat back and seating surface. SUBARU OF AMERICA Locate Velcro® sections at the bottom of the seat. Repérez les bandes Velcro® au bas du siège. Mettez la housse en place, et insérez les languettes centrales du bas entre le dossier et le siège. Tuck side edge of the seat cover into the plastic trim of the seat. Starting at the front and working your way to the back. (Repeat for the other side) Insérez le bord latéral de la housse dans l’habillage en plastique du siège, en allant de l’avant vers l’arrière. (Répéter de l’autre côté.) Form #1350082 13 14 15 16a DATE 04/20/2021 PAGE 5 OF 6 Locate the fabric tabs on the sides of the Pet-friendly Padded Seat Protector. Gently insert the fabric tab between the seat and the door weatherseal. Slide it back and forth until it settles into the opening and push it in until it disappears. Repeat for the second tab and then repeat for the other side. Note: There is one fabric tab above and below the door-open sensor. While inserting tabs, do not push into sensor. Repérez les languettes en tissu de chaque côté de la housse de siège matelassée pour animaux de compagnie. Insérez délicatement la languette en tissu entre le siège et le caoutchouc d’étanchéité de la porte. Faites-la glisser d’avant en arrière jusqu’à ce qu’elle se place dans l’ouverture, puis poussez-la jusqu’à la faire disparaître. Répétez l’opération pour la deuxième languette, puis répétez l’opération pour l’autre côté. Remarque : Il y a une languette de tissu au-dessus et en dessous du capteur d’ouverture de porte. Lors de l’insertion des languettes, ne les poussez pas dans le capteur. SUBARU OF AMERICA Attach Velcro® sections at the bottom of the seat. Fixez les bandes Velcro® au bas du siège. Ensure seatbelt is accesible, unobstructed and next to the seat cover. Repeat for the other side. Press the rear seatback lock release button on both ends of the rear seat. Assurez-vous que la ceinture de sécurité est accessible, dégagée et à côté de la housse de siège. Répéter de l’autre côté. Appuyez sur le bouton de déverrouillage du dossier de siège arrière aux deux extrémités du siège arrière. Form #1350082 16b 16c 16d DATE 04/20/2021 PAGE 6 OF 6 Push rear seatback and confirm that it is in the locked position. Poussez le dossier de siège arrière et vérifiez qu’il est en position verrouillée. Reinstall rear left and right headrests. Refer to Owner’s Manual for detailed instructions under “Head restraint Fold down the rear seatback and then press the button height adjustment” section. to reinstall the headrest. Réinstallez les appuis-tête arrière gauche et droit. Reportez-vous au manuel du propriétaire pour obtenir des instructions détaillées à la section « Réglage de la hauteur des appuis-tête ». Rabattez le dossier de siège arrière, puis appuyez sur le bouton pour réinstaller l’appuie-tête. SUBARU OF AMERICA CLEANING INSTRUCTIONS 1. Using a large washer without agitator, wash the cover in COLD, using a mild all-purpose cleaner (suitable for fabrics). DO NOT USE BLEACH or HARSH DETERGENTS. 2. Rinse the cover twice (2x) in COLD to remove any residual cleaner. 3. Hang and allow to air dry. INSTRUCTIONS DE NETTOYAGE 1. Dans une grande laveuse sans agitateur, laver la housse À L’EAU FROIDE à l’aide d’un nettoyant tout usage doux (convenant aux tissus). NE PAS UTILISER DE JAVELLISANT OU DE DÉTERGENTS CORROSIFS. 2. Rincer la housse à deux (2) reprises À L’EAU FROIDE pour enlever toute trace de nettoyant. 3. Suspendre et laisser sécher à l’air. SPOT CLEANING INSTRUCTIONS 1 – Mix one ounce of a mild all-purpose cleaner (suitable for fabrics) per quart of warm water. 2 – Spray or sponge onto cover. 3 – Rinse with water (until no suds remain) and allow to air dry. INSTRUCTIONS DE NETTOYAGE DES TACHES 1 – Mélanger une once d’un nettoyant tout usage doux (convenant aux tissus) à une pinte d’eau chaude. 2 – Vaporiser le mélange sur la housse ou l’appliquer à l’éponge. 3 – Rincer à l’eau (jusqu’à ce qu’il n’y ait plus de mousse) et laisser sécher à l’air. Form #1350082
**************************************************************************************************************
SEOCONTENT-END
This product presentation was made with AAWP plugin.