
NHTSA ID Number: 10219471
Manufacturer Communication Number: 12-240-22
Summary
This bulletin announces the repair procedures for the left and right-side horns to address DTC B1610 (Front Sub Sensor RH Failure) detected when the horns are operated shortly after engine start up.
NUMBER: 12-240-22
DATE: 08/02/22
| APPLICABILITY: | 2019-22MY Ascent |
| SUBJECT: | Repair Procedure / DTC B1610 Front Sub Sensor RH Failure |
INTRODUCTION:
This bulletin announces the repair procedures for the left and right-side horns to address DTC B1610 (Front Sub Sensor RH Failure) detected when the horns are operated shortly after engine start up. If the horns are continuously operated four to six seconds after the engine is started, vibrations from the right-side horn can potentially resonate and transmit to the right front sub sensor. This may result in DTC B1610 detected within the airbag control module. If this DTC is detected, the right-side (350 Hertz) horn must be exchanged with the left-side (420 Hertz) horn. This procedure will also require some retrofitting of the bulkhead harness.
PRODUCTION CHANGE INFORMATION:
The horn and harness changes have been incorporated into Ascent production starting VIN N3434496.
PART INFORMATION:
REMINDER: Always order the most up-to-date replacement parts based on the specific VIN being repaired.
| Part Description | Part Number |
| REPAIR PARTS | 81990XC00A |
| Repair Pats Kit Component Breakdown | ||
| Side | Description | Quantity |
| Left | 410mm Harness Jumper (Black) | 1 |
| Butyl Rubber | 1 | |
| Wire Tie Strap | 6 | |
| Protective Tube | 1 | |
| Wire Crimping Joint | 1 Plus 1 Spare | |
| Right | 350mm Harness Jumper (White) | 1 |
| Butyl Rubber | 1 | |
| Wire Tie Strap | 6 | |
| Protective Tube | 1 | |
| Wire Crimping Joint | 1 Plus 1 Spare | |
Required Tools:
- Soldering Iron with solder – Example: Snap-On® Industrial Soldering Kit
- Wire Crimping Tool – Example: Blue-Point® Crimping Tools
- Wire Stripers – Example: Blue-Point® Wire Stripper/Cutter
SERVICE PROCEDURE / INFORMATION:
STEP 1: Record any stored seat position(s) before proceeding. Relearn any seat position memory after work is complete. If the power rear gate (PRG) height has been customized, that position must also be noted and relearned.
STEP 2: Carefully disconnect the ground terminal from the battery sensor.
STEP 3: Remove the front bumper.
STEP 4: Remove the left and right-side horns. Install the left horn onto the right side. Install the right horn onto the left side Do not attempt to attach the connectors at this time. The horn mounting bolt torque is 18 N·m (1.8kgf-m, 13.3ft-lb).
STEP 5: Starting with the left side of the vehicle, plug the left side repair harness (410mm) from kit 81990XC00A into the horn. Using the supplied wire ties, secure the repair harness to the bulkhead harness as shown below. Be sure to have the upper wire tie facing the front of the vehicle and the lower wire tie facing the rear of the vehicle. This will prevent any damage to the harnesses.
STEP 6: Locate the original horn harness connector and cut it off. Dispose of the connector. Measure 50mm from the end of the protection tube and CAREFULLY cut off the measured section using a suitable tool. Strip 15mm of insulation from the original horn harness and repair harness wiring. Use car and avoid damaging the wire.
STEP 7: Using the supplied wire crimping joint from kit 81990XC00A, crimp the two wires together. Use the information provided in Appendix A (page 10) for details on the wire crimping procedure.
STEP 8: Using vinyl tape, wrap the butyl rubber section to add further protection.
STEP 9: Insert the wire joint into the provided protection tube. Position the wire joint in the center of the tube. Secure the protection tube to the harness with vinyl tape as shown below.
STEP 10: Using the two supplied wire ties, secure the protective tube to the bulkhead harness. Be careful not to use the straps over the joined portion.
STEP 11: Using a supplied wire tie, secure the remaining loose section of the repair harness to the bulkhead harness. Be sure the repair harness does not interfere with the horn.
STEP 12: Proceed to the passenger side of the vehicle. Plug the right-side repair harness (350mm) from kit 81990XC00A into the horn. CARFULLY separate the original horn harness from the bulkhead harness by cutting the vinyl tape holding them together. Use care and avoid damaging the wire.
STEP 13: Using a supplied wire tie, secure the white taped portion of the repair harness to the bulkhead harness. This should be positioned slightly below the bulkhead harness/body holding clip. Be sure to position the wire tie facing the right side of vehicle to prevent any damage to the harness.
STEP 14: Locate the original horn harness and cut off the connector. Dispose of the connector. Measure 50mm from the end of the protection tube and cut off the measured section. Strip off 15mm of insulation from the original horn harness and the repair harness wiring.
STEP 15: Using the same procedure outlined in STEP 7-8 and Appendix A (page 10), crimp the two wires together.
STEP 16: Wrap the jointed section with vinyl tape and insert the wire joint into the provided protection tube. Position the wire joint in the center of the tube. Secure the protection tube to the harness with vinyl tape as shown below.
STEP 17: Using the two supplied wire ties, secure the protective tube to the bulkhead harness. Be careful not to use the straps over the joined portion.
STEP 18: Using a supplied wire tie, secure the remaining loose section of the repair harness to the bulkhead harness. Be sure the repair harness does not interfere with the horn.
STEP 19: Reinstall all parts in the reverse order of removal.
IMPORTANT NOTE: Whenever reconnecting the ground cable terminal to the battery sensor, torque to 7.5Nm (5.5ft.-lbs. or 66inch-lbs.) while supporting the sensor with the other hand as outlined in the applicable Service Manual under: STARTING/CHARGING SYSTSEMS > Battery Sensor.
STEP 20: Confirm the horns operate as expected. Confirm there are no DTCs stored.
Appendix A
Wire Crimping & Soldering Procedure:
1. Confirm the wires (Bulkhead Harness side & Original Horn Harness side) are prepared as shown below.
2. Using a suitable crimping tool, crimp two wires using the supplied Wire Crimping Joint that is included in the Repair Parts Kit (81990XC00A).
3. Once the wires are crimped together, the jointed portion will require a solder application. Pre-heat the crimped portion with soldering iron first and then apply solder.
CAUTION: If solder is applied without pre-heating, the solder may not penetrate sufficiently into crimped portion.
4. After the solder has been applied and allowed the appropriate time to cool, wrap Butyl Rubber onto the jointed portion and press softly with fingers to eliminate gaps between the Butyl Rubber and the wires. The section can then be wrapped with vinyl tape over the Butyl Rubber. This will prevent the possibility of dirt and/or dust adhering to the jointed portion.
NOTE: Wrap the Butyl Rubber as shown below in order to cover the exposed wires completely for better isolation.
4 Affected Products
Vehicle
| MAKE | MODEL | YEAR |
| SUBARU | ASCENT | 2019-2022 |
1 Associated Document
Manufacturer Communications
NUMBER: 12-240-22
DATE: 08/02/22
MC-10219471-0001.pdf 6394.541KB
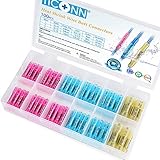
- Solid Crimp: Seamless tinned copper barrel grips each wire without splitting, giving these butt connectors a strong hold that helps reduce the risk of short circuits; The thick copper barrel helps reduce voltage drop, supports high current flow, and minimizes heat buildup for dependable electrical connectors
- Watertight Seal: These heat shrink butt connectors feature dual-wall tubing with a 3:1 shrink ratio and a heat-activated adhesive lining, creating a secure 360-degree seal around each crimp; The dual-wall tubing helps seal out moisture and reduce corrosion, making these heat shrink wire connectors suitable for underground conduit, engine bays, and other demanding environments
- Color-Coded Sizing: Color-coded tubing lets you quickly identify the right butt splice connectors by wire gauge, with red for AWG 22–16, blue for AWG 16–14, yellow for AWG 12–10, black for AWG 14–12, and white for AWG 24–22; Strip, insert, and crimp with a standard tool, then apply heat to create secure wire connectors for a wide range of wiring projects
- Wide Applications: Ideal for marine, automotive, home, trailer, and outdoor wiring projects; These marine butt connectors provide dependable connections for boat consoles, bilge pumps, vehicle wiring, outdoor speakers, and other electrical installations where moisture protection is important
- Available Options: This assortment includes red, blue, and yellow waterproof butt connectors for wire sizes from AWG 22–10; Choose the appropriate color-coded connector to match your wire gauge for marine wire connectors, vehicle harnesses, home electrical wiring, and other electrical applications

- Tinned Copper Core: Butt connectors use a heavy-duty copper core, strong crimp, higher conductivity
- Package Includes: 100Pcs Blue heat shrink butt connectors that can be used on wire AWG from 16 to 14
- Solderless Crimping: Insert the wires to be connected, crimp both sides with crimping pliers, and then heat with a heat gun
- 3:1 Shrink Ratio: Marine grade heat shrink tubing provides high tensile strength and enough hot melt adhesive inside the tubing to ensure waterproof performance, your wires will never slip out of the wire connectors
- Wide Application: Wire connectors are waterproof, stable, and corrosion resistant and are used in the automotive, marine, electrical, and electronic industries

- Package Included: 50 pcs red waterproof wiring connectors for 22, 20, 18, 16 gauge wires, 40 pcs blue waterproof wiring connectors for 16, 14 gauge wires, 10 pcs yellow waterproof wiring connectors for 12, 10 gauge wires—total 100 pcs
- Premium Copper Core: The butt splice terminals use seamless and high-quality thick copper tubular, which makes the connection project safer! Fix the wire firmly, increase current flow, and decrease voltage drop
- Wide Usage: Our heat shrink wire connector is ideal for marine, automobile, industry, electrical and electronics. Whether working on boat, vehicle, RC car, home, scientific project, car stereo, or electrical DIY, the crimp connectors will work well
- 3:1 Heatshrink Ratio: The heat shrink butt connector has dual-wall shrinking tube and inside hot melt glue, providing a fully safe seal and wire corrosion. Its dual wall insulation seals against moisture corrosion, air leakage, and can be used underground
- AIRIC Brand Advantages: As a professional manufacturer of electrical accessories, we own a large leading wire connectors factory and get UL, CE, ROHS, SGS, and ISO9001-2005 international quality system certification

- Package included: Total 200 pcs, 90 pcs red connectors for 22-16 AWG, 80 pcs blue connectors for 16-14 AWG, 30 pcs yellow butt connectors for 12-10 AWG
- Flared Insulation: Flared barrel design of insulated butt crimp connectors is easy to insert
- Wire-stop Structure: Wire-stop structure of butt splice terminals is conducive to inserting wires into the right place to ensure the effect of compression
- Practical Crimp Connectors: With the electronic wiring splice connectors, one or more different conductors can be crimped in a short space, which is ideal for automotive, home, scientific, car stereo, or occasional project
- High-quality Material: Wire butt connectors are made of high-end brass conductor ( tin-plated finish ), PVC insulation

- COMPLIANT WITH ALL RELEVANT STANDARDS:With Haisstronica 330PCS( A.W.G.:22-16 150 PCS,16-14 100 PCS,12-10 32 PCS,26-24 48 PCS) heat shrink waterproof wire connectors are compliant with ROHS, ISO 9001:2008, SGS, and CE standards
- HIGH-QUALITY COPPER CORE:Heat shrink butt connectors use a copper core with a higher thickness rating.This makes your connection project safer and better meets our customers’ quality needs
- HIGH-QUALITY HEAT SHRINK:Translucent heat shrink tubing provides high tensile strength and resistance to stretch and minimize mechanical damage.The thick barrel ensures a strong crimp every time.The inner wall of the heat-shrinkable tube has enough hot melt adhesive to ensure waterproof performance reliability.Your wire will never slip out of these heat shrink wire connectors
- RECOGNIZABLE:Tubings of varying colors with easily recognizable wire gauge markings. Simply measure the wiring, and by checking the mark of wire gauge of the polyolefin tubing, then you can quickly choose the right connector
- WIDE APPLICATIONS: High quality 3:1 shrinkage tubing has a heat-activated sealant lining to provide complete secure seal. It's flame-retardant, waterproof, and can be used underground. Compliant with all electrical standards, Perfect for marine and automobile applications, whether you are working on your boat, Vehicle, Home or scientific project
SEOCONTENT-START
Bulletin Number: 12-240-22; Date: 08/02/22 Page 1 of 10 SERVICE BULLETIN Continued… CAUTION: VEHICLE SERVICING PERFORMED BY UNTRAINED PERSONS COULD RESULT IN SERIOUS INJURY TO THOSE PERSONS OR TO OTHERS. Subaru Service Bulletins are intended for use by professional technicians ONLY. They are written to inform those technicians of conditions that may occur in some vehicles, or to provide information that could assist in the proper servicing of the vehicle. Properly trained technicians have the equipment, tools, safety instructions, and know-how to do the job correctly and safely. If a condition is described, DO NOT assume that this Service Bulletin applies to your vehicle, or that your vehicle will have that condition. Subaru of America, Inc. is ISO 14001 Compliant ISO 14001 is the international standard for excellence in Environmental Management Systems. Please recycle or dispose of automotive products in a manner that is friendly to our environment and in accordance with all local, state and federal laws and regulations. NUMBER: 12-240-22 DATE: 08/02/22 APPLICABILITY: 2019-22MY Ascent SUBJECT: Repair Procedure / DTC B1610 Front Sub Sensor RH Failure INTRODUCTION: This bulletin announces the repair procedures for the left and right-side horns to address DTC B1610 (Front Sub Sensor RH Failure) detected when the horns are operated shortly after engine start up. If the horns are continuously operated four to six seconds after the engine is started, vibrations from the right-side horn can potentially resonate and transmit to the right front sub sensor. This may result in DTC B1610 detected within the airbag control module. If this DTC is detected, the right-side (350 Hertz) horn must be exchanged with the left-side (420 Hertz) horn. This procedure will also require some retrofitting of the bulkhead harness. PRODUCTION CHANGE INFORMATION: The horn and harness changes have been incorporated into Ascent production starting VIN N3434496. PART INFORMATION: REMINDER: Always order the most up-to-date replacement parts based on the specific VIN being repaired. Part Description Part Number REPAIR PARTS 81990XC00A ATTENTION: GENERAL MANAGER q PARTS MANAGER q CLAIMS PERSONNEL q SERVICE MANAGER q IMPORTANT – All Service Personnel Should Read and Initial in the boxes provided, right. ©2022 Subaru of America, Inc. All rights reserved. Bulletin Number: 12-240-22; Date: 08/02/22 Page 2 of 10 Continued… Repair Pats Kit Component Breakdown Side Description Quantity Left 410mm Harness Jumper (Black) 1 Butyl Rubber 1 Wire Tie Strap 6 Protective Tube 1 Wire Crimping Joint 1 Plus 1 Spare Right 350mm Harness Jumper (White) 1 Butyl Rubber 1 Wire Tie Strap 6 Protective Tube 1 Wire Crimping Joint 1 Plus 1 Spare Bulletin Number: 12-240-22; Date: 08/02/22 Page 3 of 10 Continued… Required Tools: • Soldering Iron with solder – Example: Snap-On® Industrial Soldering Kit • Wire Crimping Tool – Example: Blue-Point® Crimping Tools • Wire Stripers – Example: Blue-Point® Wire Stripper/Cutter SERVICE PROCEDURE / INFORMATION: STEP 1: Record any stored seat position(s) before proceeding. Relearn any seat position memory after work is complete. If the power rear gate (PRG) height has been customized, that position must also be noted and relearned. STEP 2: Carefully disconnect the ground terminal from the battery sensor. STEP 3: Remove the front bumper. STEP 4: Remove the left and right-side horns. Install the left horn onto the right side. Install the right horn onto the left side Do not attempt to attach the connectors at this time. The horn mounting bolt torque is 18 N·m (1.8kgf-m, 13.3ft-lb). STEP 5: Starting with the left side of the vehicle, plug the left side repair harness (410mm) from kit 81990XC00A into the horn. Using the supplied wire ties, secure the repair harness to the bulkhead harness as shown below. Be sure to have the upper wire tie facing the front of the vehicle and the lower wire tie facing the rear of the vehicle. This will prevent any damage to the harnesses. Bulletin Number: 12-240-22; Date: 08/02/22 Page 4 of 10 Continued… STEP 6: Locate the original horn harness connector and cut it off. Dispose of the connector. Measure 50mm from the end of the protection tube and CAREFULLY cut off the measured section using a suitable tool. Strip 15mm of insulation from the original horn harness and repair harness wiring. Use car and avoid damaging the wire. STEP 7: Using the supplied wire crimping joint from kit 81990XC00A, crimp the two wires together. Use the information provided in Appendix A (page 10) for details on the wire crimping procedure. STEP 8: Using vinyl tape, wrap the butyl rubber section to add further protection. Bulletin Number: 12-240-22; Date: 08/02/22 Page 5 of 10 Continued… STEP 9: Insert the wire joint into the provided protection tube. Position the wire joint in the center of the tube. Secure the protection tube to the harness with vinyl tape as shown below. STEP 10: Using the two supplied wire ties, secure the protective tube to the bulkhead harness. Be careful not to use the straps over the joined portion. STEP 11: Using a supplied wire tie, secure the remaining loose section of the repair harness to the bulkhead harness. Be sure the repair harness does not interfere with the horn. Bulletin Number: 12-240-22; Date: 08/02/22 Page 6 of 10 Continued… STEP 12: Proceed to the passenger side of the vehicle. Plug the right-side repair harness (350mm) from kit 81990XC00A into the horn. CARFULLY separate the original horn harness from the bulkhead harness by cutting the vinyl tape holding them together. Use care and avoid damaging the wire. STEP 13: Using a supplied wire tie, secure the white taped portion of the repair harness to the bulkhead harness. This should be positioned slightly below the bulkhead harness/ body holding clip. Be sure to position the wire tie facing the right side of vehicle to prevent any damage to the harness. STEP 14: Locate the original horn harness and cut off the connector. Dispose of the connector. Measure 50mm from the end of the protection tube and cut off the measured section. Strip off 15mm of insulation from the original horn harness and the repair harness wiring. Bulletin Number: 12-240-22; Date: 08/02/22 Page 7 of 10 Continued… STEP 15: Using the same procedure outlined in STEP 7-8 and Appendix A (page 10), crimp the two wires together. STEP 16: Wrap the jointed section with vinyl tape and insert the wire joint into the provided protection tube. Position the wire joint in the center of the tube. Secure the protection tube to the harness with vinyl tape as shown below. STEP 17: Using the two supplied wire ties, secure the protective tube to the bulkhead harness. Be careful not to use the straps over the joined portion. STEP 18: Using a supplied wire tie, secure the remaining loose section of the repair harness to the bulkhead harness. Be sure the repair harness does not interfere with the horn. Bulletin Number: 12-240-22; Date: 08/02/22 Page 8 of 10 Continued… STEP 19: Reinstall all parts in the reverse order of removal. IMPORTANT NOTE: Whenever reconnecting the ground cable terminal to the battery sensor, torque to 7.5Nm (5.5ft.-lbs. or 66inch-lbs.) while supporting the sensor with the other hand as outlined in the applicable Service Manual under: STARTING/CHARGING SYSTSEMS > Battery Sensor. STEP 20: Confirm the horns operate as expected. Confirm there are no DTCs stored. WARRANTY / CLAIM INFORMATION: For vehicles within the Basic New Car Limited Warranty period, this repair may be submitted using the following claim information: Labor Description Labor Operation # Labor Time Fail Code HORN SWAP & HARNESS RETROFIT A860-108 0.8 UYI Up to $1.00 can be claimed in sublet for the solder used during this repair. IMPORTANT REMINDERS: • SOA strongly discourages the printing and/or local storage of service information as previously released information and electronic publications may be updated at any time. • Always check for any open recalls or campaigns anytime a vehicle is in for servicing. • Always refer to STIS for the latest service information before performing any repairs. Bulletin Number: 12-240-22; Date: 08/02/22 Page 9 of 10 Continued… Appendix A Wire Crimping & Soldering Procedure: 1. Confirm the wires (Bulkhead Harness side & Original Horn Harness side) are prepared as shown below. 2. Using a suitable crimping tool, crimp two wires using the supplied Wire Crimping Joint that is included in the Repair Parts Kit (81990XC00A). 3. Once the wires are crimped together, the jointed portion will require a solder application. Pre-heat the crimped portion with soldering iron first and then apply solder. CAUTION: If solder is applied without pre-heating, the solder may not penetrate sufficiently into crimped portion. Bulletin Number: 12-240-22; Date: 08/02/22 Page 10 of 10 4. After the solder has been applied and allowed the appropriate time to cool, wrap Butyl Rubber onto the jointed portion and press softly with fingers to eliminate gaps between the Butyl Rubber and the wires. The section can then be wrapped with vinyl tape over the Butyl Rubber. This will prevent the possibility of dirt and/or dust adhering to the jointed portion. NOTE: Wrap the Butyl Rubber as shown below in order to cover the exposed wires completely for better isolation.
SEOCONTENT-END
This product presentation was made with AAWP plugin.