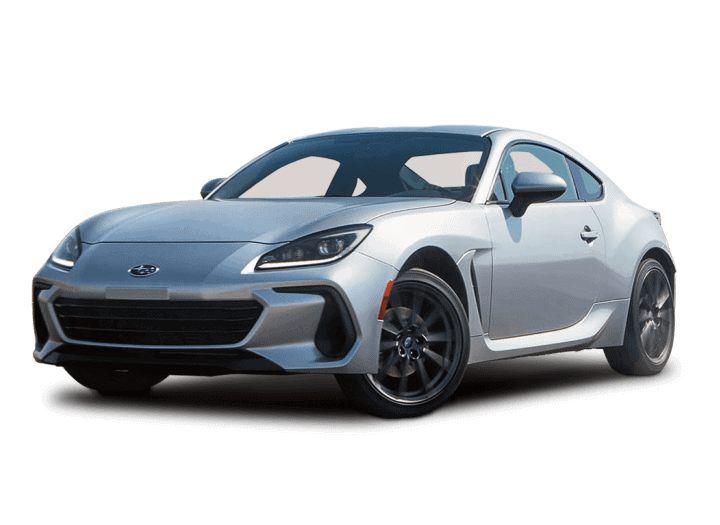
Accessory Installation Guides
| 2022 MY BRZ Rear Under Diffuser | E5610CC150 |
Installation Instructions
REAR UNDER DIFFUSER
Installation Manual
This manual describes how to install the rear under diffuser.
Request
Before installing this product, please ensure to read this manual and carry out proper installation.
Precautions
1. When installing this product on a car, park the car on a flat surface and securely apply the parking brake before carrying out the work.
2. Before starting the installation work, use a neutral detergent (or cleaning detergent) and waste cloth to remove dirt adhering to the car’s surfaces to which the rear under diffuser are to be attached, and completely dry the surfaces. Moreover, if sand or mud adheres to the back of the clip insertion holes, etc., then clean the contaminated sections.
3. Install the rear under diffuser before applying a car body coating treatment. When installing them on a coated car, remove the coating in the areas where the double-sided tape is to be applied before carrying out the installation work.
4. During the installation work, pay careful attention not to damage the car with tools, etc.
5. The purpose of this document is to illustrate explanations common to installation work on the left and right sides. Check the shape of the components to be installed before carrying out the work.
6. When the air temperature is 15℃ or lower, use a dryer to warm up this product and the surfaces of the car where the double-sided tape is to be applied to 30℃ to 50℃ or thereabouts. Avoid using an industrial dryer.
7. The double-sided tape attached to this product does not adhere to the surfaces unless it is adequately pressed. Moreover, reattaching the product significantly reduces the adhesive strength of the tape; therefore, properly position the product before attaching it to the car.
8. The adhesive strength of the double-sided tape gradually increases after it is applied to the car. Avoid washing the car within 24 hours after attachment . When washing and waxing the car are necessary on the day of the attachment, leave the car as is for at least one hour and subsequently cover the rear under diffuser with tape, etc. to prevent water from penetrating into areas where the double-sided tape is applied. Further, be careful not to apply an excessive force to the guards.
9. When blowing air on this product after it is attached to the car, maintain a distance of at least 300 mm between the exhaust port of the blower and the product. Insufficient distance may cause this product to peel.
10. When a car has undergone a body coating treatment including glass coating, this product cannot exhibit its original adhesive performance. Please confirm whether or not a body coating treatment is applied to the car. Moreover, ensure to remove dirt, oil, grease, etc. adhering to the surface on which the product is to be attached, and also ensure to adequately pressure bond it to the car.
<<How to remove a body coating film and confirm the removal>>
– Use a fine-grained compound agent (so as not to affect the car’s paint) to rub the coating film off the area on which the product is to be attached.
– After polishing the area, spray water on it. You can confirm that the coating film has been removed when there is no repelling of water on the area.
Installation procedure
1. Make a hole in the Rear Bumper.
(1) Remove the vehicle clip from the Rear Bumper. ( 5 places )
※ Do not reuse vehicle clip.
(2) Attach 3 Inner parts to the Rear Bumper with ⑪Clip(Large) and ⑫Washer. ( 5 places )
(3) Move the 5 holes of the parts to the Rear Bumper with a needle.
(4) Remove the clip from the Rear Bumper and remove the 3 Inner parts.
(5) Drill a 3 mm hole in the center of the mark position. ( 5 places )
※ The position of Ⓐ penetrates to the Rear Bumper. ( 2 places )
(6) Remove the Rear fog cover from the Rear Bumper.
(7) Make 8mm holes in the Rear fog cover ( 3 places ) and the Rear Bumper ( 2 places ).
※ Wrap masking tape 10 mm from the tip of the drill.
(8) Using a Hole saw, make a 20mm hole in the 3mm hole made in step (5). ( 2 places )
2. Install the ④Inner center.
(1) Clean, degreas, and dry the shaded area of the Rear fog cover with a degreasing agent.
(2) Peel the double-sided tape liners of the ④Inner center, and fix with masking tape. ( 7 places )
(3) Insert ⑨U-nut into 3 places in the left figure.
(4) Turn the ④Inner center over and fix it with masking tape so that the U-nut does not fall. ( 3 places )
(5) Cover the Rear fog cover with the ④Inner center and align the three holes.
※ Pressing until the mounting reference of the Rear fog cover.
(6) Temporarily fix the ④Inner center with ⑩Bolt. ( 3 places )
※ Remove the masking tape that secures the U-nut.
(7) Check the position of the hole and crimp the shaded area in the left figure.
Crimp the whole while pulling out the liners. ( 2 places )
※ To care not deviated hole position.
(8) Pull out all the liners and crimp it. ( 5 places )
(9) Fully tighten the ⑩Bolt. ( 3 places )
Reference tightening torque 2.0N・m ( 0.2kgf・m )
3. Install the ⑥Inner side LH.
( Same for ⑤Inner side RH )
(1) Insert the ⑨U-nut at the position shown on the left.
(2) Turn the ⑥Inner side LH over and fix it with masking tape so that the U-nut does not fall.
(3) Part of the double-sided tape liners on the ⑥Inner side LH is peeled off and fixed with masking tape.
※ For short double-sided tape (2 places), peel off all the liners from the double-sided tape.
(4) Clean, degreas, and dry the shaded area of the Rear Bumper with a degreasing agent.
(5) Cover the Rear Bumper with the ⑥Inner side LH, align the holes, and crimp.
※ Press it against the mounting reference of the Rear Bumper.
(6) Temporarily fix the ⑥Inner side LH with ⑩Bolt.
※ Since the work space is small, pull down the Rear Bumper to work.
※ Remove the masking tape that secures the U-nut.
(7) Pull out the liners of the double-sided tape and crimp it to the Rear Bumper.
(8) Fully tighten the ⑩Bolt.
Reference tightening torque 2.0N・m ( 0.2kgf・m )
(9) Attach the ⑫Washer to the ⑪Clip(Large) and secure it to the Rear Bumper.
※ Install the ⑤Inner side RH in the same way.
4. Install the ①Outer center.
(1) Clean, degreas, and dry the inside of the shaded area of the ①Outer center with a degreasing agent.
(2) Return the Rear fog cover to the Rear Bumper.
(3) Attach the ⑫Washer to the ⑪Clip(Large) and secure it to the Rear Bumper. ( 3 places )
(4) Install the ①Outer center while sliding it slowly, and check the installation condition in advance.
(5) Remove the ①Outer center, peel off all of the double-sided tape liners of the ④Inner center. ( 5 places )
(6) Install the ①Outer center while sliding it slowly, and insert the ⑬Clip(Small) and fix it. ( 6 places )
※ Be careful not to get the double-sided tape on the way.
(7) Crimping the double-sided tape sticking position. ( 5 places )
5. Assembly of ③Outer LH and ⑧Inner LH.
(The same applies to the RH side)
(1) Clean, degreas, and dry the inside of the shaded area of the ③Outer LH with a degreasing agent.
(2) Part of the double-sided tape liners on the ⑧Inner LH is peeled off and fixed with masking tape.
(3) Cover ⑧Inner LH with ③Outer LH.
(4) Insert the ⑬Clip(Small) to secure it.
(5) Press ③Outer LH against ⑧InnerRH, pull out the liner and crimp.
※ Assembly of ②Outer RH and ⑦Inner RH in the same way .
6. Install the LH parts.
( Same for RH parts )
(1) Clean, degreas, and dry the shaded area of the Rear Bumper with a degreasing agent.
(2) Remove the vehicle clips from the Rear Bumper.
※ Do not reuse vehicle clip.
(3) Part of the double-sided tape liners on the LH parts is peeled off and fixed with masking tape. ( 3 places )
(4) Place the LH parts against the mounting reference and align the holes with the Rear Bumper.
(5) Pull out the liners of the double-sided tape and crimp it.
※ Make sure that the hole position does not shift.
(6) Attach the ⑫Washer to the ⑪Clip(Large) and secure it to the Rear Bumper.
(7) Pull out the liners of the double-sided tape and crimp it to the Rear Bumper. (2places)
※ Install the RH parts in the same way.
This is the end of the work.
Inspection guidelines
Check the fitting of the clips and the pressure bonded state of the double-sided tape, and ensure no rattling.
Make sure there are no scratches or stains.
There shall be no significant gaps or separation.
Revised contents
| △ | Details of the work | Date |
| 00 | Newly created document | 2021.03.18 |
REAR UNDER DIFFUSER
Genuine Part Number : E5610CC150
Applicable Model : BRZ MY 2022 ~
Precautions for maintenance work when genuine parts are installed
1. Replacement work for back lamp bulbs and rear fog lamp bulbs.
The work to remove the rear fog cover is different.
Follow the procedure below to remove it.
(1) Remove the small clip (2 places) and the large clip (3 places).
(2) Pull out the Rear fog cover to the rear of the vehicle and remove it from the Rear Bumper.
※ Rear under diffuser center also will come off together.
2. Muffler attachment / detachment work.
This will affect the muffler removal / installation work.
After removing the muffler cutter, attach / detach the muffler.

- Superior Adaptability: Compatible with 2015-2021 Subaru WRX STI; Compatible with 2015-2021 Subaru WRX. Please check the model and year of your vehicle to buy appropriate products
- Great Construction: Made from premium PE Plastic, our rear diffuser is durable enough to withstand daily wear and tear. Unfinished surfaces allow for do-it-yourself DIY, enabling you to paint or modify them to suit your personal style preferences
- Enhanced Functionality: This diffuser effectively improves airflow management underneath the vehicle. By optimizing airflow, it reduces rear-end turbulence, resulting in improved stability and handling. This subtle but important enhancement can make your driving experience more enjoyable and efficient
- Improved Style: This diffuser increases a sleek black finish to the rear of your vehicle that not only protects it, but also enhances its visual appeal. The modern design complements the lines of your vehicle, giving it an aggressive and sporty look
- Easy Installation: You will receive 2 x Rear Bumper Aprons Spats, 1 x Center Diffuser Fin. Instructions are not included, but there are mounting points on the surface to make your installation process smoother, Drilling is required
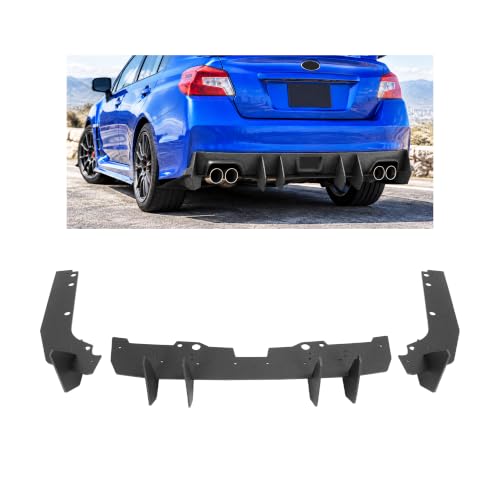
- Fitment: This Rear Bumper Diffuser is compatible with 2015-2021 Subaru WRX STI; Compatible with 2015-2021 Subaru WRX. Please confirm your car model before purchasing
- Material: Constructed from premium PE Plastic. This material offers excellent impact resistance and durability against road debris. The material withstands road debris and environmental exposure while maintaining structural integrity
- Function: Engineered to optimize underbody airflow, reducing turbulence and improving high-speed stability. This contributes to better driving dynamics and a more planted feel on the road
- Appearance: The black painted rear bumper diffuser not only protects the rear of the vehicle, but also enhances the visual aesthetic. It adds a layer of texture and depth to the bumper area, giving the car a custom high-performance look
- Easy Installation: Includes 2 x Rear Bumper Aprons Spats, 1 x Center Diffuser Fin. Instructions are not included. Directly install with screws, Installation : Not Included - Drilling is required

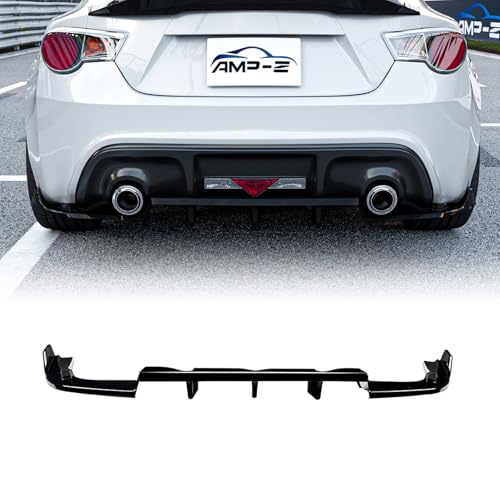
- Will Not Fit TRD Models
- 1SET Rear Bumper Diffuser Lip
- High Quality ABS Plastic
- Easy install and durable use.
- It'll give you excellent look , Decorate your car charming luxury vivid.
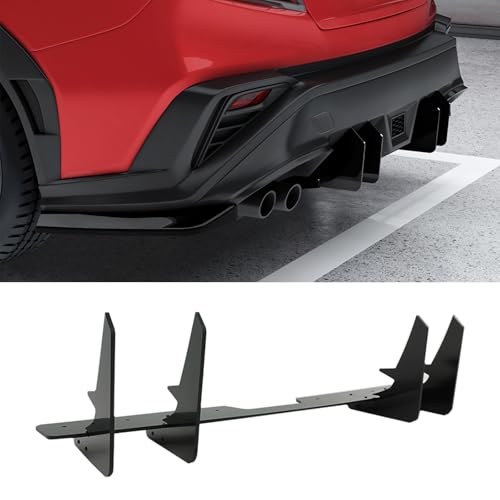
- Noted - There is a protective film on the surface of the product to prevent scratches during transportation.Please remove the protective film on the surface of the product after receiving it, and then proceed with installation and use!!!!
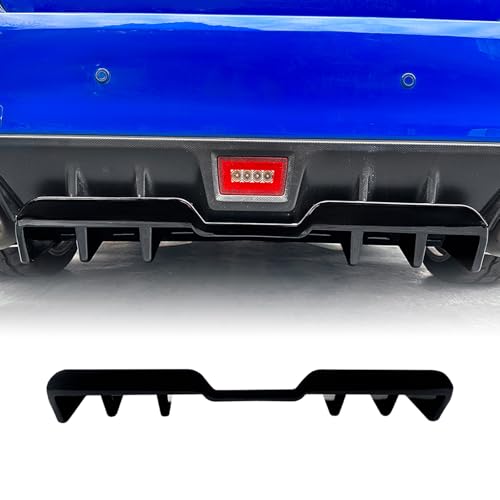
- Fitment: For Subaru Wrx 2022-2024
- Package Includes:1Set of Painted Glossy Black Rear Bumper Diffuser For Subaru Wrx 2022 2023 2024
- Installation : The surface of the product is covered with double-sided film during transportation. When installing the product, the double-sided film needs to be torn open for installation
- Great material: Made of High density plastic, lightweight, and with good impact resistance, Can adapt to various harsh environments and has a long service life. Gives your car an more aggressive rear end instantly and dramatically improves the sporty appearance for your car
SEOCONTENT-START
This manual describes how to install the rear under diffuser. ! Precautions 1. When installing this product on a car, park the car on a flat surface and securely apply the parking brake before carrying out the work. 2. Before starting the installation work, use a neutral detergent (or cleaning detergent) and waste cloth to remove dirt adhering to the car’s surfaces to which the rear under diffuser are to be attached, and completely dry the surfaces. Moreover, if sand or mud adheres to the back of the clip insertion holes, etc., then clean the contaminated sections. 3. Install the rear under diffuser before applying a car body coating treatment. When installing them on a coated car, remove the coating in the areas where the double-sided tape is to be applied before carrying out the installation work. 4. During the installation work, pay careful attention not to damage the car with tools, etc. 5. The purpose of this document is to illustrate explanations common to installation work on the left and right sides. Check the shape of the components to be installed before carrying out the work. 6. When the air temperature is 15℃ or lower, use a dryer to warm up this product and the surfaces of the car where the double-sided tape is to be applied to 30℃ to 50℃ or thereabouts. Avoid using an industrial dryer. 7. The double-sided tape attached to this product does not adhere to the surfaces unless it is adequately pressed. Moreover, reattaching the product significantly reduces the adhesive strength of the tape; therefore, properly position the product before attaching it to the car. 8. The adhesive strength of the double-sided tape gradually increases after it is applied to the car. Avoid washing the car within 24 hours after attachment . When washing and waxing the car are necessary on the day of the attachment, leave the car as is for at least one hour and subsequently cover the rear under diffuser with tape, etc. to prevent water from penetrating into areas where the double-sided tape is applied. Further, be careful not to apply an excessive force to the guards. 9. When blowing air on this product after it is attached to the car, maintain a distance of at least 300 mm between the exhaust port of the blower and the product. Insufficient distance may cause this product to peel. 10. When a car has undergone a body coating treatment including glass coating, this product cannot exhibit its original adhesive performance. Please confirm whether or not a body coating treatment is applied to the car. Moreover, ensure to remove dirt, oil, grease, etc. adhering to the surface on which the product is to be attached, and also ensure to adequately pressure bond it to the car. <<How to remove a body coating film and confirm the removal>> – Use a fine-grained compound agent (so as not to affect the car’s paint) to rub the coating film off the area on which the product is to be attached. – After polishing the area, spray water on it. You can confirm that the coating film has been removed when there is no repelling of water on the area. Request Before installing this product, please ensure to read this manual and carry out proper installation. REAR UNDER DIFFUSER Installation Manual -1- Δ00 Distributor Co., Ltd. SUBARU -2- Genuine Part Number : E5610CC150 Applicable Model : BRZ MY 2022~ Rear Under Diffuser ① ② 1 ③ 5 7 7 ④ ⑤ 5 ⑦ ⑥ 8 1 1 1 1 1 1 1 ⑧ ⑫ ⑪ ⑩ ⑨ ⑬ ⑨ ⑩ ⑫ ⑬ ④ ⑥ ⑤ ⑧ ⑦ ⑪ ② ① ③ Outer center Outer RH Outer LH Inner center Inner side RH Inner side LH Inner RH Inner LH Bolt Clip(Large) Clip(Small) Washer Components Tools Installation Completion Illustration ① Outer center ② Outer RH ③ Outer LH No. Part Name Qty U-nut ● Masking tape ● Drill 3mm 8mm ● Hole saw 20mm ● Clean cloth ● Dryer ● Needle ● Short driver ● Degreasing agent (recommended nonane) ⑭ ⑭ Manual 1 -3- 10mm Ⓐ Ⓐ ※ Do not reuse vehicle clip. Vehicle clip ×5 ⑥ Inner side LH ④ Inner center ⑤ Inner side RH 1. Make a hole in the Rear Bumper. ⑫ Washer 【 Bottom view 】(1) Remove the vehicle clip from the Rear Bumper. ( 5 places ) (2) Attach 3 Inner parts to the Rear Bumper with ⑪Clip(Large) and ⑫Washer. ( 5 places ) ⑪ Clip(Large) (3) Move the 5 holes of the parts to the Rear Bumper with a needle. Holes ×5 3mm Drill ×5 (4) Remove the clip from the Rear Bumper and remove the 3 Inner parts. (5) Drill a 3 mm hole in the center of the mark position. ( 5 places ) ※ The position of Ⓐ penetrates to the Rear Bumper. ( 2 places ) (6) Remove the Rear fog cover from the Rear Bumper. 8mm Drill ×3 8mm Drill ×2 Rear fog cover Rear Bumper 20mm Hole saw ×2 Rear Bumper Masking tape (7) Make 8mm holes in the Rear fog cover ( 3 places ) and the Rear Bumper ( 2 places ). ※ Wrap masking tape 10 mm from the tip of the drill. (8) Using a Hole saw, make a 20mm hole in the 3mm hole made in step (5). ( 2 places ) Installation procedure (1) Clean, degreas, and dry the shaded area of the Rear fog cover with a degreasing agent. ※ Remove the masking tape that secures the U-nut. -4- Rear fog cover ④ Inner center Masking tape ④ Inner center Rear fog cover ④ Inner center Rear fog cover Rear fog cover ④ Inner center ④ Inner center ⑨ U-nut ⑨ U-nut ⑩ Bolt ⑩ Bolt 【 Back side view 】 【 Surface view 】 2. Install the ④Inner center. Crimping Crimping Crimping Push Push Mounting reference Pull out Pull out Pull out all (5 places) (2) Peel the double-sided tape liners of the ④Inner center,and fix with masking tape. ( 7 places ) (3) Insert ⑨U-nut into 3 places in the left figure. (4) Turn the ④Inner center over and fix it with masking tape so that the U-nut does not fall. ( 3 places ) (5) Cover the Rear fog cover with the ④Inner center and align the three holes. ※ Pressing until the mounting reference of the Rear fog cover. Align the holes (6) Temporarily fix the ④Inner center with ⑩Bolt. ( 3 places ) (7) Check the position of the hole and crimp the shaded area in the left figure. Crimp the whole while pulling out the liners. ( 2 places ) ※ To care not deviated hole position. (8) Pull out all the liners and crimp it. ( 5 places ) (9) Fully tighten the ⑩Bolt. ( 3 places ) Reference tightening torque 2.0N・m ( 0.2kgf・m ) (1) Insert the ⑨U-nut at the position shown on the left. (4) Clean, degreas, and dry the shaded area of the Rear Bumper with a degreasing agent. (5) Cover the Rear Bumper with the ⑥Inner side LH, align the holes, and crimp. ※ Press it against the mounting reference of the Rear Bumper. (6) Temporarily fix the ⑥Inner side LH with ⑩Bolt. ※ Since the work space is small, pull down the Rear Bumper to work. (7) Pull out the liners of the double-sided tape and crimp it to the Rear Bumper. ※ Remove the masking tape that secures the U-nut. -5- ⑨ U-nut 【 Back side view 】 【 Bottom view 】 ※ Install the ⑤Inner side RH in the same way. 3. Install the ⑥Inner side LH. ⑫ Washer ⑪ Clip(Large) Peel off all Crimping Crimping Crimping Rear Bumper Push Push Masking tape ⑥ Inner side LH ⑥ Inner side LH ⑥ Inner side LH ⑩ Bolt Pull out Mounting reference (3) Part of the double-sided tape liners on the ⑥Inner side LH is peeled off and fixed with masking tape. ※ For short double-sided tape (2 places), peel off all the liners from the double-sided tape. (8) Fully tighten the ⑩Bolt. (9) Attach the ⑫Washer to the ⑪Clip(Large) and secure it to the Rear Bumper. Muffler Align the holes Reference tightening torque 2.0N・m ( 0.2kgf・m ) ( Same for ⑤Inner side RH ) (2) Turn the ⑥Inner side LH over and fix it with masking tape so that the U-nut does not fall. (1) Clean, degreas, and dry the inside of the shaded area of the ①Outer center with a degreasing agent. 【 Bottom view 】 -6- 【 Bottom view 】 ⑫ Washer ⑪ Clip(Large) ⑬ Clip(Small) ⑬ Clip(Small) ① Outer center ① Outer center ① Outer center ① Outer center ④ Inner center ④ Inner center ④ Inner center Rear Bumper Rear Bumper 4. Install the ①Outer center. Inside the shaded area Peel off all (5 places) Crimping Rear Bumper Rear Bumper Rear fog cover Glide parts slowly (2) Return the Rear fog cover to the Rear Bumper. (3) Attach the ⑫Washer to the ⑪Clip(Large) and secure it to the Rear Bumper. ( 3 places ) (4) Install the ①Outer center while sliding it slowly, and check the installation condition in advance. (5) Remove the ①Outer center, peel off all of the double-sided tape liners of the ④Inner center. ( 5 places ) (6) Install the ①Outer center while sliding it slowly, and insert the ⑬Clip(Small) and fix it. ( 6 places ) ※ Be careful not to get the double-sided tape on the way. (7) Crimping the double-sided tape sticking position. ( 5 places ) (1) Clean, degreas, and dry the shaded area of the Rear Bumper with a degreasing agent. -7- 5. Assembly of ③Outer LH and ⑧Inner LH. (The same applies to the RH side) (1) Clean, degreas, and dry the inside of the shaded area of the ③Outer LH with a degreasing agent. ③ Outer LH Inside the shaded area (2) Part of the double-sided tape liners on the ⑧Inner LH is peeled off and fixed with masking tape. (3) Cover ⑧Inner LH with ③Outer LH. (4) Insert the ⑬Clip(Small) to secure it. (5) Press ③Outer LH against ⑧InnerRH, pull out the liner and crimp. ※ Assembly of ②Outer RH and ⑦Inner RH in the same way . ⑧ Inner LH ③ Outer LH ⑧ Inner LH Push Push Push Pull out ③ Outer LH ⑧ Inner LH ⑬ Clip(Small) Crimping Muffler Vehicle clip 【 Bottom view 】 6. Install the LH parts. ( Same for RH parts ) ※ Do not reuse vehicle clip. (2) Remove the vehicle clips from the Rear Bumper. (7) Pull out the liners of the double-sided tape and crimp it to the Rear Bumper. (2places) (5) Pull out the liners of the double-sided tape and crimp it. ※ Make sure that the hole position does not shift. -8- LH parts LH parts Push Pull out Pull out Pull out Push Mounting reference Rear Bumper ⑫ Washer ⑪ Clip(Large) Crimping Align the hole position △ Newly created document Revised contents Details of the work Date 00 2021.03.18 Check the fitting of the clips and the pressure bonded state of the double-sided tape,and ensure no rattling. There shall be no significant gaps or separation. This is the end of the work. ! Inspection guidelines Make sure there are no scratches or stains. ※ Install the RH parts in the same way. (3) Part of the double-sided tape liners on the LH parts is peeled off and fixed with masking tape. ( 3 places ) (6) Attach the ⑫Washer to the ⑪Clip(Large) and secure it to the Rear Bumper. (4) Place the LH parts against the mounting reference and align the holes with the Rear Bumper. REAR UNDER DIFFUSER Genuine Part Number : E5610CC150 Applicable Model : BRZ MY 2022 ~ Precautions for maintenance work when genuine parts are installed The work to remove the rear fog cover is different. Follow the procedure below to remove it. (1) Remove the small clip (2 places) and the large clip (3 places). (2) Pull out the Rear fog cover to the rear of the vehicle and remove it from the Rear Bumper. ※ Rear under diffuser center also will come off together. Rear under diffuser center Rear fog cover Small Clip × 2 Large Clip × 3 Washer × 3 2. Muffler attachment / detachment work. This will affect the muffler removal / installation work. After removing the muffler cutter, attach / detach the muffler. Rear under diffuser center Muffler cutter Muffler cutter LH RH Remove the bolt. 1. Replacement work for back lamp bulbs and rear fog lamp bulbs.
**************************************************************************************************************
SEOCONTENT-END
This product presentation was made with AAWP plugin.