| “This site contains affiliate links for which OEMDTC may be compensated” |
NUMBER: 12-200-16
DATE: 06/08/16
| APPLICABILITY: | 2013-14MY BRZ |
| SUBJECT: | Rear Combination Lamp and Related Enhancements |
INTRODUCTION:
Since the introduction of the BRZ, there have been a number of revisions to the rear combination lamps and their sealing gaskets (a.k.a. packing) to address varying customer concerns. Conditions ranging from the accumulation of water and condensation, to insect intrusion and lens / body cracking have all been addressed in previous bulletins. Recently, concerns about a cloudy appearance of the lens have created yet another bulletin. To help better organize these publications, all the related bulletins are being been condensed into this new release putting all the information in one place for easier reference.
As listed in their chronological order, design changes and procedures have been developed to address customer concerns of:
- Condition 1: Condensation accumulation- inspection for possible cracking of lamp housing
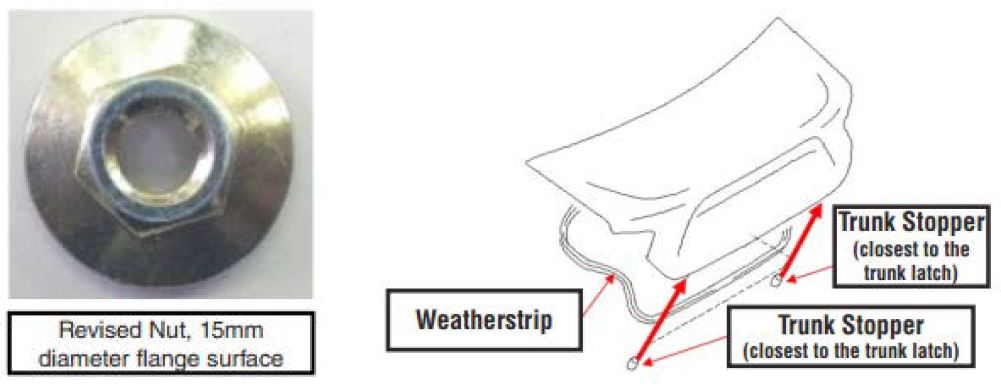
- Condition 2: Condensation accumulation- flange (retaining) nut change for combination lamp assy. to prevent rear body panel distortion and increased gasket (packing) thickness to improve sealing.
- Condition 3: Trunk lid contacting (and in isolated cases cracking) the combination lamp assy. when closing- change to the trunk stoppers and trunk weatherstrip
- Condition 4: Insect intrusion inside the combination lamps- further revision to the lamp assy. and gasket
- Condition 5: Cloudy appearance of the lens- anti-fog coating applied at production to the inside of combination lamp lens.
NOTE: It is VERY IMPORTANT to read through this bulletin completely, review the vehicle’s history and understand which revisions may or may not be applicable before ordering any parts or proceeding with any of the associated repairs.
Not all of the parts and / or repairs listed below are applicable to every vehicle!
Production changes include:
- Flange surface dimension of retaining nuts increased from 12mm to 15mm.
- Thickness of the combination lamp gaskets increased for improved sealing.
- The “height” of the trunk stoppers has been increased by 2.7mm and a liner added to the trunk weatherstrip intended to improve crush resistance and keep the trunk lid from contacting (and in a small number of cases, cracking) the tops of the combination lamps when closing.
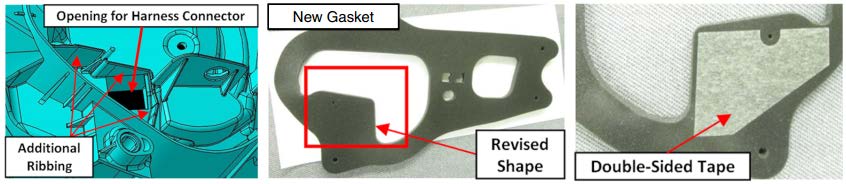
- Further revision of combination lamp assy. (additional ribbing) and further revision of the gasket shape along with addition of double-sided tape to the gasket for improved sealing.
- Application of an anti-fog coating to the inside of the combination lamp lens at production to prevent “clouding”.
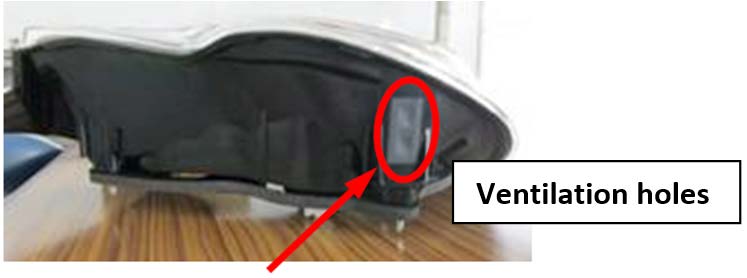
- Additional ventilation holes have been added to prevent condensation build-up.
Production Change and Repair Information:
| If the VIN is: | Replace Retaining Nuts with p.n. 902370040 | Replace Combination Lamps & Gaskets (packing) |
Replace Trunk Stoppers
* (Where Applicable) |
Replace Trunk Weatherstrip
* (Where Applicable) |
| BEFORE D*605847 | YES | YES | YES* | YES* |
| BEFORE E*600523 | NO | YES | YES* | YES* |
| BEFORE E*601089 | NO | YES | YES | NO |
| BEFORE E*601334 | NO | YES | YES | NO |
| BEFORE F*600023 | NO | YES | NO | NO |
To summarize the table above:
| Production Change: | Starting VIN |
|---|---|
| Larger flange area (15mm) retaining nuts | D*605847 |
| Liner added to trunk weatherstrip | E*600523 |
| New combination lamp gaskets (packing) | E*601089 |
| 2.7mm “taller” trunk stoppers | E*601334 |
| Anti-fog coating to inside of lenses | F*600023 |
Part Information:
The part numbers provided in the table below are for the latest combination lamp assemblies, gaskets (packing), flange nuts, trunk weatherstrip and trunk stoppers which have all of the revisions described in the introduction section to address the conditions listed above.
| Part Number |
Description |
|---|---|
| 84912CA062 | Lens & Body CP RH |
| 84912CA062 | Lens & Body CP LH |
| 84940CA061 | Packing RH (gasket) |
| 84940CA071 | Packing LH (gasket) |
| 902370040 | Flange Nut |
| 57533FE040 | Stopper Trunk Lower |
| 57532CA001 | WSTR Trunk |
Service Procedure / Information:
To make this “condensed” bulletin easier to follow, the service procedures and related information for each “condition” as described above will be outlined individually.
Conditions 1,2, 3**, 4 & 5: Combination Lamp Assembly R&R
** Where Applicable, see Condition 3 NOTE: on pg. 6.
Gasket replacement and inspection / repair of rear body panel deformation will also be described in this section.
- Remove the 3 retaining clips for the trunk threshold trim then, using a plastic trim tool, lift the trim to release the hidden trim clips located on the underside.
- Take out the 6 retaining clips from the trunk side liners then remove them to gain access to the combination lamp mounting nuts.
- After removing the 4 retaining nuts from each combination lamp, unplug and remove the
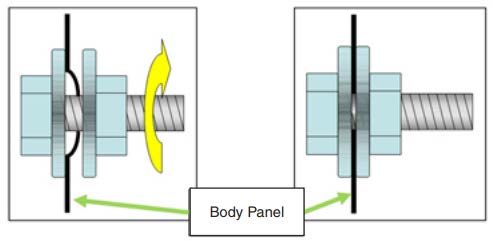
- Before reinstalling any lamp assemblies, always inspect the rear body panel closely in the retaining nut areas for any deformation of the metal as shown in the illustrations below.
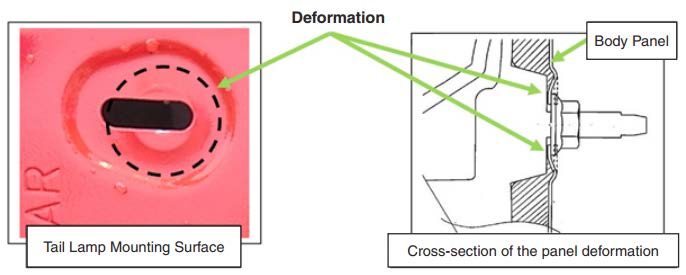
- If any deformation is found, CAREFULLY straighten the affected mounting area using a small body hammer and dolly.
- Another straightening method is to clamp the body panel using a bolt, flat washers and a nut as shown in the illustration below.
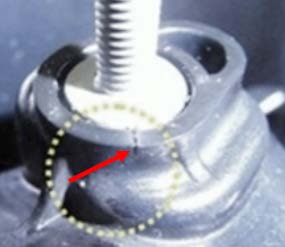
- Inspect the retaining stud boss areas of the housings for any cracking as shown below. If cracking is confirmed, the lamp assy. must be replaced.
NOTE: Unless the most recent combination lamp assemblies are already installed, when replacement is required, replace BOTH assemblies with the new parts.
- Transfer the wiring harness and bulb sockets to the replacement lamps. Use caution to avoid touching the bulbs. If touched, oil will transfer from your fingers and likely cause premature bulb failure. Always use rubbing alcohol to clean any bulb that is touched before reinstallation.
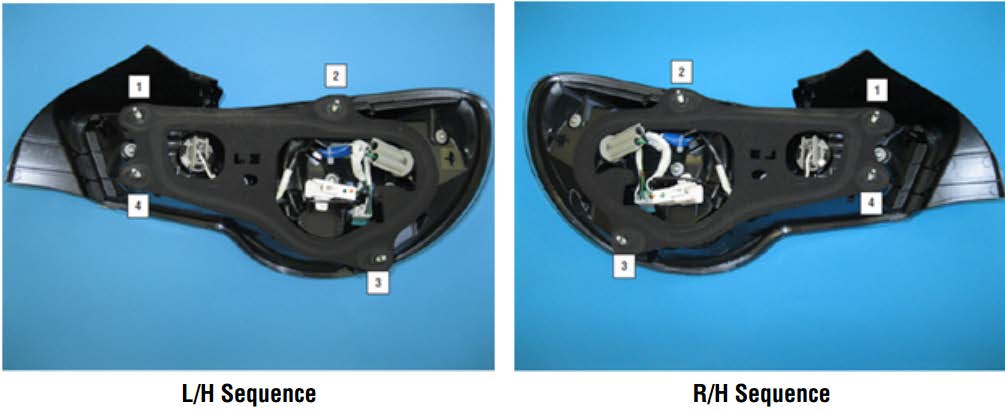
- Peel the backing off the new gaskets (packings) to expose the adhesive then CAREFULLY install the gasket down over the mounting studs. Position the revised shape area and adhesive of the gasket over the additional ribbing and align the edge with the white harness connector as shown in the photos below (a right side lamp shown).
NOTE: These gaskets are one-time use items and must be replaced any time the combination lamp assembly is removed.
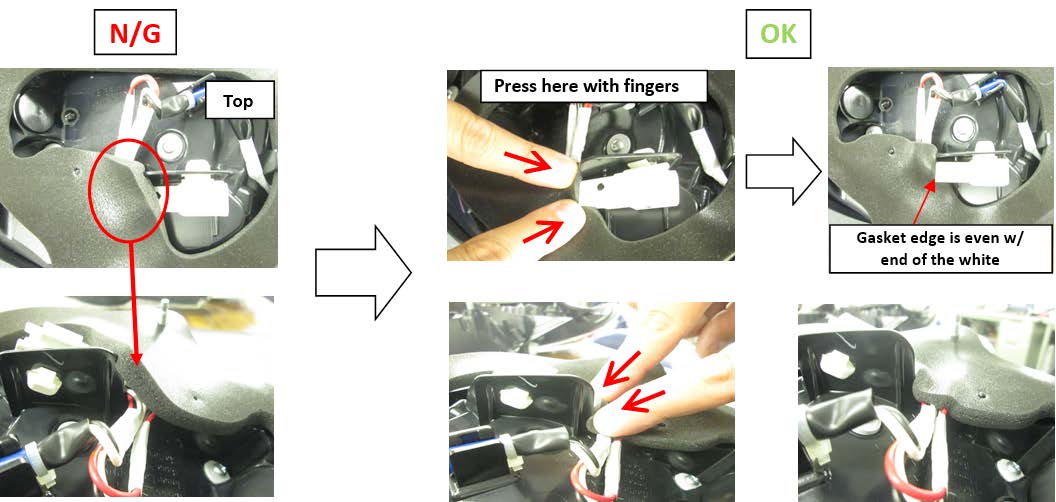
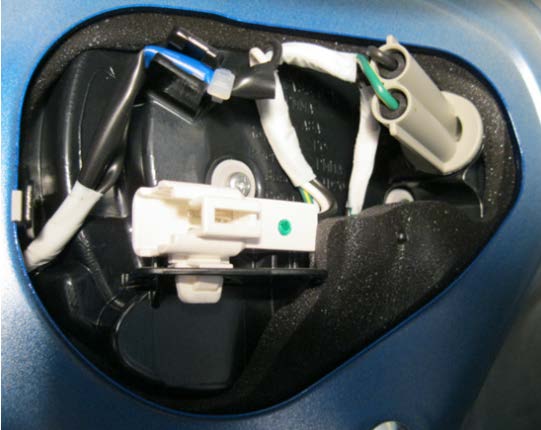
- With the new gaskets in place, refit the combination lamp assemblies to the vehicle but before tightening the retaining nuts, confirm the new gaskets are in the proper position as shown in the photo below (left side shown). NOTE: If not already being used, always use the new retaining nuts (p.n. 902370040) which have a 15mm flange / washer portion.
- The proper torque sequence must always be followed as shown in the photos below or damage to the combination lamp assembly may result. The torque specification for the retaining nuts is 4.5 Nm (39 inch-pounds).
Condition 3: Trunk Stopper and Weatherstrip Replacement (ONLY where required)
NOTE: Unless there is evidence of the trunk lid contacting the tops of the combination lamp assemblies, replacement of the stoppers and trunk weatherstrip is not required.
The photos below show the differences between the “OLD” and “NEW” trunk stoppers and the retaining tangs which secure them to the trunk lid.
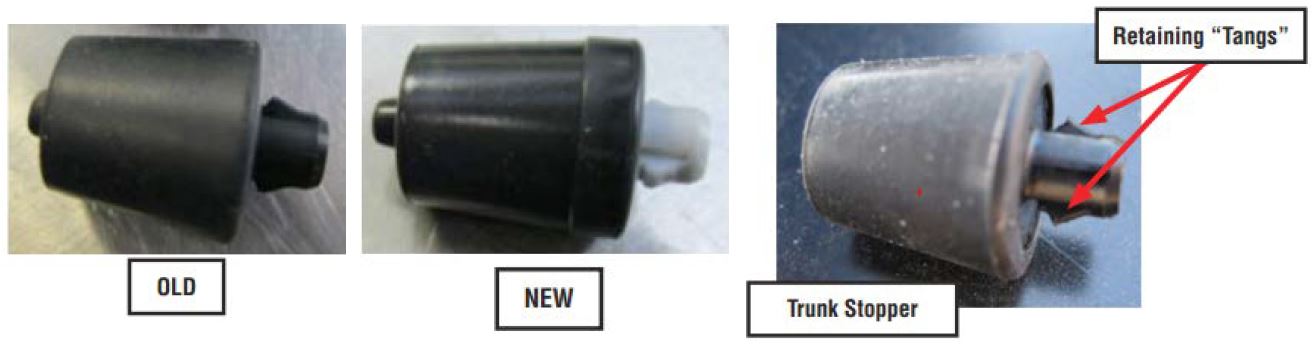
- To remove the trunk stoppers, use a plastic trim tool to lift up and release one of the retaining tangs. Once one side is released, hold the one side of the stopper away from the body then release the opposite tang with the plastic trim tool as shown in the photos below.

- Grasp and pull up on the old weatherstrip to release and remove it from the trunk opening body flange. Leave any adhesive remaining on the flange in place to help secure the new weatherstrip. Start installation with the weatherstrip seam aligned with the striker, arrow and notch towards the rear bumper as shown in the photo below.
- Proceed to either the right or left working your way around the trunk opening and back to the seam. As you work the new weatherstrip into position, WITH YOUR HANDS, always make sure it is fully seated onto the trunk opening body flange evenly with no high spots (which will result when the weatherstrip is not fully seated).
- Position the inner lip of the new weatherstrip over the trunk lining trim as shown in the photo below, right.
NOTE: To avoid damaging the new weatherstrip, NEVER use any tool other than your hands (no rubber mallets or similar tools) to fully seat it onto the trunk opening body flange.

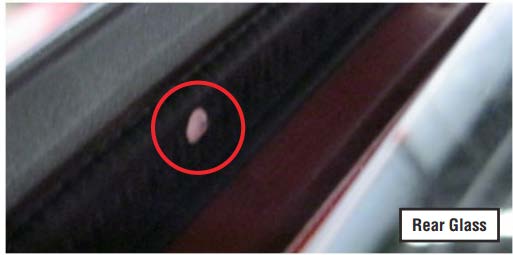
- As an extra “check” to confirm the weatherstrip is installed properly, the white dot on the outside must face the rear window as shown below.
Warranty / Claim Information:
For vehicles within the Basic New Car Limited Warranty period, this repair may be claimed using the following information:
| Labor Description | Labor Operation # |
Labor Time |
Fail Code |
|---|---|---|---|
| REAR COMBINATION LAMP / GASKET ASSY. R&R (BOTH SIDES) | B914-744 | 0.3 | WBB-02 |
| METAL REPAIR (BOTH SIDES) | C916-224 | 0.3 | |
| TRUNK WEATHERSTRIP / STOPPER REPLACEMENT | C914-743 | 0.2 |
IMPORTANT REMINDERS:
- SOA strongly discourages the printing and/or local storage of service information as previously released information and electronic publications may be updated at any time.
- Always check for any open recalls or campaigns anytime a vehicle is in for servicing.
- Always refer to STIS for the latest service information before performing any repairs.


