
NHTSA ID Number: 10232550
Manufacturer Communication Number: 1213712R
Summary
EyeSight Acceptable Windshield Repair Areas
NUMBER: 12-137-12R
DATE: 09/21/12
REVISED: 08/05/13
| APPLICABILITY: | 2013MY and later Legacy and Outback models with EyeSight System |
| SUBJECT: | EyeSight Acceptable Windshield Repair Areas |
INTRODUCTION
The purpose of this bulletin is to provide information concerning acceptable windshield repair areas in vehicles equipped with the new EyeSight system.
SERVICE PROCEDURE / INFORMATION
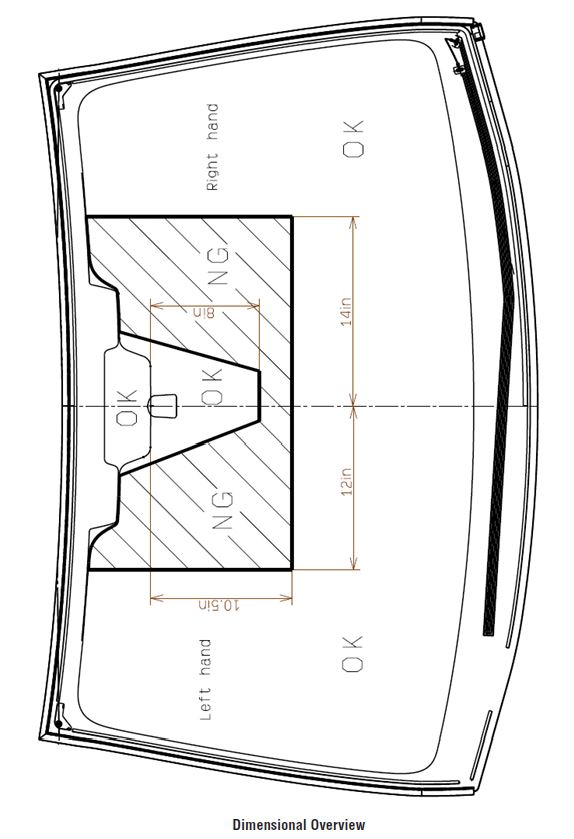
In the event you receive an EyeSight-equipped vehicle with repairable windshield damage, e.g., stone chip, small crack or nick, etc. It is important to understand NO repairs can be made to the glass if the damage is in the Prohibited or “NG” areas. Damage and/or repairs in the NG areas as shown in the Dimensional Overview area of this bulletin can interfere with EyeSight’s stereo camera, possibly compromising proper operation of the system.
Examples of often-repaired windshield damage are:
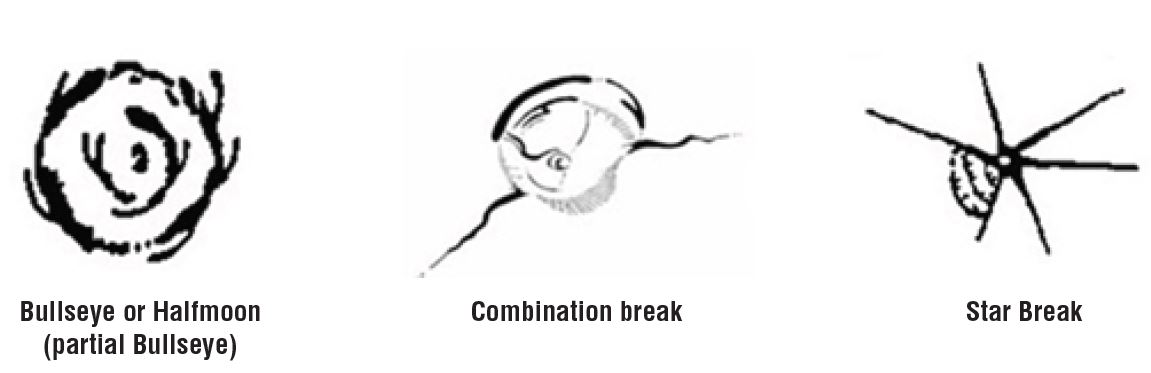
NOTE: These types of damage are from outside influence and not a defect in the glass or a matter for warranty.
Instructions for printing the actual-size location template:
- Scroll to the end of this Bulletin and have the template page displayed.
- Click on the “print” icon from the toolbar or click “file” then “print”.
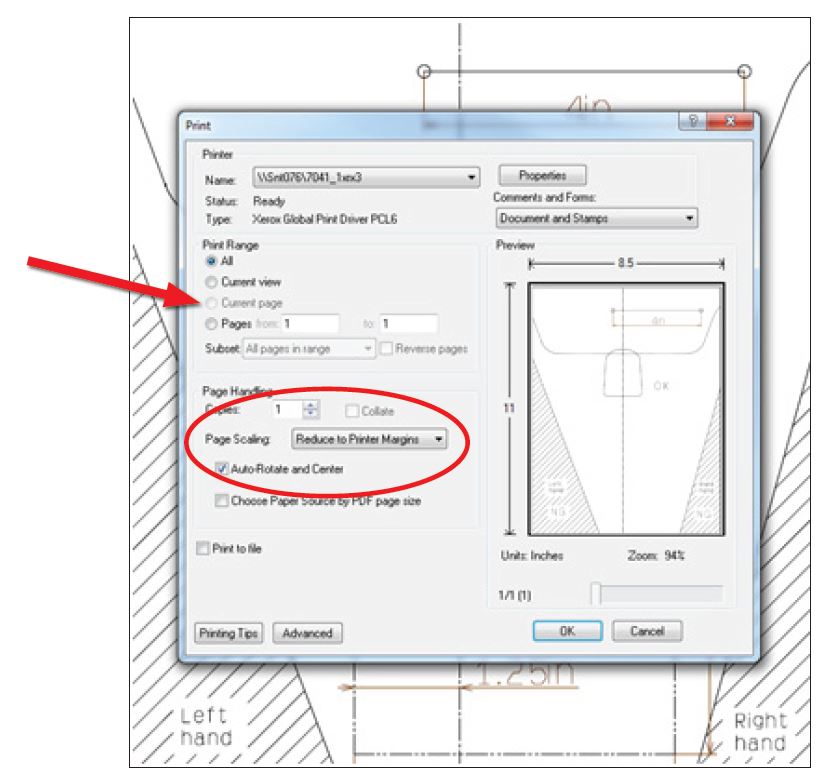
- In the Print window, select “Current page”.
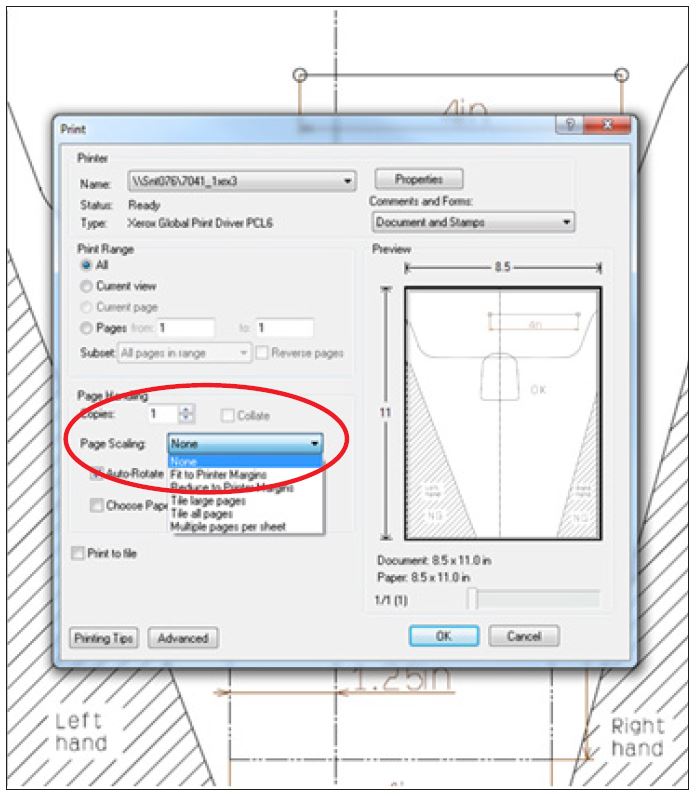
- Click on the drop-down arrow in the Page Scaling menu as shown. The default setting is “Reduce to Printer Margins”. From the menu, select “None” then click “OK”. Your template should print normally and be ready to cut out for use.
- IMPORTANT: Verify the 4 inch dimension measures a true 4 inches before using the template.
The photo below shows an example of the template (printed to scale) for acceptable windshield repair areas, cut out and ready to use.
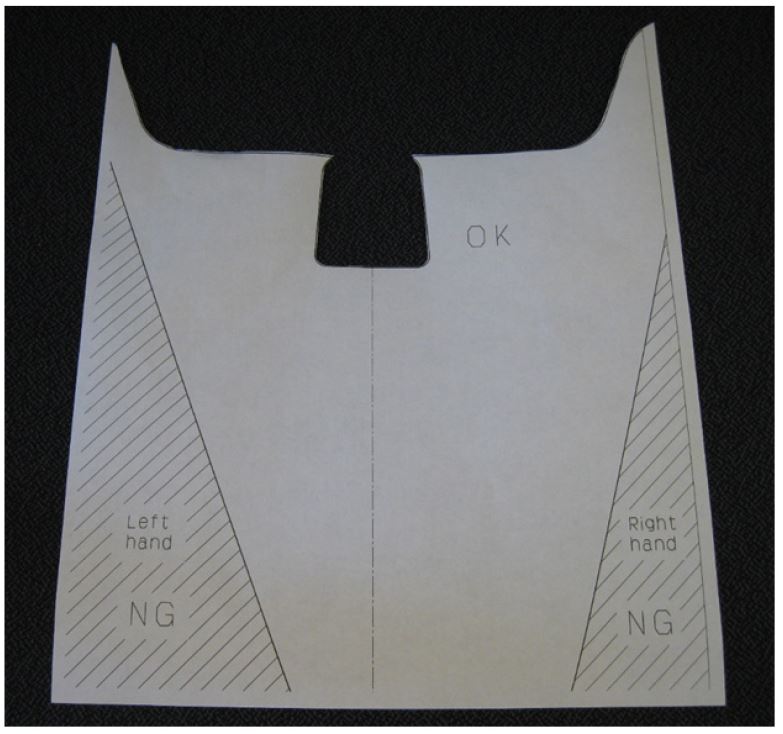
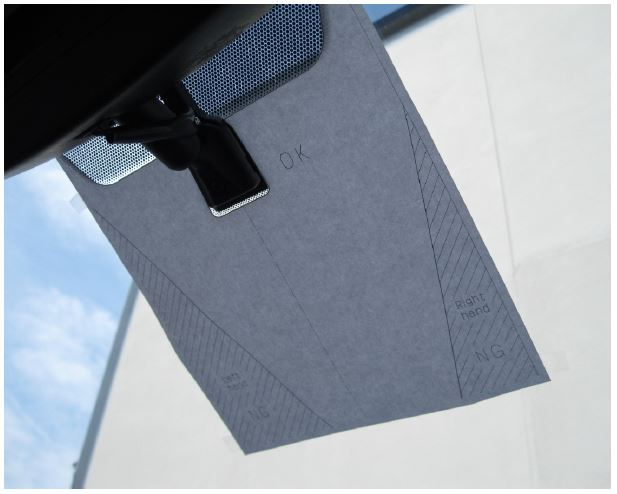
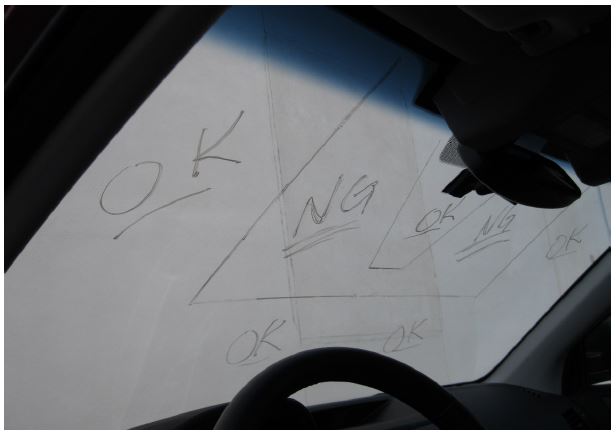
Attach the printed to scale template to the windshield as shown. Once the template is in place, extend the Left and Right-hand lines as necessary using the Dimensional Overview measurements as a guide to complete the prohibited “NG” and acceptable “OK” areas for windshield repairs. Once completed, inspect the area of the windshield that is damaged to determine if repair is possible or if a replacement EyeSight windshield is needed.
IMPORTANT NOTES:
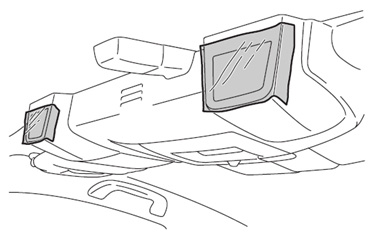
- A common practice when repairing a windshield is to ensure the glass surface is clean and free of all residue. For this reason, the following caution from the Owner’s Manual has been included for reference. Always protect the openings for EyeSight’s stereo camera with removable tape or plastic wrap prior to application of any glass cleaners or polishes to the inside of the windshield and surrounding areas. Overspray or residue from these materials reaching the lenses of the Eyesight stereo camera will cause damage and require them to be replaced.
- NEVER attempt to clean the cameras’ lenses as doing so will damage them, also requiring replacement. It is also critical to protect the EyeSight stereo camera with tape prior to windshield removal. This will prevent any contamination of the EyeSight camera by dust or debris produced during the windshield removal and installation process.
- Required decals (e.g. state inspection, military base, local community, campground, etc.) may be placed in the upper center of the windshield using the template provided in this bulletin a guide to ensure they are installed within the specified “OK”
- The use of any “glossy backed” labels, stickers or decals should be avoided as glare may be created and interfere with the EyeSight system operation. Any labels, stickers and decals should be installed as close to the top of the “OK” area of the windshield as possible.
- When installing labels, stickers or decals, their location must be compliant with any and all applicable Federal, State and Local ordinances relating specifically to possible visual obstructions.
Other ordinances may also apply so, please check with your specific authority.
22 Affected Products
Vehicles
1 Associated Document
Manufacturer Communications
NUMBER: 12-137-12R
DATE: 09/21/12
REVISED: 08/05/13
MC-10232550-9999.pdf 1327.676KB
NHTSA ID Number: 10067006
Manufacturer Communication Number: 12-137-12R
Summary
SUMMARY TO BE PROVIDED ON A FUTURE DATE.
1 Associated Document
Service Bulletin Document
NUMBER: 12-137-12R
DATE: 09/21/12
REVISED: 08/05/13
SB-10067006-3639.pdf 1327.676KB

- Stops The Spread of Chips and Cracks - Rain-X Windshield Repair Kit Helps You Minimize The Appearance And Stop The Spread Of Chips And Cracks In Your Windshield.
- Easy To Use - Everything You Need Is Included, Takes Only Minutes With Minimal Steps. For Cracks Simply Apply Resin To Crack Then Curing Strips, Move Windshield Into Direct Sunlight And Remove Excess. Good for multiple repairs
- Durable Resin Formula - Use Durable Resin To Make Windshields Stronger Than Before, Repairing All Types Of Laminated Windshields Up To First Layer Of Windshield Glass
- For Best Results - Repairs Should Be Made As Soon As Possible After The Damage Occurs And Before The Break Has Had A Chance To Be Contaminated By Dirt Or Water
- Pro-Tip To Avoid Poor Results - Refrain From Applying Resin Too Quickly, Air Pockets Forming During The Repair Or Repairing On A Contaminated Crack As This May Compromise Your Results. Use A Gentle Touch — Too Much Pressure Can Extend The Crack Rather Than Repair It.


- SAVE HUNDREDS ON WINDSHIELD REPLACEMENT: Make permanent, air-tight repairs on bullseye damage up to 1¼" in diameter on most laminated windshields , for a fraction of a dealer's cost.
- CRYSTAL-CLEAR REPAIR WITH ZERO GUESSWORK: Permatex's precision resin penetrates deep into the break, restoring strength and optical clarity. No cloudy, bubbly, or uneven results — just a clean, nearly invisible fix.
- SPRING-LOCK SYRINGE DOES THE HARD WORK FOR YOU: The advanced spring-lock mechanism controls pressure automatically, so resin flows exactly where it's needed. No mixing, no measuring, no experience required.
- JUST ADD SUNLIGHT, RESIN CURES NATURALLY: Skip the UV lamps and special equipment. Park in the sun for 15 minutes and let nature finish the job. Works on any day with natural daylight, even overcast skies.
- ONE BOX, ZERO EXTRA TRIPS: Every single item needed for a complete repair ships in the box: syringe, resin compound, adhesive disc, pedestal, curing strip, push pin, razor blade, prep towelette & photo instructions included.

- Windshield Chip Repair Kit: Our newly upgraded glass repair kit, no mixing required, windshield chip repair kit quickly and efficiently repairs small damage in 20-30 minutes, Save your budget and stop the spreading of car glass chips and cracks, restoring windshields to near new condition
- Upgrade Recipe: The upgraded version of glass repair fluid, the shear strength can reach 20P--A, even if the glass is broken, it will not affect the repair position. Enhanced injection head, and unique vacuum design, push the windshield repair resin into the crack, which can prevent air from entering between the gels and affect the repair effect. cracked windshield repair kit can pressurize the resin for better penetration into chips or cracks
- Quickly Repair: When you use the window crack repair kit, first clean and dry the glass surface, then squeeze the resin into the crack, apply the curing film, then place the car in the scorching sun or use a UV curing lamp, dry, and bond the car for 5-20 minutes, and remove with a scraper, residual glass repair solution
- Wide Application: Automotive Windshield Repair Kits are designed to repair all types of laminated windshield shards and cracks such as bugs, cobwebs, bull's eyes, half-moon cracks, star damage, and cracks smaller than 12"/30cm and Spherical lesions less than 1 inch in diameter were the best candidates for this group
- Long-Lasting Effect: A windshield crack can spread and worsen over time due to factors like temperature changes, road vibrations, or exposure to moisture. Repairing the crack with a windshield repair kit for chips and cracks helps prevent it from expanding, preserving the structural integrity of the windshield, Efficient and durable, without repeated maintenance

- Professional-Grade Windshield Chip Repair Kit: Our all-in-one windshield repair kit is engineered to deliver professional results at home. This comprehensive glass repair kit requires no mixing and comes with a powerful UV curing light, enabling you to fix minor windshield chips and cracks in just 5-10 minutes. It's the ultimate rock chip repair kit windshield solution to prevent damage from spreading, saving you significant time and money on a full replacement.
- Professional-Grade Windshield Chip Repair Kit: Our all-in-one windshield repair kit is engineered to deliver professional results at home. This comprehensive glass repair kit requires no mixing and comes with a powerful UV curing light, enabling you to fix minor windshield chips and cracks in just 5-10 minutes. It's the ultimate rock chip repair kit windshield solution to prevent damage from spreading, saving you significant time and money on a full replacement.
- Versatile Application on Auto Glass: Designed as a universal car windshield crack repair kit, it works perfectly on laminated auto glass. Whether you're dealing with a simple chip or a complex spider web crack, this complete glass repair kit provides everything needed. The included high-quality glass repair liquid for cracks seamlessly fills the damage, restoring clarity and strength.
- Smart, Adjustable UV Curing Lamp: The process is simplified with the intelligent UV lamp in this windshield repair kit. It offers multiple modes, including two timer settings and two light exposure options. This flexibility allows you to customize the curing cycle based on the damage, making the entire windshield repair process efficient and user-friendly.
- Quick and Easy 5-Minute Repair Process: Using this windshield repair kit for chips and cracks is straightforward. After cleaning the surface, apply the glass repair liquid for cracks into the damage, cover with the curing film, and use the UV light. In just 5-10 minutes, the repair is complete. Finally, remove any residue with the provided scraper. This rapid window crack repair kit restores your windshield to near-original condition with minimal effort.
- ⏱ 𝐐𝐮𝐢𝐜𝐤 & 𝐒𝐢𝐦𝐩𝐥𝐞 𝐑𝐞𝐩𝐚𝐢𝐫 𝐏𝐫𝐨𝐜𝐞𝐬𝐬: Most repairs are done in about 30 minutes, though time varies by damage size and type. Simply apply the resin, cure it under sunlight or UV light (curing strip included) and use the provided tools to achieve a clear, durable finish.
- 🔍 𝐕𝐄𝐑𝐒𝐀𝐓𝐈𝐋𝐄 𝐂𝐑𝐀𝐂𝐊 𝐑𝐄𝐏𝐀𝐈𝐑 𝐊𝐈𝐓: Designed for a variety of common windshield damage, including bullseye, star-shaped, spiderweb, and linear cracks. The clear repair resin flows into small chips and fractures, then cures under UV light to help fill and improve the appearance of minor windshield damage.
- 🔧 𝐂𝐎𝐌𝐏𝐋𝐄𝐓𝐄 𝐏𝐑𝐎𝐅𝐄𝐒𝐒𝐈𝐎𝐍𝐀𝐋 𝐊𝐈𝐓: This glass scratch repair resin penetrates deep into chips and cracks, restoring clarity and strength to damaged windshields for a long-lasting fix. The compound bonds firmly with glass surfaces, creating a durable repair that withstands everyday driving.
- 🛡️ 𝐂𝐎𝐒𝐓-𝐄𝐅𝐅𝐄𝐂𝐓𝐈𝐕𝐄 𝐎𝐄𝐌 𝐀𝐋𝐓𝐄𝐑𝐍𝐀𝐓𝐈𝐕𝐄 : Comes complete with two 3mL resin vials, this kit offers enough repair material for 4 to 6 applications. The package also comes with curing films, application tools, and detailed instructions designed for easy and effective application.
- ✨𝐌𝐔𝐋𝐓𝐈-𝐃𝐀𝐌𝐀𝐆𝐄 𝐑𝐄𝐏𝐀𝐈𝐑 𝐊𝐈𝐓: This lab-tested kit delivers reliable performance on automotive windshield chips and cracks. The cured repair withstands temperatures ranging from -40°F to 200°F, and a single kit covers various types of minor damage across most vehicle glass surfaces.
SEOCONTENT-START
Bulletin Number: 12-137-12R; Date: 08/05/13 Page 1 INTRODUCTION The purpose of this bulletin is to provide information concerning acceptable windshield repair areas in vehicles equipped with the new EyeSight system. SERVICE PROCEDURE / INFORMATION In the event you receive an EyeSight-equipped vehicle with repairable windshield damage, e.g., stone chip, small crack or nick, etc. It is important to understand NO repairs can be made to the glass if the damage is in the Prohibited or “NG” areas. Damage and/or repairs in the NG areas as shown in the Dimensional Overview area of this bulletin can interfere with EyeSight’s stereo camera, possibly compromising proper operation of the system. Examples of often-repaired windshield damage are: NUMBER: 12-137-12R DATE: 09/21/12 REVISED: 08/05/13 APPLICABILITY: 2013MY and later Legacy and Outback models with EyeSight System SUBJECT: EyeSight Acceptable Windshield Repair Areas SERVICE BULLETIN ATTENTION: GENERAL MANAGER q PARTS MANAGER q CLAIMS PERSONNEL q SERVICE MANAGER q IMPORTANT – All Service Personnel Should Read and Initial in the boxes provided, right. Continued… CAUTION: VEHICLE SERVICING PERFORMED BY UNTRAINED PERSONS COULD RESULT IN SERIOUS INJURY TO THOSE PERSONS OR TO OTHERS. Subaru Service Bulletins are intended for use by professional technicians ONLY. They are written to inform those technicians of conditions that may occur in some vehicles, or to provide information that could assist in the proper servicing of the vehicle. Properly trained technicians have the equipment, tools, safety instructions, and know-how to do the job correctly and safely. If a condition is described, DO NOT assume that this Service Bulletin applies to your vehicle, or that your vehicle will have that condition. SUBARU OF AMERICA, INC. IS “ISO 14001 COMPLIANT” The international standard for excellence in Environmental Management Systems. Please recycle or dispose of automotive products in a manner that is friendly to our environment and in accordance with all local, state and federal laws and regulations. Bullseye or Halfmoon (partial Bullseye) Combination break Star Break NOTE: These types of damage are from outside influence and not a defect in the glass or a matter for warranty. Bulletin Number: 12-137-12R; Date: 08/05/13 Page 2 Instructions for printing the actual-size location template: • Scroll to the end of this Bulletin and have the template page displayed. • Click on the “print” icon from the toolbar or click “file” then “print”. • In the Print window, select “Current page”. • Click on the drop-down arrow in the Page Scaling menu as shown. The default setting is “Reduce to Printer Margins”. From the menu, select “None” then click “OK”. Your template should print normally and be ready to cut out for use. • IMPORTANT: Verify the 4 inch dimension measures a true 4 inches before using the template. Bulletin Number: 12-137-12R; Date: 08/05/13 Page 3 Bulletin Number: 12-137-12R; Date: 08/05/13 Page 4 Continued… Dimensional Overview Bulletin Number: 12-137-12R; Date: 08/05/13 Page 5 Continued… The photo below shows an example of the template (printed to scale) for acceptable windshield repair areas, cut out and ready to use. Bulletin Number: 12-137-12R; Date: 08/05/13 Page 6 Attach the printed to scale template to the windshield as shown. Once the template is in place, extend the Left and Right-hand lines as necessary using the Dimensional Overview measurements as a guide to complete the prohibited “NG” and acceptable “OK” areas for windshield repairs. Once completed, inspect the area of the windshield that is damaged to determine if repair is possible or if a replacement EyeSight windshield is needed. Bulletin Number: 12-137-12R; Date: 08/05/13 Page 7 IMPORTANT NOTES: • A common practice when repairing a windshield is to ensure the glass surface is clean and free of all residue. For this reason, the following caution from the Owner’s Manual has been included for reference. Always protect the openings for EyeSight’s stereo camera with removable tape or plastic wrap prior to application of any glass cleaners or polishes to the inside of the windshield and surrounding areas. Overspray or residue from these materials reaching the lenses of the Eyesight stereo camera will cause damage and require them to be replaced. • NEVER attempt to clean the cameras’ lenses as doing so will damage them, also requiring replacement. It is also critical to protect the EyeSight stereo camera with tape prior to windshield removal. This will prevent any contamination of the EyeSight camera by dust or debris produced during the windshield removal and installation process. • Required decals (e.g. state inspection, military base, local community, campground, etc.) may be placed in the upper center of the windshield using the template provided in this bulletin a guide to ensure they are installed within the specified “OK” areas. • The use of any “glossy backed” labels, stickers or decals should be avoided as glare may be created and interfere with the EyeSight system operation. Any labels, stickers and decals should be installed as close to the top of the “OK” area of the windshield as possible. • When installing labels, stickers or decals, their location must be compliant with any and all applicable Federal, State and Local ordinances relating specifically to possible visual obstructions. Other ordinances may also apply so, please check with your specific authority. IMPORTANT: After printing the template, confirm this “4in” dimension measures a true 4” or it will not fit the windshield properly.
SEOCONTENT-END
This product presentation was made with AAWP plugin.