
Accessory Installation Guide
| 2023MY Ascent (all trims) – Bumper Under Guard – Front, Chrome | E551SXC100 |
PART NUMBER: E551SXC100
DESCRIPTION: Ascent Front Bumper Under Guard
Surface Preparation
1.
Make sure that all installation surfaces are clean, free of dirt, grease and debris using soap and water solution. Clean the indicated tape adhesion area with the alcohol wipe (provided).
Front Bumper Under Guard Installation
2.
Identify the center location of the factory retainer in underside of bumper and remove with either flat head screwdriver or plastic pry bar. Discard the retainer.
3.
Peel back approx. 50mm / 2” of tape liner at each end of the part and fold at 45 degrees to part. Tape peeled back section of tape liner to outside surface of the bumper under guard using masking tape.
4.
Install Front Bumper Under Guard in position of best fit ensuring that folded tape liners remains outside.
5.
Install provided replacement retainer plug in center hole and (2) snap clips on the sides in Front Bumper Under Guard.
6.
Apply moderate forward pressure towards bumper for product best fit, then apply pressure to the ends of the Front Bumper Under Guard where the double sided tape liner has been removed, (as shown).
7.
While applying moderate forward pressure towards bumper, pull exposed tape liners towards opposite end of Front Bumper Under Guard, one side at a time (as shown).
8.
With a clean, dry microfiber towel, apply pressure to taped surface of Front Bumper Under Guard, (as shown) going from side to side approx. 5 times to ensure proper tape adhesion is achieved.
E551SXC100
E551SXC100 – French
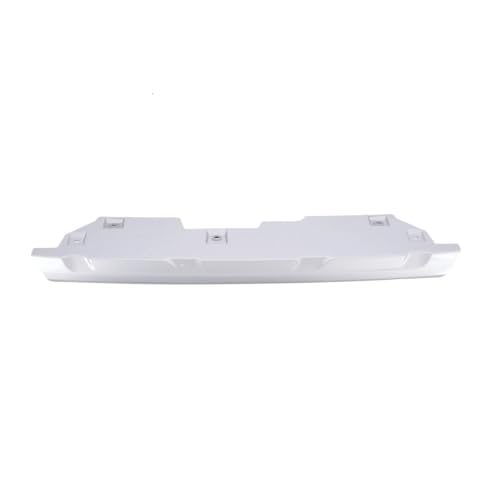
- Genuine Subaru Rear Bumper Under Guard
- 57734AN11A
- May not be used in conjunction with the Trailer Hitch or Automatic Reverse Braking
- 2020-2025 Outback (Base Aad Premium)
- Adds a rugged styling accent Look to the Outback.

- Stylish
- Provides your Subaru with a cosmetic off-road ruggedness

- Special Design:Designed specifically for your 2025 2026 Forester model, this Rear Bumper Protector seamlessly fits into your car's interior, enhancing both functionality and aesthetics.
- High-Quality Materials: Made of durable ABS plastic with excellent corrosion resistance and toughness. It can protect your rear bumper panel from wear and scratches.
- Easy Installation: Wipe the rear bumper clean, remove the adhesive backing film, position the protection strip, stick it flat, and press evenly for a few seconds to ensure it adheres securely.
- Multiple Use: Effectively prevents scratches and damage during loading and unloading in the car trunk. Also covers existing scratches and stains to keep the car looking new and clean.
- Good Service: We care about your feedback,and if there is any issues with our product or service for any reason, do not hesitate to contact us. We will spare no effort to get your satisfaction.

- Special Design:Designed specifically for your Crosstrek 2024 2025 2026 model, this Rear Bumper Protector seamlessly fits into your car's interior, enhancing both functionality and aesthetics.
- High-Quality Materials: Made of durable ABS plastic with excellent corrosion resistance and toughness. It can protect your rear bumper panel from wear and scratches.
- Easy Installation: Wipe the rear bumper clean, remove the adhesive backing film, position the protection strip, stick it flat, and press evenly for a few seconds to ensure it adheres securely.
- Multiple Use: Effectively prevents scratches and damage during loading and unloading in the car trunk. Also covers existing scratches and stains to keep the car looking new and clean.
- Good Service: We care about your feedback,and if there is any issues with our product or service for any reason, do not hesitate to contact us. We will spare no effort to get your satisfaction.

SEOCONTENT-START
INSTALLATION INSTRUCTIONS PART NUMBER: KIT CONTENTS: TOOLS REQUIRED: MEANING OF CHARACTERS: ISSUE 01 DATE 06-13-22 SUBARU OF AMERICA PAGE 1/4 Flat Head Screwdriver Masking Tape : Remove : Install : Disconnect : Connect : Location of Clip or Screw : Tightening Torque : Loosen : Discard : Reuse DESCRIPTION: Ascent Front Bumper Under Guard E551SXC100 SK775 DESCRIPTION Ascent Front Bumper Under Guard T Retainer Plug Snap Clip x 2 x 1 Alcohol Wipe x 1 Surface Preparation Front Bumper Under Guard Installation SK775 DESCRIPTION Ascent Front Bumper Under Guard ISSUE 01 DATE 06-13-22 SUBARU OF AMERICA PAGE 2/4 1 2 3 Make sure that all installation surfaces are clean, free of dirt, grease and debris using soap and water solution. Clean the indicated tape adhesion area with the alcohol wipe (provided). Identify the center location of the factory retainer in underside of bumper and remove with either flat head screwdriver or plastic pry bar. Discard the retainer. Peel back approx. 50mm / 2” of tape liner at each end of the part and fold at 45 degrees to part. Tape peeled back section of tape liner to outside surface of the bumper under guard using masking tape. 1 2 SK775 DESCRIPTION Ascent Front Bumper Under Guard ISSUE 01 DATE 06-13-22 SUBARU OF AMERICA PAGE 3/4 4 5 6 Install Front Bumper Under Guard in position of best fit ensuring that folded tape liners remains outside. Install provided replacement retainer plug in center hole and (2) snap clips on the sides in Front Bumper Under Guard. Apply moderate forward pressure towards bumper for product best fit, then apply pressure to the ends of the Front Bumper Under Guard where the double sided tape liner has been removed, (as shown). towards bumper for product best fit, then apply pressure to the ends of the Front Bumper SK775 DESCRIPTION Ascent Front Bumper Under Guard ISSUE 01 DATE 06-13-22 SUBARU OF AMERICA PAGE 4/4 7 8 While applying moderate forward pressure towards bumper, pull exposed tape liners towards opposite end of Front Bumper Under Guard, one side at a time (as shown). With a clean, dry microfiber towel, apply pressure to taped surface of Front Bumper Under Guard, (as shown) going from side to side approx. 5 times to ensure proper tape adhesion is achieved. dry microfiber towel, apply pressure to taped surface of Front Bumper Under Guard, (as shown) going from
**************************************************************************************************************
NUMÉRO DE PIÈCE : E551SXC100 SK775 INSTRUCTIONS D’INSTALLATION DESCRIPTION : Écran inférieur de pare-chocs avant de l’Ascent CONTENU DE LA TROUSSE : Écran inférieur de pare-chocs avant x 1 Agrafe à ressort x 2 Bouchon de sûreté x 1 Lingette imbibée d’alcool x 1 OUTILS REQUIS : Tournevis à tête plate Ruban-cache SIGNIFICATION DES SYMBOLES : : Retirer : Installer : Déconnecter : Connecter : Emplacement de l’attache ou de la vis T : Couple de serrage : Desserrer : Mettre au rebut : Réutiliser DESCRIPTION Écran inférieur de pare-chocs avant de l’Ascent NUMÉRO 01 DATE 13-06-22 SUBARU OF AMERICA PAGE 1/4 2 Préparation de la surface 1 2 SK775 S’assurer que toutes les surfaces d’installation sont propres, sans taches, graisse ni résidus en utilisant une solution d’eau savonneuse. Nettoyer les zones d’adhérence du ruban indiquées avec une lingette imbibée d’alcool (fournie). Écran inférieur de pare-chocs avant Repérer l’emplacement de la fixation d’origine sous le pare-chocs et les retirer à l’aide d’un tournevis à tête plate ou d’un levier en plastique. Jeter le dispositif de retenue. 3 Retirer une section d’environ 50 mm / 2 po de la pellicule protectrice à chaque extrémité de la pièce, puis plier les sections décollées à 45 degrés. Coller la section décollée de la pellicule protectrice sur la surface extérieure de l’écran inférieur de pare-chocs avec du ruban-cache. DESCRIPTION Écran inférieur de pare-chocs avant de l’Ascent VERSION 01 DATE 13-06-22 SUBARU OF AMERICA PAGE 2/4 1 SK775 4 Mettre l’écran inférieur de pare-chocs avant en place à l’endroit qui lui convient le mieux en s’assurant que les sections de pellicule protectrice repliées demeurent à l’extérieur. 5 Placer le bouchon de sûreté de rechange fourni dans le trou central et (2) agrafes à ressort sur les côtés de l’écran inférieur de pare-chocs avant. 6 Appliquer une pression modérée vers l’avant pour que le produit soit bien placé sur le pare-chocs, puis appliquer une pression aux extrémités de l’écran inférieur du pare-chocs avant là où la pellicule protectrice double face a été retirée (comme illustré). DESCRIPTION Écran inférieur de pare-chocs avant de l’Ascent VERSION 01 DATE 13-06-22 SUBARU OF AMERICA PAGE 3/4 SK775 8 7 En appliquant une pression modérée vers le pare-chocs, tirer les sections exposées de la pellicule protectrice vers l’extrémité opposée de l’écran inférieur de pare-chocs avant, un côté à la fois (comme illustré). À l’aide d’une serviette en microfibre propre et sèche, appliquer une pression sur la surface du ruban sur l’écran inférieur de pare-chocs avant (comme illustré), d’un côté à l’autre environ cinq fois pour assurer une adhérence adéquate du ruban. DESCRIPTION Écran inférieur de pare-chocs avant de l’Ascent VERSION 01 DATE 13-06-22 SUBARU OF AMERICA PAGE 4/4
SEOCONTENT-END
This product presentation was made with AAWP plugin.