
NHTSA ID Number: 10234859
Manufacturer Communication Number: 1517314
Summary
Exterior Auto Dim Mirrors with Approach Lighting
NUMBER: 15-173-14
DATE: 05/16/14
| APPLICABILITY: | 2014-15 Forester Models |
| SUBJECT: | Exterior Auto Dim Mirrors with Approach Lighting |
INTRODUCTION
There have been a limited number of cases where the appearance of the exterior Auto Dim mirror glass has changed to having a permanent dark blue or yellowish tint (sometimes also with a pattern) as shown in the example photos below.
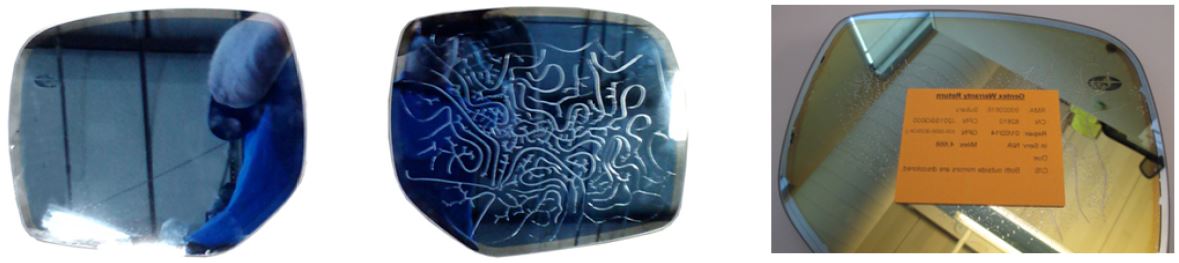
The source of this condition has been traced to a short to ground in the interior Auto Dim mirror harness as a result of improper routing during installation. The interior Auto Dim mirror controls the dimming function of the 2 exterior mirrors. This short to ground may result in excessive voltage (more than 1.6v) being applied to the Auto Dim mirror circuit. The result is damage to both exterior mirrors as described above.
PART INFORMATION
- J201SSG000 Exterior Auto Dim Mirror Kit with Approach Lighting
- H501SSG010 Interior Auto Dim Mirror wiring harness (with or without Homelink)
SERVICE PROCEDURE / INFORMATION
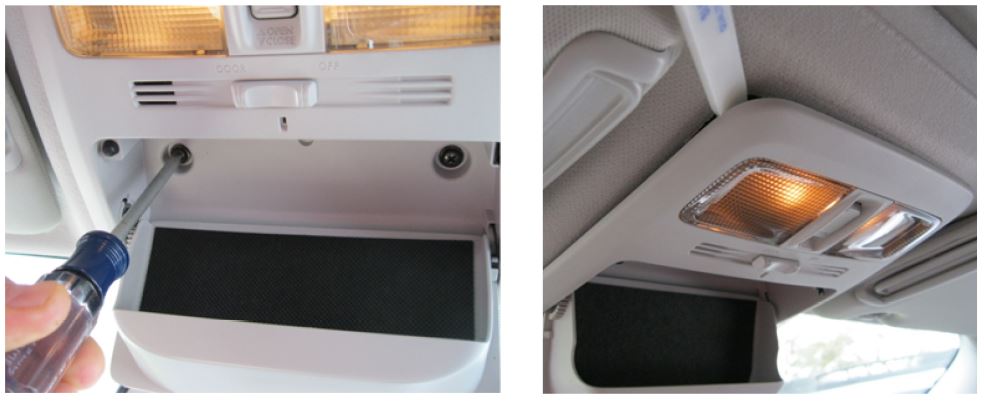
Remove the upper console / map light assembly by removing the 2 screws above the sunglass holder and CAREFULLY releasing the 2 rear retaining clips using a plastic trim tool as shown below.
Once the upper console / map light assembly is removed, CAREFULLY disconnect the map light (and if equipped, sunroof switch) harness connectors as shown below then set it aside in a safe place.
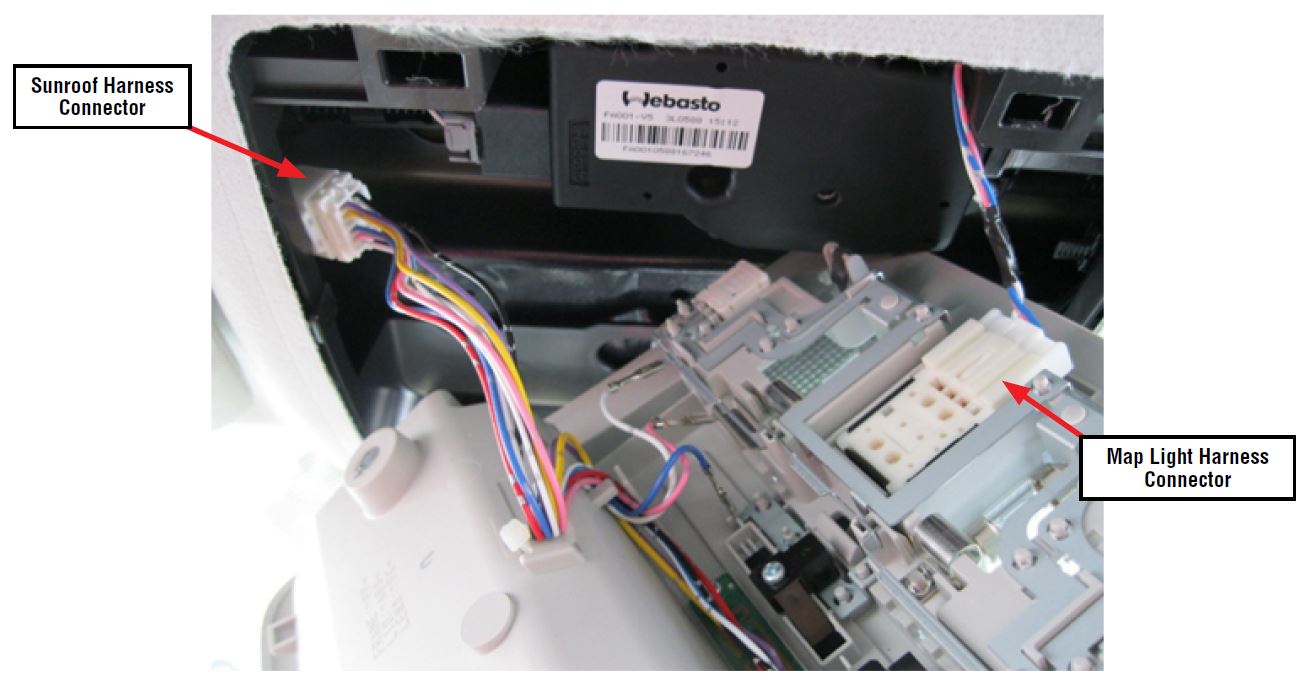
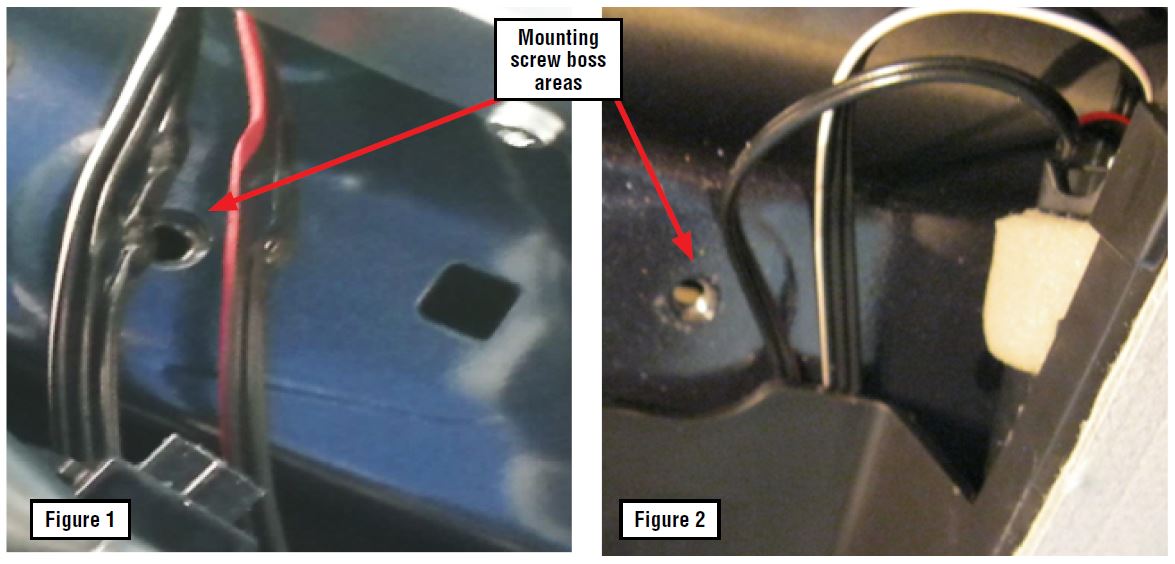
Figure 1 below shows a damaged (pinched) wiring harness. Figure 2 shows how the Auto Dim mirror harness should NOT be routed.
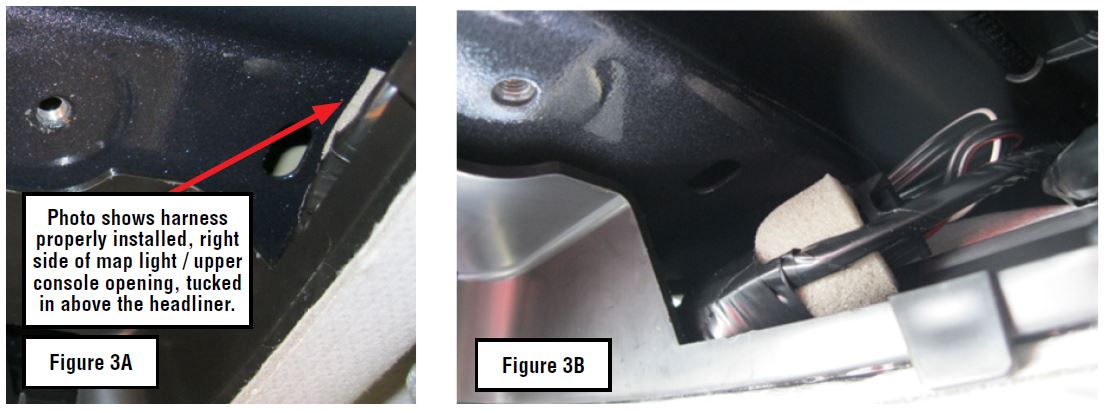
If after removing the upper console / map light assembly, harness damage is confirmed, replace the interior Auto Dim Mirror w/Compass wiring harness. Repairing this harness is not recommended. REMINDER: Always confirm any part numbers being ordered are the most up-to-date. Install the new replacement wiring harness. It must be routed as to not interfere with either of the 2 map light assembly mounting screw boss areas or any other potential harness pinch area (e.g. clips, metal brackets, etc…) then tucked above the headliner as shown in Figures 3A and 3B on the next page.
NOTE: Do not reinstall the upper console at this point as additional circuit testing is required.
After installation of the new mirror harness, remove both damaged exterior Auto Dim mirror glass assemblies following the procedure shown in the Accessory Installation Guide accessible on STIS.
J201SSG000 – 2014 Forester Exterior auto dimming mirror with approach lighting
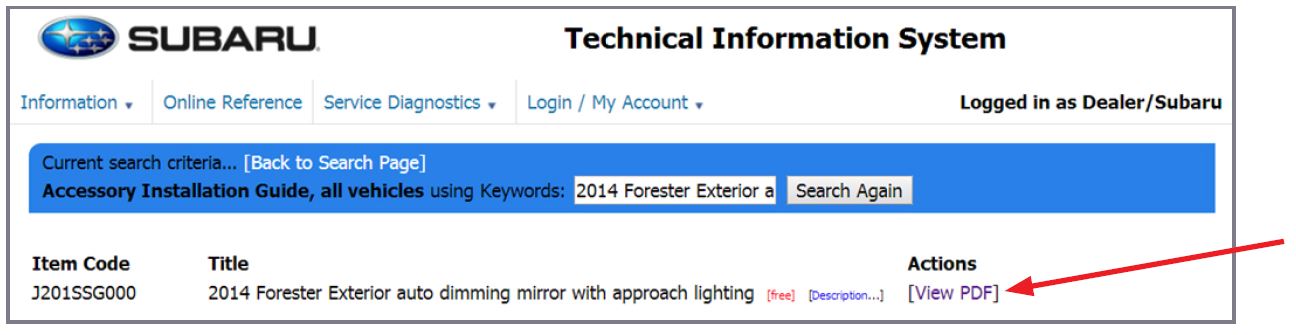
NOTE: It is recommended to download and print the .pdf of this procedure then read through it in its entirety before proceeding further as there are 18 steps to complete the mirror glass assembly replacement.
After removal of both exterior Auto Dim mirror glass assemblies, both exterior mirror circuits will need to be tested to ensure that no other concerns are present which could affect the operation of the new replacement parts.
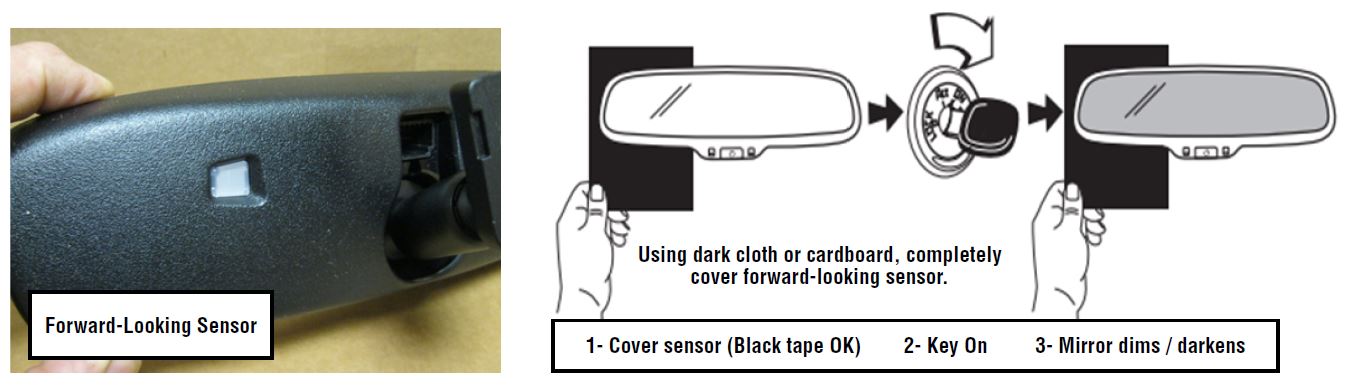
Activate the interior Auto Dim mirror by covering the forward-facing sensor while the key is in the ON or RUN position as shown in the illustrations below.
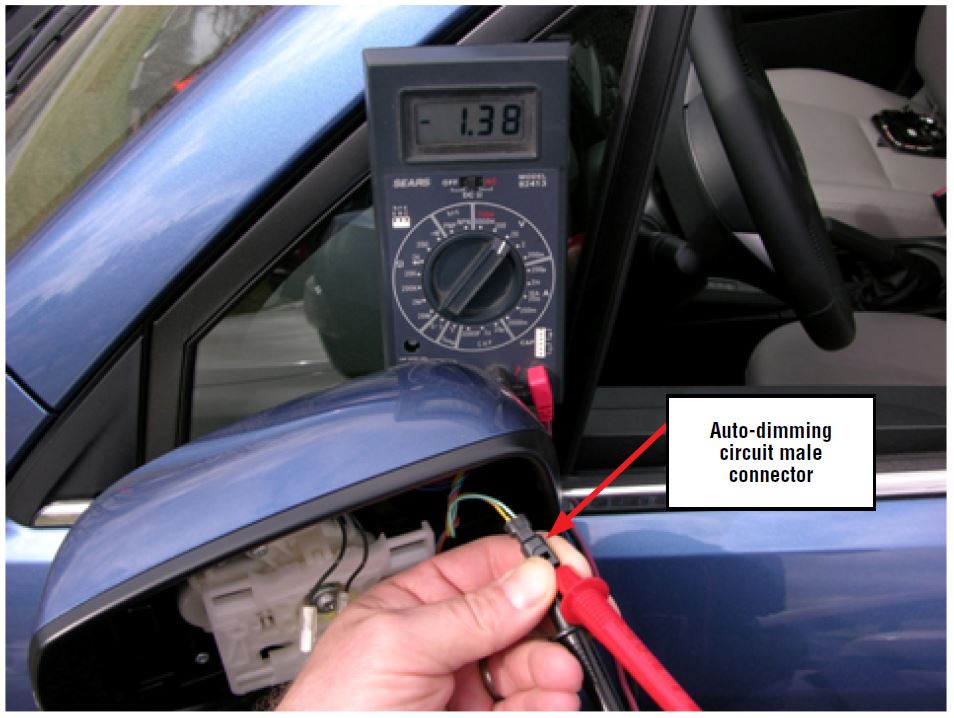
Perform the following voltage tests on BOTH exterior mirror harness connectors before installing the new Auto Dim mirror glass assemblies. With the interior Auto Dim mirror in the dimmed state, connect a DVOM set to read DC voltage. Confirm the voltage at BOTH of the Auto Dim circuit exterior mirror 2-pin harness connectors does not exceed 1.6v as shown in the photo below. If the required voltage is not present or if another electrical concern is found to exist, diagnose and repair it before proceeding.
Once the Auto Dim circuit voltage is verified as acceptable, replace both exterior Auto Dim mirror glass assemblies following the procedure in the Accessory Installation Guide referenced above.
Reinstall the upper console / map light assembly in reverse order of removal paying close attention to the following precautions:
- Refer to figures 3A and 3B above and do a final check for proper positioning of the new Auto Dim mirror harness.
- Reconnect the wire harness connector for the map lights and, if equipped with a sunroof, confirm the 6-wire harness connector is properly fitted onto its (blue) retainer as shown below.
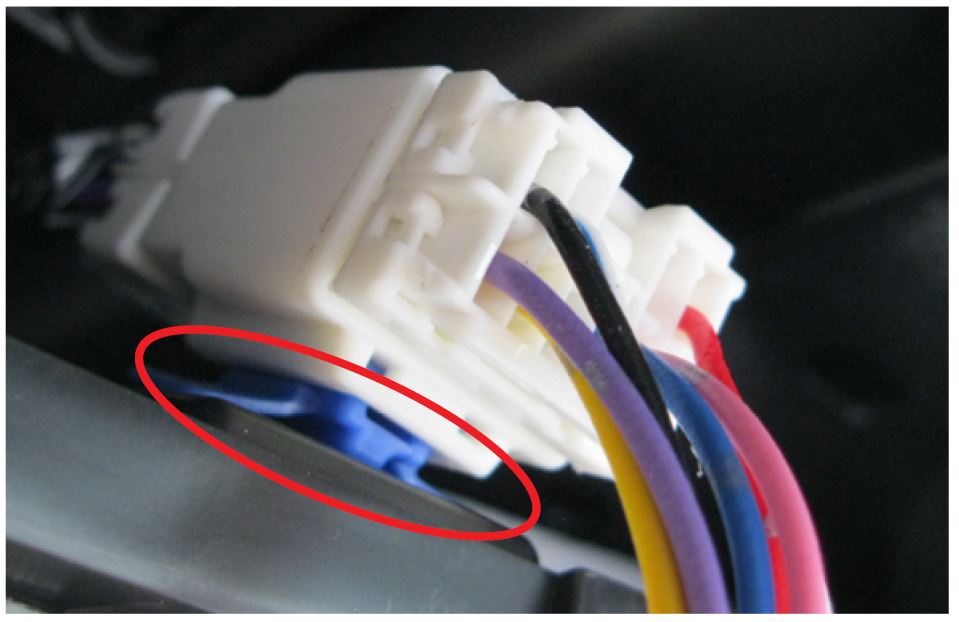
- Make sure the upper console / map light assembly’s retaining claws engage above the support properly to retain the front edge before reattaching the 2 rear edge retaining clips and the 2 mounting screws as shown below.
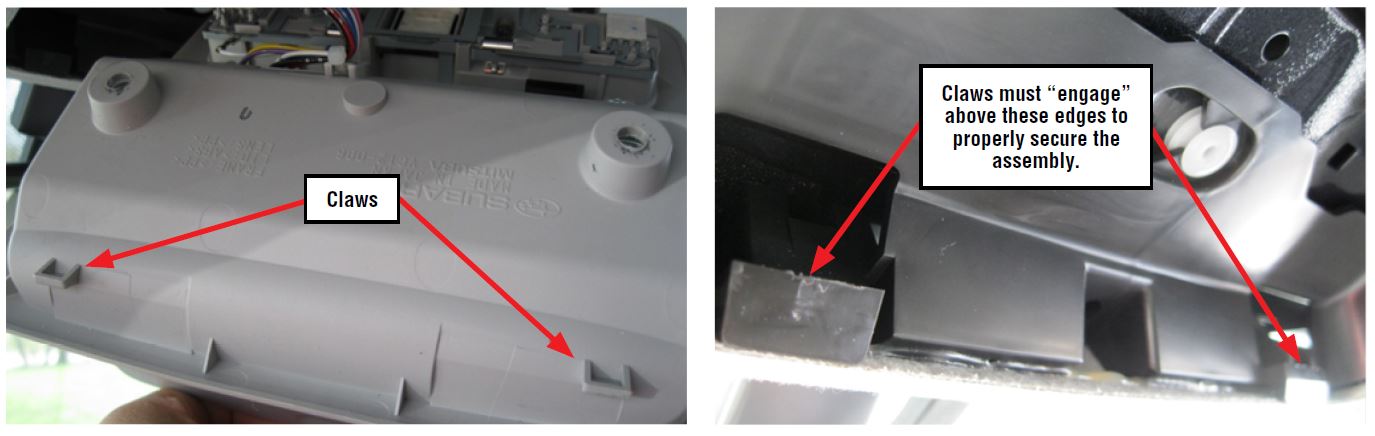
- Confirm proper operation of all 3 Auto Dim mirrors to complete procedure.
2 Affected Products
Vehicle
| MAKE | MODEL | YEAR |
| SUBARU | FORESTER | 2014-2015 |
1 Associated Document
Manufacturer Communications
NUMBER: 15-173-14
DATE: 05/16/14
MC-10234859-9999.pdf 2943.194KB
NHTSA ID Number: 10067897
Manufacturer Communication Number: 15-173-14
Summary
SUMMARY TO BE PROVIDED ON A FUTURE DATE.
1 Associated Document
Service Bulletin Document
NUMBER: 15-173-14
DATE: 05/16/14
SB-10067897-0699.pdf 2943.194KB
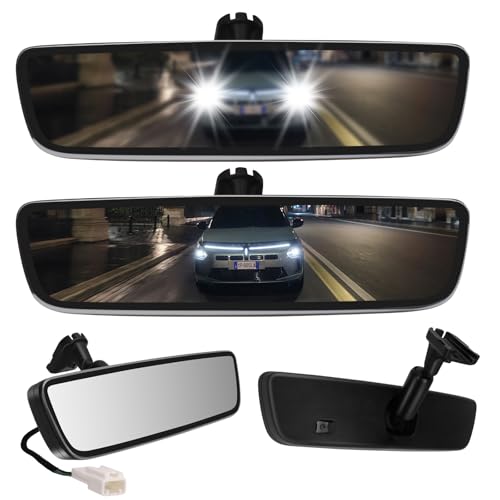
- Auto-Dimming Electrochromic Technology — Automatically darkens when bright headlights hit the rearview mirror, eliminating blinding glare instantly. No more flipping a manual tab. Safer night driving in one upgrade.
- True Universal Fit — Comes with a sliding metal bracket that adapts to most OEM button-style mounts. If your original mount doesn't match, simply swap to the included alternative metal base. Extended cable provides extra length for trucks, vans, and SUVs.
- Premium Frameless Design — Ultra-slim, sleek edge-to-edge glass with no plastic bezel. Looks OEM-pro and gives your interior a modern, clean finish
- DIY Installation (2 Options) — If your vehicle has a pre-wired plug , simply connect the plug-and-play harness and you're done. No plug? No problem — use the included extended cable and wiring kit to hardwire to your ACC fuse or dome light. Everything included: mirror, sliding bracket kit, alternative base, extended cable, wire ties, trim cover, and wrench.
- Why Upgrade from a auto dimming rear view mirror? — A basic rearview mirror costs $20-40 and does nothing. For a few dollars more, your auto-dimming mirror actively works for you every night — reducing eye strain, improving reaction time, and making every drive safer. Fits most vehicles from 2000 to present day.

- These mirrors eliminate the glare of headlights behind you for safer nighttime
- Mirror automatically dims as it detects glare
- The brighter the glare, the more the mirror dims
- Dimensions - 12 x 6.5 x 4.75 in.
- Gentex Auto-Dimming Rear View Mirrors

- AUTO_DIMMING: Automatically darkens to eliminate glare
- FRAMELESS DESIGN: Enhanced aesthetics to complement any vehicle interior
- CAR_TO_HOME AUTOMATION: Control garage doors, gates, home lighting, and more
- INTEGRATED HOMELINK 5: 99% compatibility with garage door openers and security gates
- COMPATIBILITY: Compatible with any wedge mount vehicle along with others using adapters (GENMM1, GENMM2, GENMM3)

- 1.【4.3-inch screen】: Our car rearview mirror display is a 4.3-inch color screen with a resolution of 480*272 and a 16:9 display format; the brightness of 500 cd/m2 ensures clear visibility even in bright sunlight.
- 2.【Auto-dimming function】: The HD is equipped with an automatic dimming function, which can adjust the brightness according to the ambient light conditions and automatically turn on the rearview camera screen when reversing. With an accurate distance scale line display, it can park and reverse correctly, making parking and reversing more convenient and .
- 3.【ABS shell】Our interior rear view mirror made of high-quality and materials. ABS shell, not only ensures its service life, but also adds a stylish and modern feel to your car interior.
- 4.【Practicality】Our 4.3-inch rearview mirror automatic dimming display is designed to provide high-definition and automatic dimming reversing images, solving the problem of poor rearview effect of the car and ensuring a safer parking and reversing experience.
- 5. 【Package List】The package contains 1 car rearview mirror monitor, 1 video cable and power cable, 1 extra cable cover, 1 English manual, 1 bracket and 5 screws, providing everything you need for easy and worry- installation.

- Auto-Dimming
- Integrated Compass
- Homelink integration
- Back Lit Buttons
SEOCONTENT-START
Bulletin Number: 15-173-14; Date: 05/16/14 Page 1
INTRODUCTION
There have been a limited number of cases where the appearance of the exterior Auto Dim mirror
glass has changed to having a permanent dark blue or yellowish tint (sometimes also with a pattern)
as shown in the example photos below.
The source of this condition has been traced to a short to ground in the interior Auto Dim mirror
harness as a result of improper routing during installation. The interior Auto Dim mirror controls
the dimming function of the 2 exterior mirrors. This short to ground may result in excessive voltage
(more than 1.6v) being applied to the Auto Dim mirror circuit. The result is damage to both exterior
mirrors as described above.
PART INFORMATION
• J201SSG000 Exterior Auto Dim Mirror Kit with Approach Lighting
• H501SSG010 Interior Auto Dim Mirror wiring harness (with or without Homelink®)
SERVICE PROCEDURE / INFORMATION
Remove the upper console / map light assembly by removing the 2 screws above the sunglass holder
and CAREFULLY releasing the 2 rear retaining clips using a plastic trim tool as shown below.
NUMBER: 15-173-14
DATE: 05/16/14
APPLICABILITY: 2014-15 Forester Models
SUBJECT: Exterior Auto Dim Mirrors with Approach Lighting
SERVICE BULLETIN
ATTENTION:
GENERAL MANAGER q
PARTS MANAGER q
CLAIMS PERSONNEL q
SERVICE MANAGER q
IMPORTANT – All
Service Personnel
Should Read and
Initial in the boxes
provided, right.
Continued…
CAUTION: VEHICLE SERVICING PERFORMED BY UNTRAINED PERSONS COULD
RESULT IN SERIOUS INJURY TO THOSE PERSONS OR TO OTHERS.
Subaru Service Bulletins are intended for use by professional technicians ONLY. They
are written to inform those technicians of conditions that may occur in some vehicles, or
to provide information that could assist in the proper servicing of the vehicle. Properly
trained technicians have the equipment, tools, safety instructions, and know-how
to do the job correctly and safely. If a condition is described, DO NOT assume that this
Service Bulletin applies to your vehicle, or that your vehicle will have that condition.
SUBARU OF AMERICA, INC. IS
“ISO 14001 COMPLIANT”
The international standard for excellence
in Environmental Management Systems.
Please recycle or dispose of automotive
products in a manner that is friendly to our
environment and in accordance with all
local, state and federal laws and regulations.
Bulletin Number: 15-173-14; Date: 05/16/14 Page 2
Once the upper console / map light assembly is removed, CAREFULLY disconnect the map light
(and if equipped, sunroof switch) harness connectors as shown below then set it aside in a safe place.
Figure 1 below shows a damaged (pinched) wiring harness. Figure 2 shows how the Auto Dim mirror
harness should NOT be routed.
If after removing the upper console / map light assembly, harness damage is confirmed, replace the
interior Auto Dim Mirror w/Compass wiring harness. Repairing this harness is not recommended.
REMINDER: Always confirm any part numbers being ordered are the most up-to-date. Install
the new replacement wiring harness. It must be routed as to not interfere with either of the 2 map
light assembly mounting screw boss areas or any other potential harness pinch area (e.g. clips, metal
brackets, etc…) then tucked above the headliner as shown in Figures 3A and 3B on the next page.
NOTE: Do not reinstall the upper console at this point as additional circuit testing is required.
Continued…
Figure 1 Figure 2
Mounting
screw boss
areas
Sunroof Harness
Connector
Map Light Harness
Connector
Bulletin Number: 15-173-14; Date: 05/16/14 Page 3
After installation of the new mirror harness, remove both damaged exterior Auto Dim mirror glass
assemblies following the procedure shown in the Accessory Installation Guide accessible on STIS.
NOTE: It is recommended to download and print the .pdf of this procedure then read through it
in its entirety before proceeding further as there are 18 steps to complete the mirror glass assembly
replacement.
After removal of both exterior Auto Dim mirror glass assemblies, both exterior mirror circuits will
need to be tested to ensure that no other concerns are present which could affect the operation of the
new replacement parts.
Activate the interior Auto Dim mirror by covering the forward-facing sensor while the key is in the
ON or RUN position as shown in the illustrations below.
Perform the following voltage tests on BOTH exterior mirror harness connectors before installing
the new Auto Dim mirror glass assemblies. With the interior Auto Dim mirror in the dimmed state,
connect a DVOM set to read DC voltage. Confirm the voltage at BOTH of the Auto Dim circuit
exterior mirror 2-pin harness connectors does not exceed 1.6v as shown in the photo below. If the
required voltage is not present or if another electrical concern is found to exist, diagnose and repair it
before proceeding.
Figure 3B
Photo shows harness
properly installed, right
side of map light / upper
console opening, tucked
in above the headliner.
Figure 3A
1- Cover sensor (Black tape OK) 2- Key On 3- Mirror dims / darkens
Using dark cloth or cardboard, completely
cover forward-looking sensor.
Continued…
Forward-Looking Sensor
Bulletin Number: 15-173-14; Date: 05/16/14 Page 4
Once the Auto Dim circuit voltage is verified as acceptable, replace both exterior Auto Dim mirror
glass assemblies following the procedure in the Accessory Installation Guide referenced above.
Reinstall the upper console / map light assembly in reverse order of removal paying close attention to
the following precautions:
• Refer to figures 3A and 3B above and do a final check for proper positioning of the new Auto
Dim mirror harness.
• Reconnect the wire harness connector for the map lights and, if equipped with a sunroof,
confirm the 6-wire harness connector is properly fitted onto its (blue) retainer as shown
below.
Auto-dimming
circuit male
connector
Continued…
Bulletin Number: 15-173-14; Date: 05/16/14 Page 5
• Make sure the upper console / map light assembly’s retaining claws engage above the support
properly to retain the front edge before reattaching the 2 rear edge retaining clips and the 2
mounting screws as shown below.
• Confirm proper operation of all 3 Auto Dim mirrors to complete procedure.
WARRANTY / CLAIM INFORMATION
For vehicles within the Basic New Car Limited Warranty period, this repair may be claimed using the
following information:
LABOR DESCRIPTION LABOR
OPERATION #
FAIL
CODE
LABOR
TIME
EXTERIOR AUTO DIMMING MIRROR REPAIR A063-804 ZPV-38 0.5
Claws
Claws must “engage”
above these edges to
properly secure the
assembly.
**************************************************************************************************************
**************************************************************************************************************
SEOCONTENT-END
This product presentation was made with AAWP plugin.