| “This site contains affiliate links for which OEMDTC may be compensated” |
NUMBER: 12-184-15
DATE: 05/28/15
| APPLICABILITY: | 2008-09 and Early-Production 2010MY Impreza, WRX and STI and STI Models with Manual Transmission Models with Manual Transmission |
| SUBJECT: | Creak / Popping-Type Sound from Clutch Pedal Bracket Welds |
INTRODUCTION
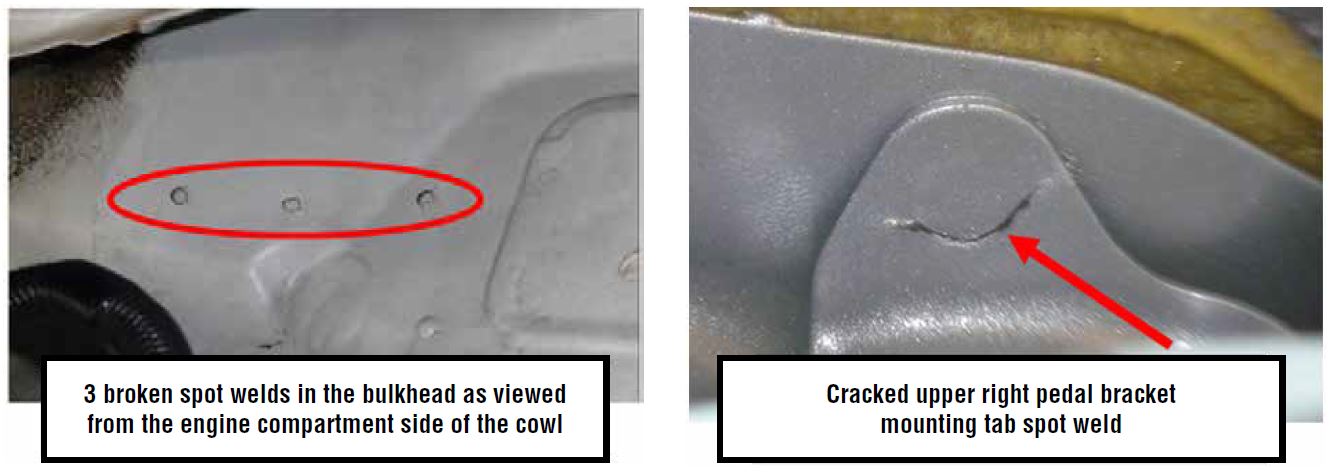
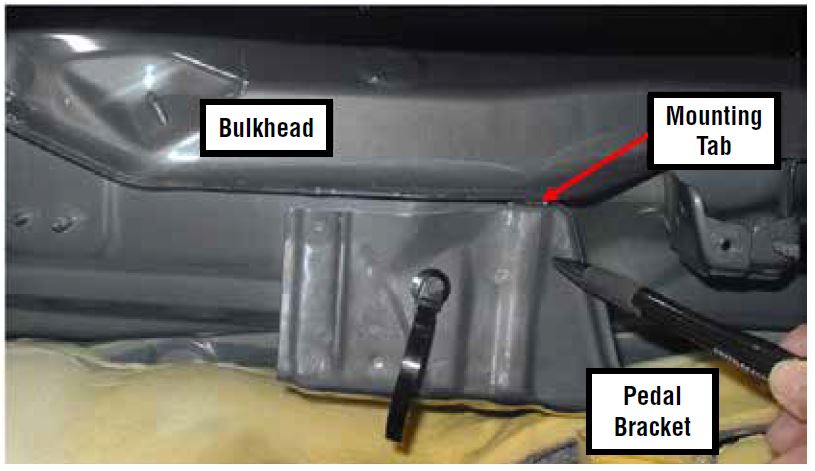
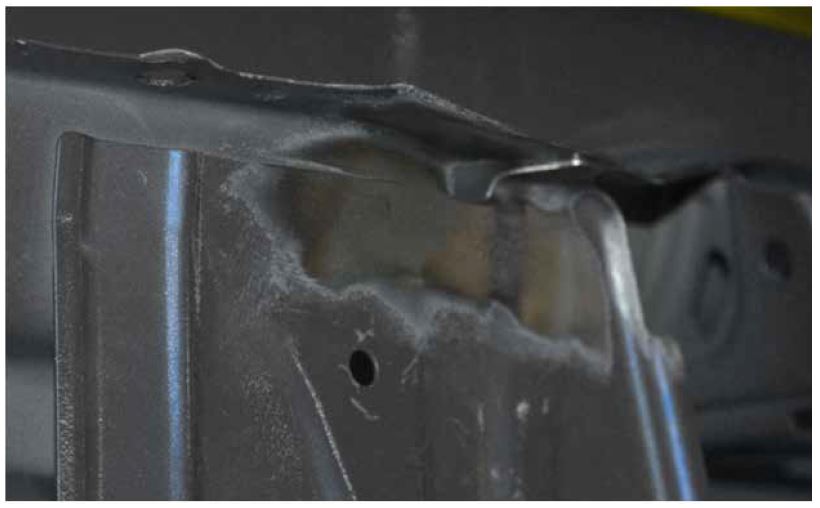
If you receive a customer concern of a creak or popping-type sound heard when depressing the clutch pedal, there is a possibility the spot weld(s) attaching the clutch pedal bracket to the bulkhead and / or a pedal bracket mounting tab may be broken. The result is increased flexing of the pedal bracket and / or bulkhead which can cause the sound to occur. Our investigation has revealed that although the condition is infrequent, it typically occurs as a result of vehicle modifications (e.g. aftermarket racing clutches), competitive driving or vehicle abuse. The photos below show examples of broken cowl area spot welds and a cracked pedal bracket mounting tab spot weld.
COUNTERMEASURE IN PRODUCTION:
The thickness of the pedal bracket was changed from 1.0mm to 1.4mm and one additional weld was added in production on August 17, 2009 starting with the following VINs:
SERVICE PROCEDURE / INFORMATION
IMPORTANT: This repair involves welding procedures and minor paint refinishing work to be performed inside the cabin of the vehicle. It cannot be over-emphasized that any and all of the proper precautions to protect the interior of the vehicle MUST be taken. From grinding sparks generated during the preparation steps to actual welding-related hazards like sparks, hot welding spatter, and paint over-spray, it is imperative that every precaution MUST be taken to protect the entire vehicle interior. It is also critical to protect the inside of the windshield from these same hazards as the glass surface can easily be damaged if left uncovered.
Unless your Service Department has their own in-house Body Shop, these repairs must be sublet to a certified Body Shop who will be better suited to handle this type of repair.
NOTE: The photos used throughout this bulletin were collected from a variety of vehicles to help better illustrate the condition, inspection and repair procedure and show the desired results.
VEHICLE INSPECTION
The inspection consists of 3 steps:
Step 1-
- Determine if the vehicle has been modified in a way which would otherwise void the warranty for the pedal bracket assembly or related components (i.e., results of abuse, racing or other competitive driving, major modifications, self-help repairs, etc.)
- If you believe there has been modification or vehicle abuse which may have contributed to this condition, do not deny repairs solely based on this. Contact the Subaru
 Claims Helpline at 1-866-782-2782 to review any concerns which could affect coverage of this repair.
 - Do not deny repairs simply because the car is no longer under any warranty coverage. Contact the Subaru
 Claims Helpline at 1-866-782-2782 to review for possible coverage of this repair.
Step 2-
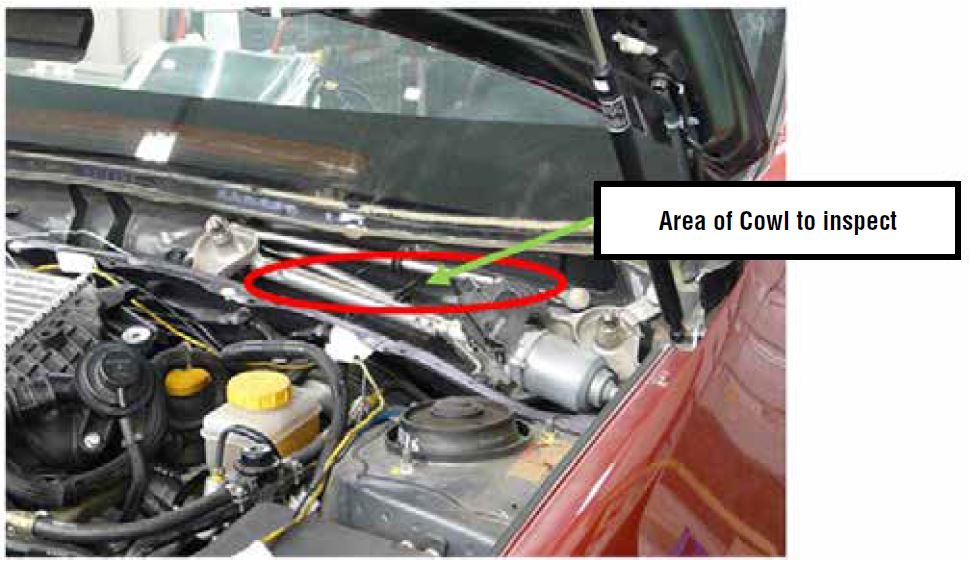
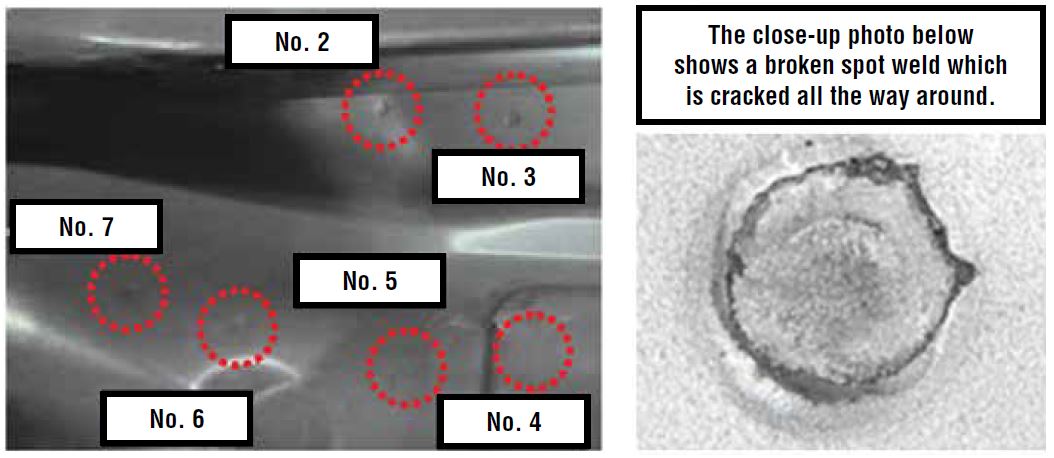
- Remove the windshield wiper arms, plastic cowl trim panel and the complete windshield wiper assembly following the procedures outlined in the applicable Service Manual. With the wiper assembly removed, inspect the now visible bulkhead (cowl area) spot welds for any cracks or breaks. Use the photo at the top of page 3 as reference (spot weld No. 1 is not visible in this view).
- If any spot welds or surrounding metal visible from the cowl area on the engine compartment side are cracked or broken, welding repairs will be needed. Regardless if weld damage is found or not, proceed to Step 3.
Step 3-
- Following the applicable Service Manual procedure, remove the instrument panel (IP) assembly.
- Once the IP assembly is removed, inspect the pedal bracket and bracket spot welds from above and below for any signs of cracking or breakage.
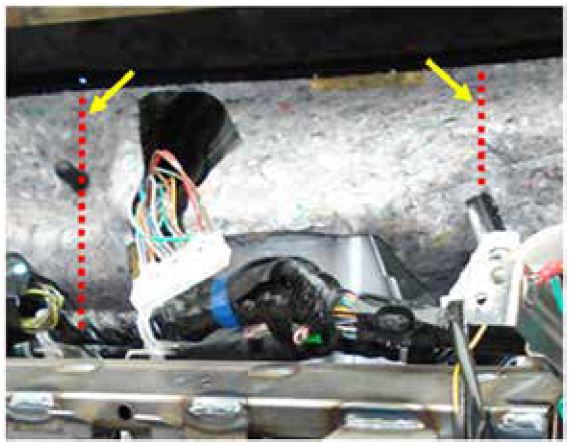
- The sound insulation pad will need to be unclipped then CAREFULLY cut and peeled back where indicated in the photo below to expose and gain access to the pedal bracket welds.
If any of the pedal bracket spot welds, the bracket itself or the surrounding metal is confirmed to be cracked or broken, welding repairs will be necessary. If no visible weld damage is found, operate the clutch and / or brake pedal additional times to confirm the source of the sound or feeling is not coming from the bracket or its spot welds.
If the sound or feeling is coming from the bracket or its spot welds, proceed with welding repairs to reinforce the bracket.
If the sound is not coming from the bracket, look for another cause for the condition found in Step 1 unrelated to the pedal bracket. A set of Chassis Ears may help to isolate the source. Reassemble the instrument panel and cowl areas following the procedures outlined in the applicable Service Manual. Consult with the customer to determine if further inspection or repair is desired as the inspection process relating to this bulletin is now complete and the repair procedures in this bulletin do not apply.
REPAIR PROCEDURE:
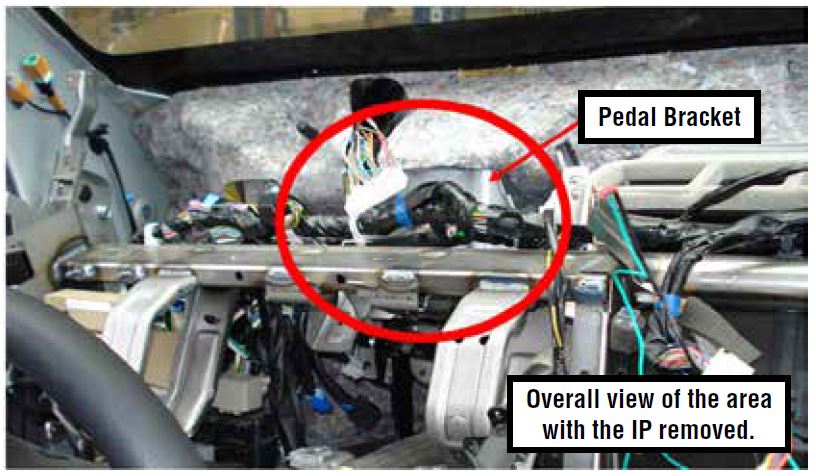
- After CAREFULLY removing the instrument panel (IP) assembly following the procedures outlined in the applicable Service Manual, set it aside in a safe place to protect it. With the IP removed as shown in the photo below, a thorough inspection of the pedal bracket and all of the other spot welds securing it to the bulkhead must be performed if not previously checked during the inspection procedure.
- The photo above shows a view of the pedal bracket and the surrounding bulkhead area (IP wiring harness removed).
- Use an abrasive disc to clean the paint from the affected areas where new welds will be applied.
- The recommended welding process for this repair procedure is MIG (GMAW), Metal Inert Gas (or wire-feed). In order to minimize heat transfer and minimize the affected weld zone, the new welds should be short duration or “stitch” welds with good penetration to secure the pedal bracket to the bulkhead as opposed to a continuous weld bead which will apply too much heat to the work.
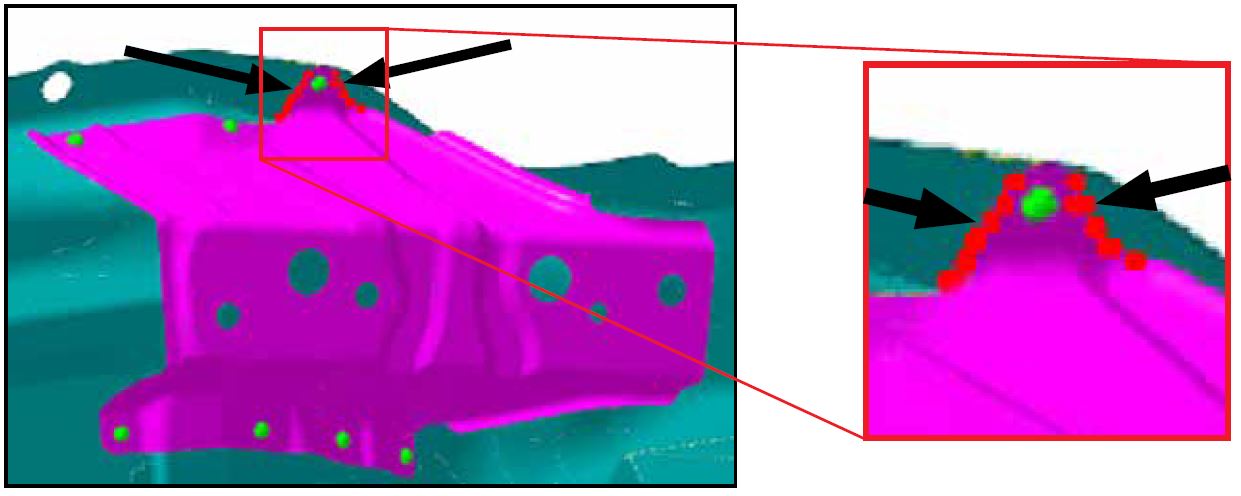
IMPORTANT: The only exception is the upper mounting tab which must have a continuous bead of weld along the edges of the mating surface as shown in red in the illustration below. Depending on how many broken welds are found, once they have been addressed, the number of additional (new) stitch welds to be added should not be in excess. Refer to the completed repair photos below.
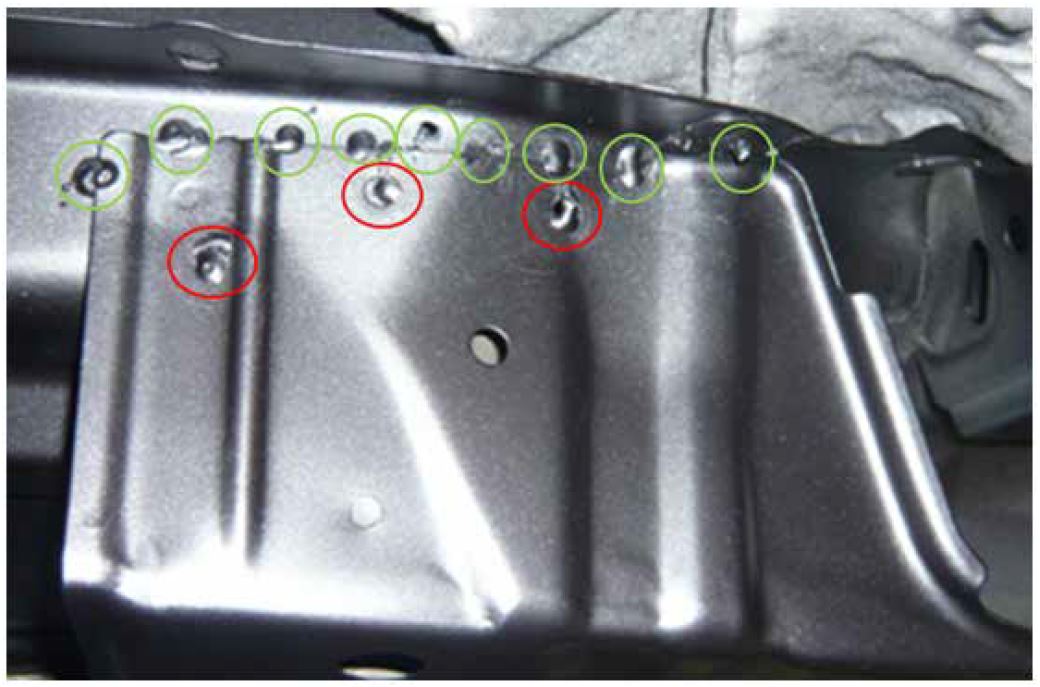
- The photo below shows a repair that has good stitch welding but still needs the continuous welds added to each side of the mounting tab. Note the repaired factory spot welds (circled in red) and the 9 additional stitch welds added along the top edge (circled in green).
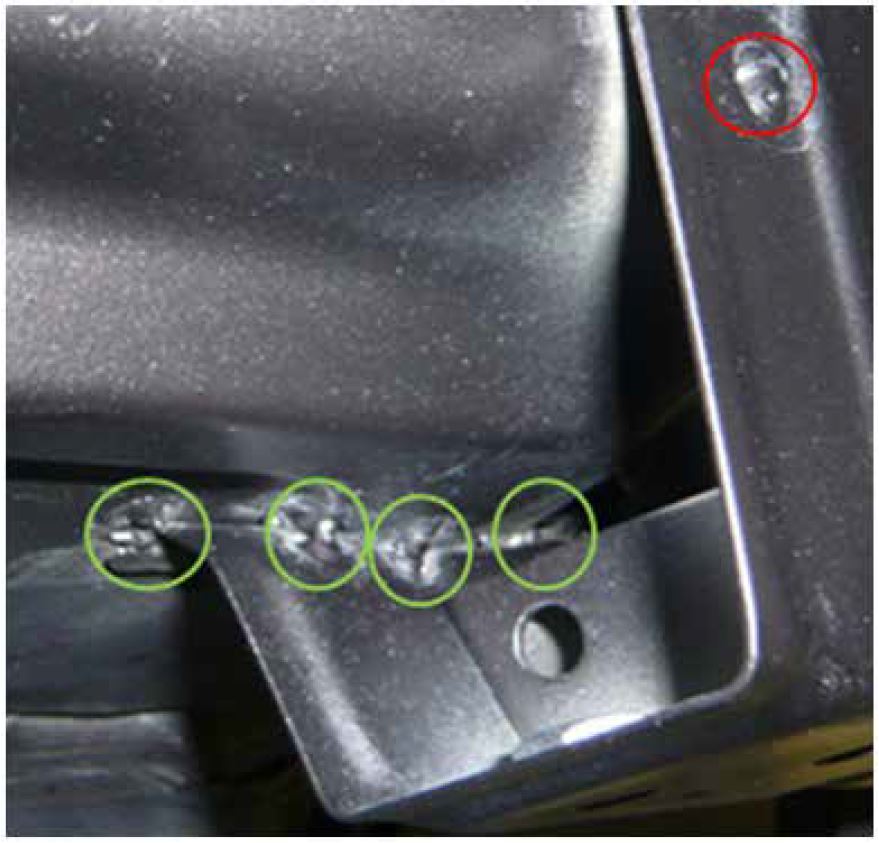
- Add a small number of additional stitch welds to the bottom of the pedal bracket as shown in the photo below. Gaining sufficient access to this area will require additional disassembly (removal of dash beam, HVAC unit etc.).
NOTE: Time to evacuate and recharge the HVAC system has been included in the repair times listed in the Warranty / Claims section of this bulletin.
- After the welding operation is complete, operate the clutch and brake pedals to confirm no unusual sounds or movement still exist from the pedal bracket.
- If the quality inspection produces good results, the repaired areas along with the corresponding engine compartment side cowl area must be cleaned, etch-primed and refinished.
- When the refinishing is complete, reassemble the vehicle in reverse order of disassembly.
Always confirm proper operation of all related vehicle systems before releasing the vehicle.
WARRANTY / CLAIM INFORMATION:
The original limited, written warranty for these vehicles was three (3) years or 36,000 miles. Subaru of America, Inc. (SOA) has decided to extend the original warranty for pedal bracket spot weld cracks or breakage for an additional one (1) year or 12,000 miles, whichever occurs first.
SOA informed vehicle owners of a possibility this condition may exist via a customer letter and stated they can schedule an appointment with an authorized Subaru retailer for a free visual inspection of the pedal bracket and spot welds. This offer expires November 30, 2015. SOA will reimburse retailers for each inspection completed. Please submit for reimbursement as you would any other covered repair using the claim coding provided below.
Your physical inspection of the vehicle may reveal the pedal bracket and / or bulkhead is cracked or broken around the spot weld(s). If so, we ask you to determine if any of the following conditions apply:
- Abuse
- Racing or other competitive driving
- Major modifications
- Self-help repairs
If any of the above listed conditions apply that would normally exclude coverage under the New Car Basic Warranty, the Warranty Extension, or Added Security Gold coverage, do not automatically deny the repairs. Contact the Claims Helpline at 1-866-782-2782 to review the case details with a representative before proceeding with or denying coverage as the necessary repairs may be covered as a Policy Adjustment (PAR) claim.
If none of the above listed conditions apply, proceed with repairs through a qualified repair facility and using one of the following coverages. If authorization is required, contact the Subaru Claims Helpline at 1-866-782-2782.
- Basic New Car Limited Warranty (Repairs over $500 require PRIOR authorization)
- Basic New Car Limited Warranty Extension (4 years/48,000 miles from the Warranty Start Date. Repairs over $500 require PRIOR authorization)
- Subaru
 Added Security Gold (Repairs over $1500 require PRIOR authorization)
 - Policy Adjustment Request (Repairs over $1500 or over 100,000 miles require PRIOR authorization)
| LABOR DESCRIPTION | LABOR OPERATION # | FAIL CODE | LABOR TIME |
|---|---|---|---|
| CLUTCH PEDAL SQUEAK SOUND DIAGNOSIS (STEP 1) | B316-200 | SBL-51 | 1.8 |
| CLUTCH PEDAL SQUEAK SOUND, WELDING & REFINISH | C316-203 | 8.2 | |
| SUBLET REPAIR, ADMINISTRATION EXPENSES | C101-108 | 0.3 |
NOTE: SOA will manage the customer reimbursement process for any customer who has previously paid for this repair. In the event you receive questions from customers regarding eligibility requirements and reimbursement procedures, direct them to contact Customer Retailer Services at: 1-800-782-2783.
REMINDER: SOA strongly discourages the printing and/or local storage of service information as previously released information and electronic publications may be updated at any time.
Always refer to STIS for the latest service information before performing any repairs.
