| “This site contains affiliate links for which OEMDTC may be compensated” |
SUMMARY:
Subaru of America, Inc. (Subaru
 ) is recalling certain 2015 and 2016 model year Subaru
 Legacy 4-Door and Outback vehicles manufactured July 3, 2015, to July 27, 2015. Transmission oil may leak from a deformed seal cap on the propeller shaft yoke.
CONSEQUENCE:
If the transmission oil leaks onto the exhaust pipe, there is a possible risk of fire.
REMEDY:
Subaru will notify owners, and dealers will replace the propeller shaft, free of charge.
The recall began on August 28, 2015.
Owners may contact 1-800-782-2783.
Subaru ’s number for this recall is WQU-56.
NOTES:
Owners may also contact the National Highway Traffic Safety Administration Vehicle Safety Hotline at 1-888-327-4236 (TTY 1-800-424-9153), or go to www.safercar.gov.
Check if your Subaru has a Recall
NUMBER: WQU-56R
DATE: August 2015
REVISED: September 15, 2015
NHTSA ID: 15V-502
| APPLICABILITY: | 2015-2016 Legacy and Outback |
| SUBJECT: | Propeller Shaft Oil Seal Failure |
INTRODUCTION
Subaru of America, Inc. (Subaru
 ) is recalling certain 2015 and 2016 model year Legacy and Outback vehicles.
AFFECTED VEHICLES
Not all vehicles listed below are covered by this recall. Coverage for all affected vehicles must be confirmed by using the Vehicle Coverage Inquiry function on subarunet.com. This data is now available.
| MODEL YEAR | MODEL | STARTING PRODUCTION DATE | ENDING PRODUCTION DATE |
|---|---|---|---|
| 2015 & 2016 | Legacy | July 3, 2015 | July 25, 2015 |
| 2015 & 2016 | Outback | July 3, 2015 | July 27, 2015 |
DESCRIPTION OF THE SAFETY HAZARD
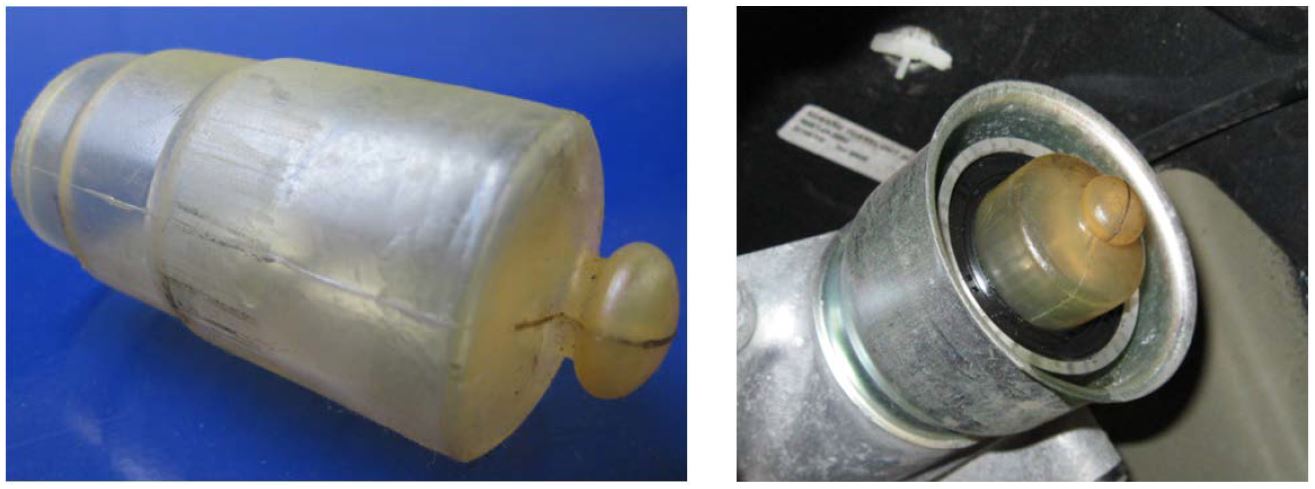
During the manufacturing process of the propeller shaft that connects to the vehicle’s transmission, the seal cap and seal located inside the propeller shaft yoke may have been deformed. As a result, the seal may leak transmission fluid. If the transmission fluid leaks onto an exhaust pipe, there is a possible risk of fire.
DESCRIPTION OF THE REMEDY
The propeller shaft assembly will be replaced at no charge.
SUBARU RETAILER PROGRAM RESPONSIBILITY
A STOP SALE order has been issued. Any vehicles listed in a recall/campaign that are in retailer stock must be:
- Immediately identified.
- Tagged or otherwise marked to prevent their delivery or use prior to inspection and/or repair.
- Repaired in accordance with the repair procedures outlined in this Product Campaign Bulletin.
Retailers are to promptly perform the applicable service procedures to correct all affected vehicles in their inventory (used, demo & SSLP). Additionally, whenever a vehicle subject to this recall is taken into retailer inventory, or in for service, necessary steps should be taken to ensure the recall correction has been made before selling or releasing the vehicle.
OWNER NOTIFICATION
Subaru will notify potentially affected vehicle owners by first class mail. This is expected to occur in late August. Retailers will be advised when owner notification begins. A copy of the owner notification letter is at the end of this bulletin.
RETAILER AFFECTED VIN LISTS
Each Subaru retailer will receive an affected VIN list from their Zone Office prior to owner notification. Vehicles will be assigned based on the selling retailer information in Subaru
 ’s system. Retailers should use this information to contact owners to schedule this repair.
PARTS INFORMATION
Parts will start to be distributed the week of August 10. It is expected that all parts will be distributed by the week of August 17. Retailers should not order parts. Parts will be allocated and shipped based on sold vehicles and retailer inventory.
Detailed information will be posted on subarunet.com as shipments are arranged. If you have any questions regarding the shipments, please contact the Parts Information Coordinators at (866)782-2782.
Listed below are the parts required for this repair, and and their applicability. Please be sure to use the correct parts and quantities for the model being repaired.
| DESCRIPTION | PART NUMBER | APPLICATION | QUANTITY |
|---|---|---|---|
| PROPELLER SHAFT AY NCV | 27111AL00A | Legacy H6 | 1 |
| 27111AL01A | Outback H6 | 1 | |
| 27111AL02A | Legacy H4 | 1 | |
| 27111AL03A | Outback H4 | 1 | |
| GASKET CR | 44022AA123 | All | 1 |
| GASKET EPF | 44011AC030 | All H4 | 2 |
| 44011AG040 | All H6 | 2 | |
| GASKET EPR | 44011AL000 | All | 1-H4, 2-H6 |
| SELF-LOCKING NUT | 902350001 | All | 2-H4, 4-H6 |
| GASKET FILLER PLUG | 803918060 | All | 1 |
NOTE: For the purposes of this campaign, the above listed parts will be shipped in appropriate quantities and combinations with the related propeller shaft assembly. Gaskets and nuts will be in a separate box packed inside the main box containing the propeller shaft.
REPAIR PROCEDURE
This campaign involves replacement of the propeller shaft assembly. During assembly of the front slip yoke component of the propeller shaft, the sealing cap may have become deformed resulting in the possibility of a transmission fluid leak. Fluid leaking from the deformed sealing cap may leak onto the exhaust system. Because none of the propeller shaft components are serviceable, the assembly must be replaced. The following information outlines the procedure for replacing the propeller shaft assembly.
- Before installation, inspect the new propeller shaft for:
- Dents or cracks on the tube surfaces
- U-joint bind or abnormal noise
- Center support bearing for excess free-play, noise or binding
- Oil seals for wear or damage
- Record the customer’s radio station presets and (navigation system favorites where applicable).
- Place the select lever in neutral.
- Release the parking brake.
- Disconnect the ground terminal from the battery sensor.
- Raise the vehicle.
- Remove the plastic engine under cover. CAUTION: The exhaust system may be HOT.
- Remove the center exhaust pipe retaining nuts and spring bolts and separate the center exhaust pipe from the front exhaust pipe assembly. Retain the nuts, springs, and bolts for later reuse. Use brake parts cleaner to clean the bolt threads if contaminated with any leaked oil or fluid.
- Disconnect the A/F and O2 Sensor wiring harness connectors.
- Remove the bolt(s) which hold the center exhaust pipe assembly to the hanger bracket.
- Remove the nuts holding the front exhaust pipe onto the cylinder heads. Retain these nuts for reuse.
CAUTION: The front exhaust pipe assembly is heavy and the heat shield edges can be very sharp. Use appropriate personal protective equipment (PPE) and care while lifting.
- Remove the front and center exhaust pipe from vehicle as an assembly.
- Remove the exhaust pipe heat shield.
CAUTION: The edges of the heat shield can be very sharp. Use appropriate PPE.
- Apply a thin coat of spray type (NON-SILICONE) lubricant to the mating areas of cushion rubber(s) to ease pipe disengagement. Remove the bolts and self-locking nuts securing the muffler(s) to the rear exhaust pipe and remove the rear exhaust pipe. Retain the bolts for reuse. Use brake parts cleaner to clean the bolt threads of any residual oil or fluid before installation.
NOTE: The self-locking nuts for the muffler installation and all the exhaust system’s gaskets are one-time use items.
CAUTION: Where applicable, take precautions to keep the muffler(s) from contacting the underside of the rear bumper cover.
- Apply a coating of CVT fluid to the machined surface of the new propeller shaft slip yoke.
- Loosen but do not remove the 2 bolts securing the center support of the propeller shaft.
- Remove the 4 nuts securing the propeller shaft to the differential input flange.
- Remove the 2 center support bolts and remove the propeller shaft.
- Install an extension plug into the back of the transmission or secure a plastic bag to the extension housing to catch any leaking CVT fluid once the old propeller shaft is removed.
IMPORTANT NOTE: There will be a very small amount of CVT fluid that will drip out of the transmission and the slip yoke after removing it from the transmission. Always make sure to thoroughly clean any fluid residue off of the exhaust system and surrounding components.
- Remove the plug or bag, insert the new propeller shaft into the extension housing and install the bolts securing the center support to the body. Torque the bolts to 52 Nm (38.4 ft. lbs.).
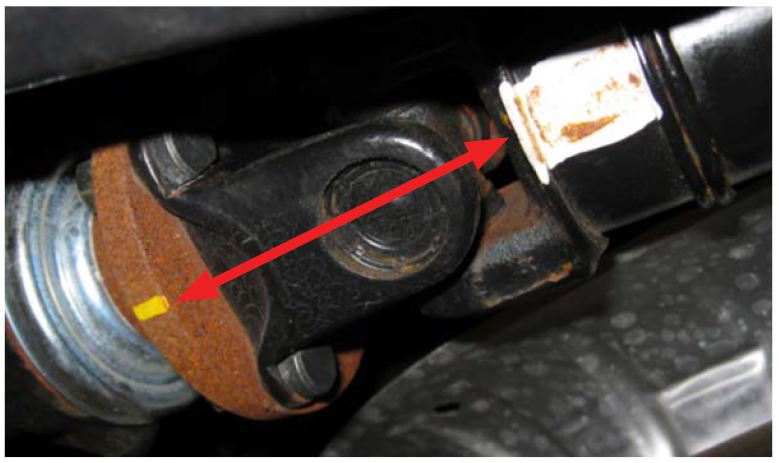
- If there is a paint mark on the new propeller shaft, align it with the paint mark on the differential input flange as shown below. Use brake parts cleaner to make sure the 4 propeller shaft bolts and nuts are clean before reinstalling them. Torque the nuts to 31 Nm (22.9 ft. lbs.).

- Reinstall the heat shield and torque the 4 bolts to 18 Nm (13.3 ft. lbs.).
- Reinstall the rear exhaust pipe assembly using new rear gasket(s) and self-locking nuts to secure the muffler(s). Torque the new self-locking nuts to 48 Nm (35.4 ft. lbs.).
- Reinstall the front exhaust pipe assembly using new gaskets. Temporarily tighten the nuts holding the assembly to cylinder heads.
- Reinstall the bolt(s) which hold the center exhaust pipe to the hanger bracket and torque to 35 Nm (25.8 ft. lbs.) for H4 models and 30 Nm (22.1 ft. lbs.) for H6 models.
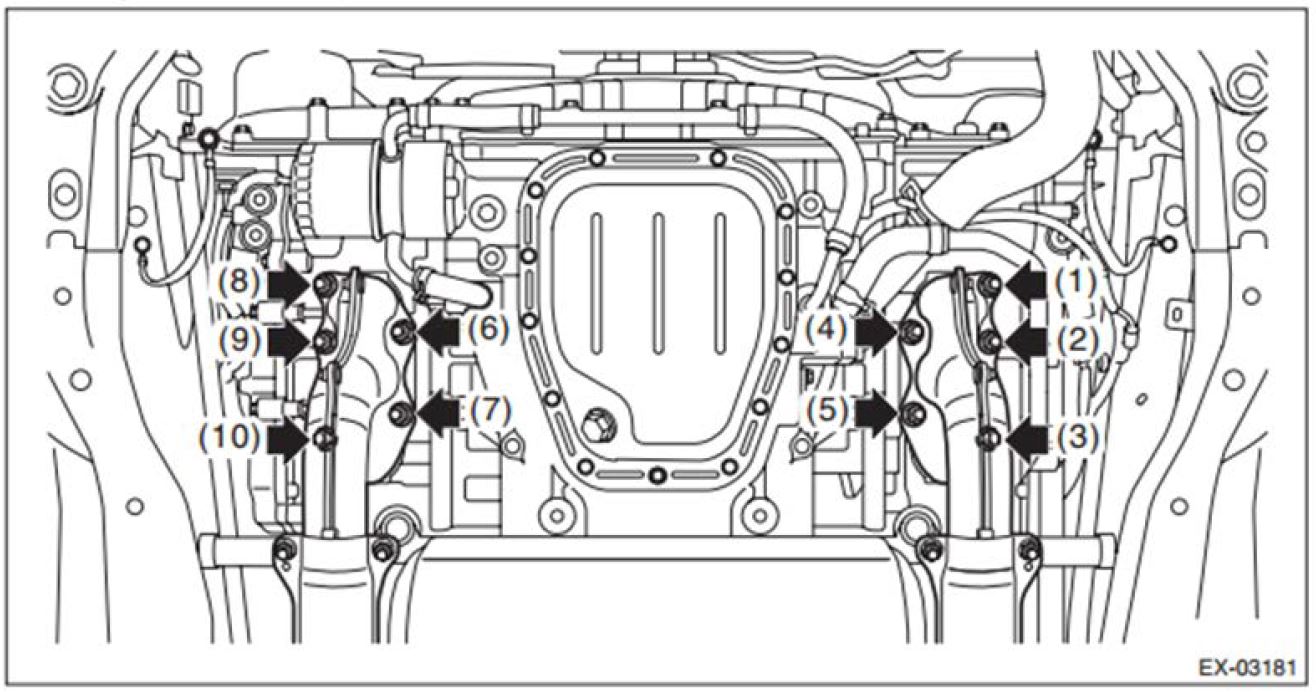
- Torque the nuts at the cylinder heads to 30 Nm (22.1 ft. lbs.). On H6 models, follow the sequence shown in the illustrations below.

- Reconnect the A/F and O2 Sensor wiring harness connectors.
- Re-connect the center exhaust pipe using a new gasket and torque the 2 spring bolt nuts to 18 Nm (13.3 ft. lbs.).
- Lower the vehicle.
- Reconnect the ground terminal to the battery sensor.
IMPORTANT: Inspect the fluid level of the CVT following the procedure below:
- Start the engine and raise the CVTF temperature to 35-45°C (95-113°F) using the SSM.
- Operate the select lever from P → R → N → D and from D → N → R → P to fully circulate CVTF with the engine at idle.
- Raise the vehicle again and with the engine at idle, remove the filler plug shown in the illustrations below.
CAUTION: The exhaust system may be HOT.

- The CVT fluid level is correct when it is up to bottom of the filler plug hole.

- If necessary, adjust the fluid level.
- Install a new filler plug gasket and torque to 50 Nm (36.9 ft. lbs.).
IMPORTANT: ALWAYS check for any residual CVT fluid which may have dripped onto the exhaust or other components during reassembly or the fluid level inspection and thoroughly wipe it clean.
- Reinstall the plastic engine under cover.
- Lower the vehicle.
- Reset the customer’s radio station presets and (navigation system favorites where applicable).
- Road test the vehicle to verify smooth operation and no fluid leakage.
CLAIM REIMBURSEMENT AND ENTRY PROCEDURES:
Credit to perform this recall will be based on the submission of properly completed repair order information. Retailers may submit claims through Vehicle Claim Entry on Subarunet.com.
| CAMPAIGN CODE | CLAIM TYPE | LABOR OPERATION | LABOR TIME |
|---|---|---|---|
| WQU-56 | RC | 137-260 | 0.5 |
NOTE: If needed, 1 quart of CVT fluid (SOA635043 for H4 models or SOA635049 for H6 models) may be claimed for this repair when topping off the transmission.
OWNER NOTIFICATION LETTER
| IMPORTANT SAFETY RECALL
This notice applies to the VIN identified in the address section printed below. |
Dear Subaru Owner:
This notice is sent to you in accordance with the National Traffic and Motor Vehicle Safety Act.
SUBARU OF AMERICA, INC. has decided that a defect, which relates to motor vehicle safety, exists in certain 2015 and 2016 model year Legacy and Outback vehicles.
You received this notice because our records indicate that you currently own one of these vehicles.
| DESCRIPTION OF THE SAFETY DEFECT AND SAFETY HAZARD
During the manufacturing process of the propeller shaft that connects to the vehicle’s transmission, the seal may have been deformed. As a result, the seal may leak transmission fluid. If the transmission fluid leaks onto an exhaust pipe, there is a possible risk of fire. |
REPAIR
Subaru will replace the propeller shaft assembly in your vehicle at no cost to you.
| WHAT YOU SHOULD DO
You should immediately contact your Subaru As a precaution, until this repair is performed, it is highly recommended that you not park your vehicle in a garage, car port or other structure. |
HOW LONG WILL THE REPAIR TAKE?
The time to replace the propeller shaft is approximately 30 minutes. However, it may be necessary to leave your vehicle for a longer period of time on the day of your scheduled appointment to allow your Subaru retailer flexibility in scheduling.
For your convenience, your retailer can provide a free loaner vehicle in the event that your vehicle cannot be repaired immediately. Please present this letter to your Subaru retailer at the time this repair procedure is performed.
CHANGED YOUR ADDRESS OR SOLD YOUR SUBARU ?
?
If you have moved or sold your vehicle, please complete the enclosed prepaid postcard and mail it to us. Or if you prefer to update this information online, please go to www.subaru.com, select ‘Customer Support,’ then select ‘Address Update’ or ‘Ownership Update’ from the drop down menu.
IF YOU NEED FURTHER ASSISTANCE:
To locate the nearest Subaru retailer you can access our website at www.subaru.com and select ‘Find a Retailer.’
If you need additional assistance, please contact us directly:
- By e-mail: Go to www.subaru.com, Customer Support and select “Contact Us”
- By telephone: 1-800-SUBARU3 (1-800-782-2783)
Monday through Thursday between 7:30 a.m. and 8:00 p.m. ET
Friday between 10:30 a.m. and 5:00 p.m. ET
Saturday between 9:00 a.m. and 3:30 p.m. ET
- By U.S. Postal mail: Write us at Subaru
 of America, Inc., Attn: Customer-Retailer Services Department, P.O. Box 6000, Cherry Hill, NJ 08034-6000
Please contact us immediately if the Subaru retailer fails or is unable to make the necessary repairs free of charge.
You may also contact the Administrator, National Highway Traffic Safety Administration, 1200 New Jersey Ave. SE, West Building, Washington, DC 20590 or call the toll free Auto Safety Hotline at 1-888-327-4236 (TTY: 1-800-424-9153) or go to https://www.safercar.gov if you believe the Subaru retailer has failed or is unable to remedy your vehicle without charge within a reasonable amount of time.
Your continued satisfaction with your Subaru is important to us. Please understand that we have taken this action in the interest of your safety and your vehicle’s proper operation. We sincerely apologize for any inconvenience this matter may cause and urge you to schedule an appointment as soon as possible to have this repair performed.
Sincerely,
Subaru of America, Inc.
Notice to Lessors: Under Federal law the lessor of a vehicle who receives this letter must provide a copy of it to the vehicle lessee(s) within 10 business days from receipt. The lessor must also keep a record of the lessee(s) to whom this letter is sent, the date sent, and the applicable vehicle identification number (VIN). (For the purposes of this section, a lessor means a person or entity that in the last twelve months prior to the date of this notification has been the owner, as referenced on the vehicle’s title, of any five or more leased vehicles. A leased vehicle is a vehicle leased to another person for a term of at least four months.) A subsidiary of Fuji Heavy Industries Ltd.
 Loading...


