| “This site contains affiliate links for which OEMDTC may be compensated” |
NHTSA ID Number: 10234905
Manufacturer Communication Number: 095714R
Summary
Fuel (Gasoline) Filler Door (Flap) Does Not Open
NUMBER: 09-57-14R
DATE: 06/11/14
REVISED: 08/22/14
INTRODUCTION
This bulletin provides new part number information along with a service procedure to address a customer concern of the fuel filler door not opening when lifting the interior release lever.
COUNTERMEASURE IN PRODUCTION
The new part was incorporated into production May 30, 2014 starting with VIN F*811136.
PART INFORMATION
| PART NUMBER | DESCRIPTION |
|---|---|
| 51478VA002 | Saucer Complete |
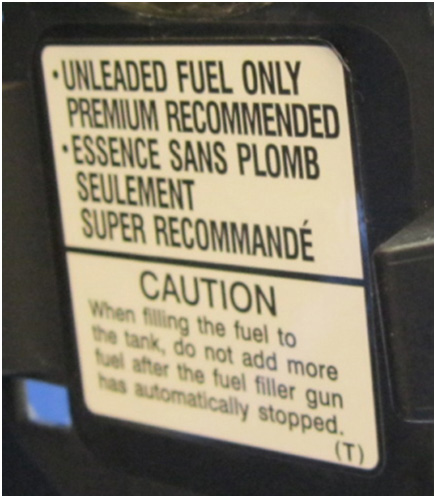
| 10024AA300 | WRX Fuel Requirement Label Fuel Requirement Label |
| 10024AA170 | STI Fuel Requirement Label Fuel Requirement Label |
NOTE: Installation of this new assembly replaces the previous repair procedure which involved installation of a revised spring and a new ring clip. A change was made to the plastic material used in addition to incorporating the new style opener spring.
SERVICE PROCEDURE / INFORMATION
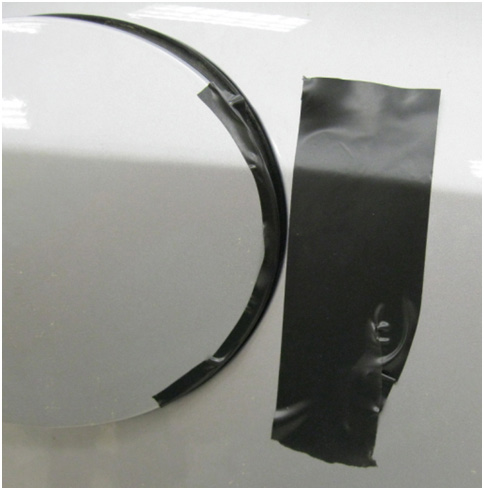
- Apply protective tape to the edge of the fuel filler door and the vehicle body to protect the finish as shown in the photo below.
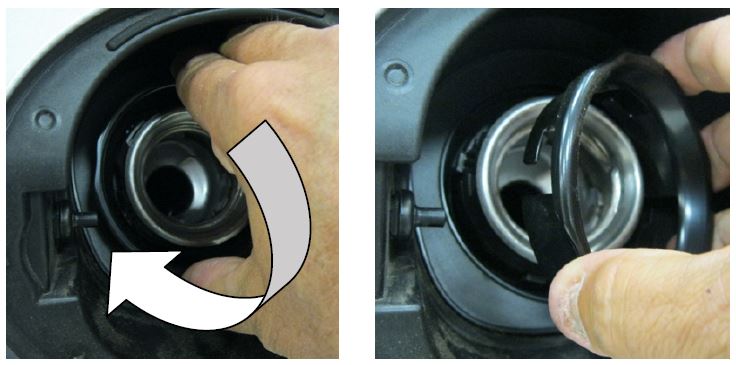
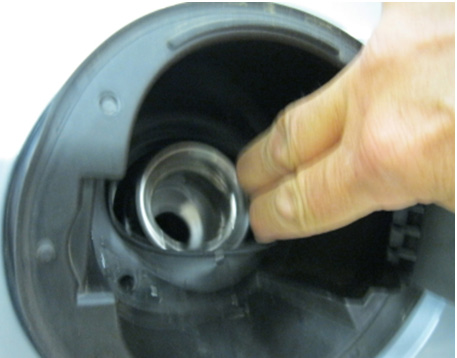
- Remove the fuel filler pipe protector (lock ring) by turning it CLOCKWISE.
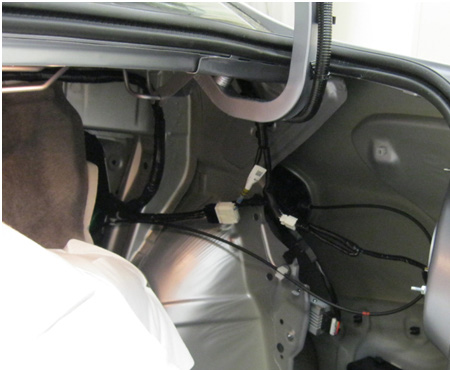
- CAREFULLY remove the retaining clips as necessary from the trunk threshold trim and the inner liner as shown in the illustrations below to provide access to the back side of the fuel filler area.
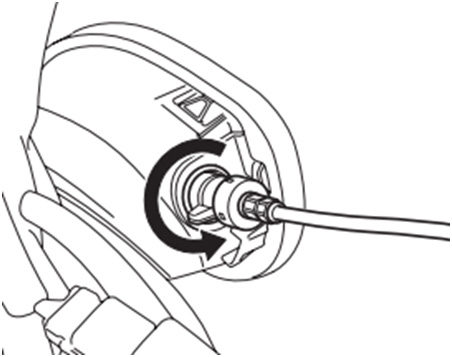
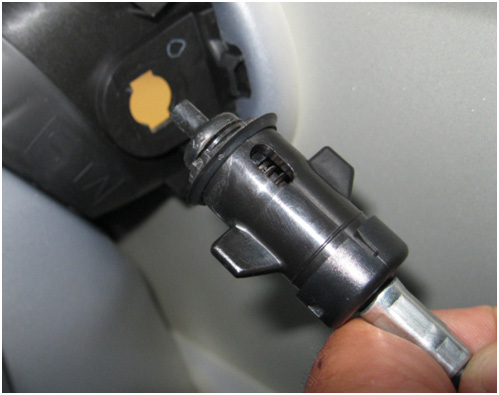
- As shown in the illustration below, rotate the housing of the fuel door release latch COUNTER-CLOCKWISE and remove it from the assembly.
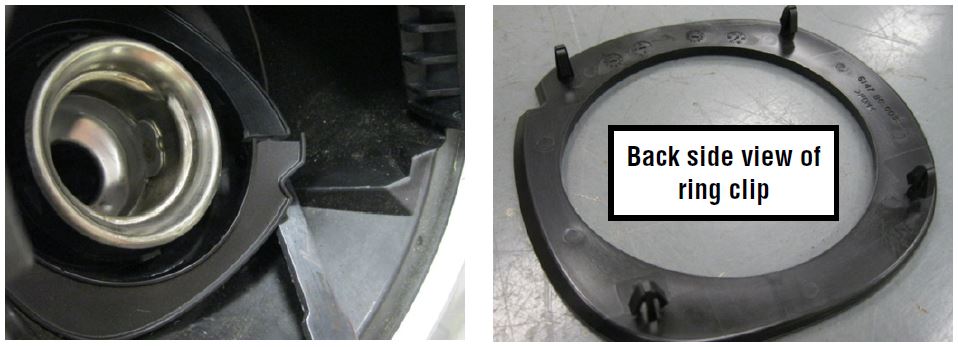
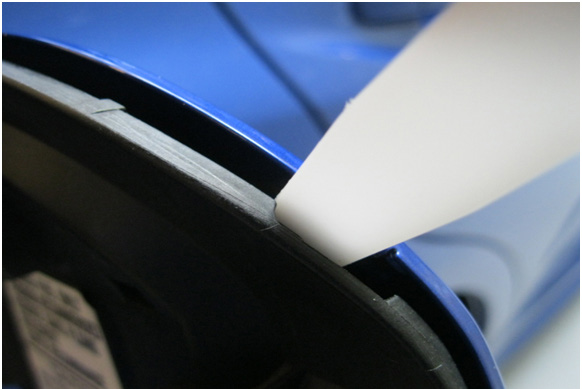
- Using a trim clip removal tool (or equivalent), pry up and remove the ring clip surrounding the fuel filler neck. There are 4 clips securing the ring clip. This part is a one-time use item as it will be broken during removal as shown in the photo below. REMINDER: Always take proper precautions to protect the vehicle’s finish.
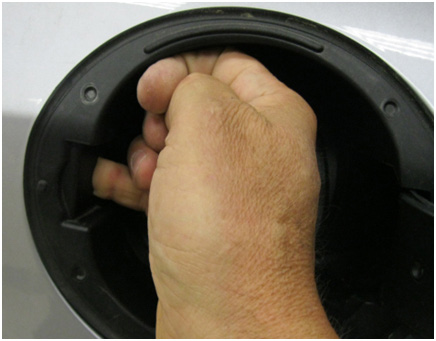
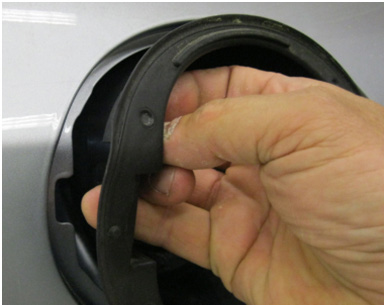
- Once the ring clip is removed, the fuel filler door assembly is ready to remove. Using a finger in the latch hole, pull the rear part of the assembly toward you to disloge it from the body. Once loose from the body, use another finger or a plastic trim tool to “unhook” the rubber insert portion from the front of the filler neck then remove completely as shown below.
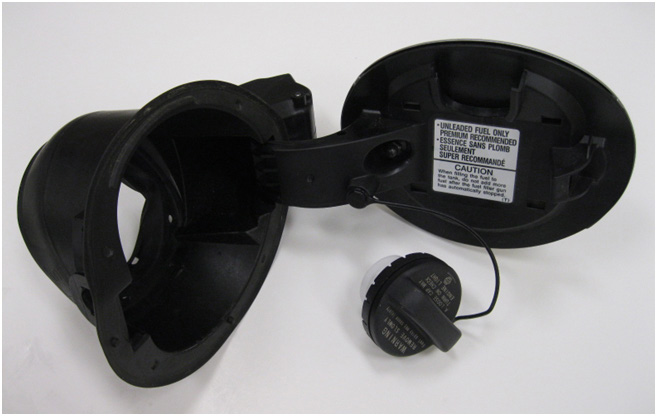
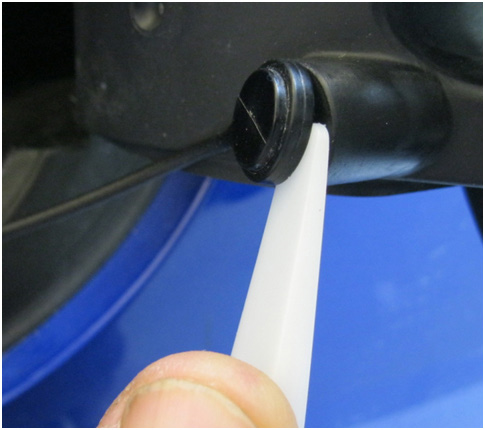
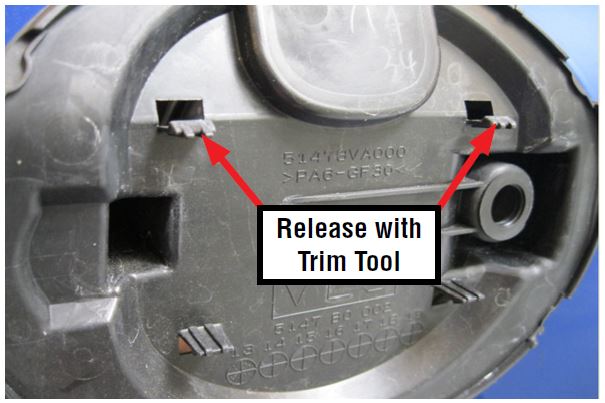
- Swap over the fuel cap / tether to the new saucer assembly. Release the tether retaining clip using a plastic trim tool as shown below.
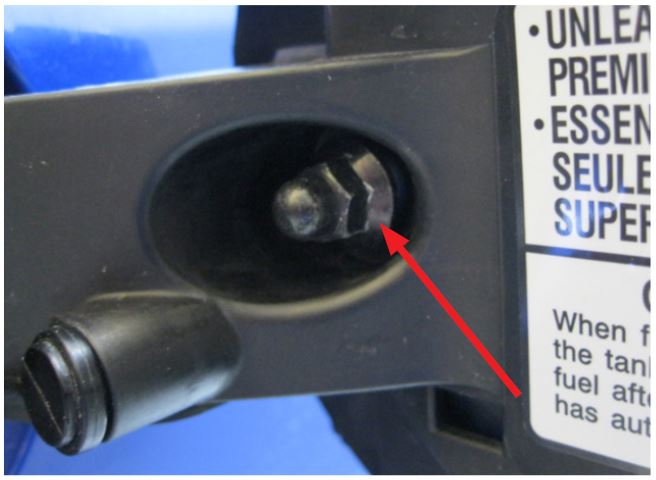
- Remove the hex cap nut securing the outer body-color panel to the outside of the filler door.
- Using a plastic trim tool, CAREFULLY work the trim tool in between the inner plastic filler door and the metal outer panel to release the 2 upper retaining clips. Once the upper 2 clips are released, the outer panel will be easy to remove from the door. A photo of the inner door with the outer panel removed showing the 4 clip locations is provided below to use as a reference.
NOTE: Be careful not to drop or damage the outer panel while releasing the retaining clips. Adding a piece of masking tape to secure the outer panel to the plastic door is a good extra safety measure to prevent damage.
- Transfer the outer panel to the new saucer’s filler door making sure all 4 retaining clips are reengaged. Reinstall the cap nut onto the outer panel’s mounting stud and torque to 5.5 ft. lbs.
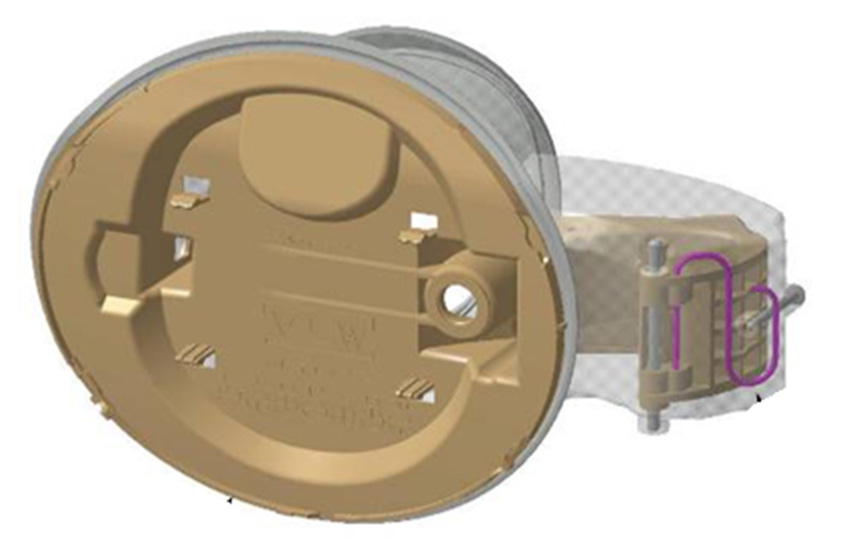
- Reinstall the new saucer assembly into the vehicle in the reverse order of removal. The new saucer assembly includes a new plastic ring clip.
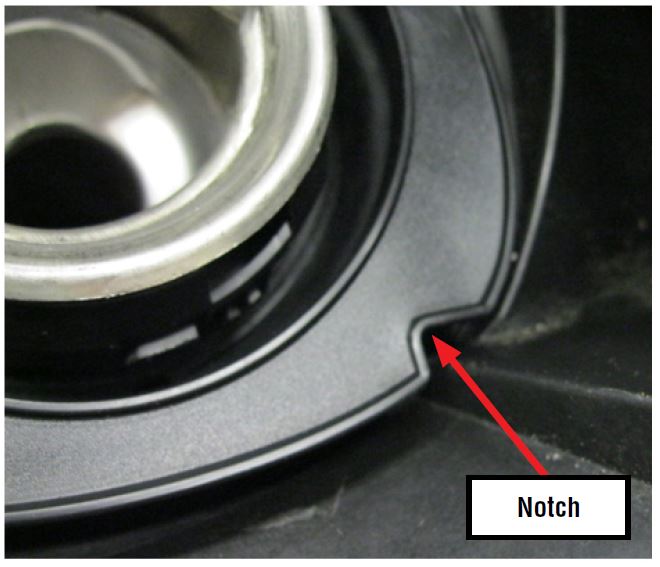
- Once the assembly is back in position, secure it in place using the new plastic ring clip. The ring clip can only be installed one way. Make sure the notch is positioned as shown below then make sure all 4 retaining clips lock into position properly.
- The remainder of the reassembly is in the opposite order of disassembly.
- Affix the appropriate fuel requirement label to the inside of the filler door.
- Confirm proper operation of the fuel filler door release to complete the procedure.
1 Affected Product
Vehicle
1 Associated Document
Manufacturer Communications
NUMBER: 09-57-14R
DATE: 06/11/14
REVISED: 08/22/14
MC-10234905-9999.pdf 1497.513KB
 Loading...
NHTSA ID Number: 10068344
Manufacturer Communication Number: T09-57-14R
Summary
SUMMARY TO BE PROVIDED ON A FUTURE DATE.
1 Associated Document
Service Bulletin Document
NUMBER: 09-57-14R
DATE: 06/11/14
REVISED: 08/22/14
SB-10068344-0699.pdf 1497.513KB
 Loading...
NHTSA ID Number: 10234833
Manufacturer Communication Number: 095714
Summary
Fuel (Gasoline) Filler Door (Flap) Does Not Open
1 Associated Document
Manufacturer Communications
NUMBER: 09-57-14
DATE: 06/11/14
MC-10234833-9999.pdf 4703.289KB
 Loading...
- [Pro OBD2 Scanner] - BlueDriver is the easiest way to scan and understand your vehicle like a professional mechanic. Read and clear your car’s trouble codes and check engine light.
- [Read & Clear All The Codes] - BlueDriver's enhanced vehicle diagnostics gives you access to information normally available only to mechanics on their OBD2 scan tools. Now you can read and clear ABS, Airbag, SRS, TPMS codes, and many more.
- [Get The Right Fix & View Live Data] - Much more than a car code reader, BlueDriver is a diagnostic tool. You’ll get unlimited repair reports with possible causes and fixes, plus real-time health monitoring while you drive with the live data feature.
- [Wireless & Bluetooth Enabled] - Say goodbye to wires. BlueDriver connects with Bluetooth via your phone/tablet to a sensor that plugs into your car's OBDII port. Get all of the capabilities of an expensive code reader & scan tool without any annoying wires.
- [User-Friendly App and Repair Videos] - BlueDriver gives you more ways to scan and fix your vehicle. Our iOS & Android app connects you to a large database of repair videos with step-by-step directions of repairs.
- [Easy to Use--Work out of box] + [FOXWELL 2025 New Version] FOXWELL NT604 Elite scan tool is the 2025 new version from FOXWELL, which is designed for those car owners who want to figure out the cause issue before fixing the car problem via scanning the most common systems like abs srs engine and transmission.The NT604 Elite diagnostic tool comes with latest software, which can be used out of box. No need to waste time to download the software first.
- [Affordable] + [Reliable Car Health Monitor] Will you be confused what happen when the warning light of abs/srs/transmission/check engine flashes? Instead of taking your cars to dealership, this foxwell scanner will help you do a thorough scanning and detection for your cars and pinpoint the root cause. It will t-urn off the warning light car after the problem is fixed.👉TIPS: Airbag crash/collision data can NOT be cleared even you replace the new airbag.
- [5 in 1 Diagnostic Scanner] Compared with those auto scanners (50-100), NT604 Elite code scanner not only includes their OBDII diagnosis but also it can be an abs/srs scanner, transmission and check engine code reader. When it’s an odb2 scanner, you can use it to check if your car is ready for annual test through I/M readiness menu. In addition, live data stream, built-in DTC library, data play back and print, all these features are a big plus for it. Note: doesn't support maintenance function.
- [Fantastic AUTOVIN] + [No extra software fee] Through the AUTOVIN menu, this NT604 Elite car scanner allows you to get your V-IN and vehicle info rapidly, no need to take time to find your V-IN and input one by one. What's more, the NT604 Elite abs srs scanner supports 60+ car makes from worldwide (America/Asia/Europe). You don’t need to pay extra software fee.
- [Solid protective case KO plastic carrying bag] + [Lifetime update] Almost all same price-level obd scanner diagnostic tool only offers plastic bag to hold on the scanner.However, NT604 Elite automotive scanner is equipped with solid protective case, preventing your obd2 scanner from damage. Then you don’t need to pay extra money to buy a solid toolbox.
- [Brand-New ArtiDiag500] We've got everything you're looking for! Forget basic OBD2 scanners; TOPDON's ArtiDiag500 car scanner offers more. The all-new ArtiDiag500 not only includes full OBD2 functions and 4-system diagnostics but also provides DIYers with 6 maintenance services. The brand-new, cost effective AD500 is back in full swing!
- [4-System Diagnostics] DIY enthusiasts, take notice! Will these 4-system diagnostics be the treasure you've been seeking? The ArtiDiag500 code reader offers in-depth testing for the engine, transmission, ABS, and SRS systems, reading fault codes and data streams. It also visualizes real-time data in chart form, simplifying complex data for storage and future playback, aiding DIY users in problem detection.
- [6 Reset Functions] Hey, hang tight for a moment. With these 6 reset functions, the ArtiDiag500 has got you covered. It offers throttle adaptation along with reset capabilities for Oil, SAS, TPMS, BMS, and EPB. Seamlessly aligning the throttle, battery, tires, and brake pads with your vehicle, it also adjusts the steering angle and turns off the oil light. Looking to restore your car to its original condition? Look no further than the ArtiDiag500.
- [Multiple Functions] The Smart AutoVIN of this TOPDON OBD2 scanner keeps track of your manual selections for vehicle make, model, and year and directs you to the suitable diagnostics. Max 4 Live Data streams integrated for much easier data processing. Diagnostic feedback online with this diagnostic tool to help you get tough repair operations well-completed. Real-time car battery voltage monitoring identifies probable vehicle defects.
- [Global Support] Rest assured about compatibility with your vehicle and language – ArtiDiag500 currently supports 67+ car brands, 10,000+ models, covering most vehicles worldwide, and is available in 12 languages. Whether it's for your car or preferred language, there's an ideal choice for you. Plus, it's fully compatible with Android 11 for smoother use.
- [Transform Your Car Care Experience] - With BLCKTEC, instantly become your own professional mechanic. Effortlessly read and clear your car’s trouble codes and check engine light, ensuring your vehicle stays in top condition.
- [Empower Yourself with Comprehensive Diagnostics] - Unlock the full potential of your vehicle with the BLCKTEC 430. Access detailed diagnostics previously exclusive to professional mechanics’ OBD2 scan tools, including ABS, Airbag, SRS, TPMS codes, and beyond, right at your fingertips.
- [Drive with Confidence] - The BLCKTEC 430 is more than just a car code reader; it's your personal vehicle health advisor. Receive tailored repair reports with potential causes and verified solutions for your specific make and model, guiding you to the right fix every time.
- [Seamless Connectivity, Ultimate Convenience] - Experience the freedom of wireless diagnostics with this portable car scanner. Easily connect via Bluetooth to our intuitive sensor and enjoy all the functionalities of high-end scan tools without the clutter of wires, directly from your smartphone or tablet. To connect the tool to the App, please DO NOT go to device's Bluetooth settings, instead, open RepairSolutions2 App and follow the instructions on the App to pair the BLCKTEC 430.
- [DIY Repairs Made Easy] - Navigate car maintenance with ease using our premium app. Access a vast library of easy-to-follow repair videos, guiding you through each step of the repair process, compatible with both iOS & Android devices.
- ✨NT604 includes all features of FOXWELL NT201/NT301 and adds deep diagnostics for the 4 most-used systems (ABS/SRS/Engine/Transmission) beyond their 10 basic OBD2 functions. FOXWELL NT604 is capable of conducting in-depth diagnostics on these 4 systems, thoroughly checking for potential faults one by one. It also supports the printing of diagnostic reports, allowing you to directly take the report to an auto repair shop for repairs and thus saving on inspection costs.
- 【Easy to use and friendly】+【Faster diagnostic speed】 FOXWELL NT604 is the 2025 newest enhanced 4 system code reader, which is capable of reading/clearing fault codes, retrieving vehicle information and displaying 4-in-1 live data stream. You will easily find what's wrong with your car to avoid expensive trip to dealership. At the same time, this car scanner will directly tell you what the corresponding code means, avoiding the hassle of searching for information.
- 【OBD2 Full Function】+【Check Engine/ABS/SRS/Transmission】 This scan tool will allow you to perform full OBDII diagnostic for all cars with OBDII protocols. You can use it to check if your car is ready for annual testing through the I/M Readiness menu. In addition, the device also has value-added functions such as real-time data flow, DTC Lookup, data playback, and printing. Turn off Check Engine/ABS/SRS/Transmission Light. Tips: the fault code can be only erased after the problem is fixed.
- 【Cover 10000+ Cars &60+ Car Makes】 and 【AUTOVIN】 Compared with Other scanner which only supports 40 car makes, NT604 car diagnostic scanner for all cars contains more than 60 car brands and 10000+ cars for almost all OBDII cars sold worldwide like passenger car, SUVs, minivans, light-duty trucks, etc. produced by Asian, European, American with the supported year differing from 1996 to 2025. It allows you to get your VIN and vehicle info rapidly, no need to take time input one by one.
- 【Battery Voltage Checker】+【Lifetime Free Update, No Subscription fee, No Micro SD Cards, No registration required】 It monitors the real-time voltage of the vehicle battery and displays it in graphical and textual form, informing you of the health status of the battery. Also monitor the health of your car. NT604 is equipped with the latest software directly, so you don't need to download a bunch of updated software after unboxing to use it. Lifetime no subscription fee for upgrading software.
- 🎉【2025 Upgraded Ver. of AL519/ ML519/ ML619】Autel develops the brand-new AutoLink AL619 as the advanced ver. of Autel ML519, AL519, AL319, MS309. This AL619 OBD2 scanner can scan ABS & SRS systems, and support 10 Modes of OBD II Diagnostics Function on Worldwide Vehicles to read, erase codes and turn off the MIL, ABS, SRS warning lights so that you can better maintain your car when related malfunctions occur and make your vehicle ready for the annual test.🚦📢Kindly note: AL619 only supports 2015 or pre-2015 cars. And services are not universal, please send us your car VIN# to check the compatibility before ordering.📩AutelStoreOnline @ outlook . com📩.
- 🎉【Accurate ABS/ SRS Diagnostics Functions】The ABS/ SRS diagnostic function is used to retrieve and clear codes from the ABS/ SRS systems. It can read and clear DTCs, show definitions of each code, display live data of multiple sensors in the graph to locate fault causes, and assist home mechanics to do the proper repair and clear ABS & Airbag warning lights. Diagnoses ABS/ SRS system codes on most 1996 and newer major vehicle models. Please email 📩 AutelStoreOnline @ outlook . com 📩 for help.
- 🎉【All 10 Modes of OBD II Diagnostics Function】The OBD II Diagnostics function is a fast-access option that allows you to carry out a quick test on the engine system of OBD II vehicles. Read Codes, Erase Codes, Live Data, Freeze Frame, Retrieving I/M Readiness Status, O2 Monitor Test, On-Board Monitor Test, DTC Lookup, Component Test, Viewing Vehicle Information, Modules Present.
- 🎉【Live Data and Freeze Frame Data】With Live Data functions, Autel AL619 OBD2 diagnostic code reader allows you to view the live PID (Parameter Identification Data) of the vehicle's computer module(s) in text, graph to check the status of various sensors. And Freeze Frame Data enables you to view the vehicle's operating parameters at the moment a DTC is detected. These information will aid the technician by allowing the parameters to be duplicated for diagnostic and repair purposes.
- 🎉【DTC Lookup Feature】Besides showing you the code’s definition while you are reading the diagnostic trouble codes, AL619 features comparably user-friendly DTC Lookup Function which enables you to retrieve the definitions of any error codes from the large database of AL619, saving you from the hassle of wasting time searching definition of every code via Google.
- 【ENHANCED DIAGNOSTIC SCAN TOOL WITH ABS/SRS/ECM/TCM
 SYSTEMS】 The XpertAuto S515 OBD2 scan diagnostic tool helps diagnose issues with ABS, SRS, ECM, and TCM
 systems. This car diagnostic scan tool reads and clears error codes, reads data streams, retrieves ECU info,and quickly locates ABS, SRS, ECM, TCM
 problems
 - 【8 HOT RESET SERVICES】The XpertAuto S515 professional level car code reader and reset tool offers 8 hot reset services, including oil, airbag, SAS, EPB, ETS, ABS bleed, DPF regeneration and battery reset. This car code reader is perfect for thoughtful and attentive service, covering everything from routine maintenance and warning light removal to auto part replacement and more
- 【PROFESSIONAL-GRADE OBD2 SCANNER】 The car scanner diagnostic tool delivers professional-grade functionality at a consumer price. It covers all the essentials: Read Codes, Erase Fault Codes, MIL Fault Indicator Light, Live Data, EVAP System Test, View Freeze-Frame, Vehicle Info, I/M Readiness, and DTCs Look-up, ensuring accurate diagnosis and peace of mind
- 【AUTOSEARCH VIN - SCREENSHOT & RECORDING】 The Vehicle Code Reader features intelligent Auto VIN technology for fast and accurate one-touch vehicle identification. It scans ECUs, collects vehicle information and performs diagnostics on selected systems. This car diagnostic tool comes with unique screenshot and video recording function, allowing you to save extensive data effortlessly
- 【MULTIPLE DISPLAY OF LIVE DATA】 The car diagnostic tool can display data streams through numbers, images, and a combination of both. It also allows comparison with historical data for a comprehensive view of your car's condition and changes at a glance. Car diagnostic reports can be easily saved, shared, printed, and emailed

- 【Designed for Volkswagen(VAG) Cars Diagnostics】The VD500 OBD2 scanner is specifically designed to diagnose Volkswagen Group (Fits for VW/Audi/Skoda/ SEAT) 12-volt 16-pin vehicles, but can also be used with other 12-volt (non-Volkswagen) and light trucks (non-electric) vehicles manufactured in 1996 or later that are OBD II -compliant with standard 16-pin OBD II protocols (J1850 VPM, J1850PWM, ISO9141, KWP 2000 and CAN)
- 【Basic + Special Advanced Functions for VAG Vehicle】The ANCEL VD500 scan tool for vw can not only read and clear codes on engine, ABS, transmission, SAS (not all cars), ESP, TPMS and other systems, but also reset the oil, brake pad(epb service) and throttle position adaption. If you don't know how to do it, please con-tact us in time. Include your car model, year and the function you want to do
- 【Plug and Play, No Complex Connection】The ANCEL VD500 is truly plug-and-play—no complicated networking or batteries required. Simply connect it and use it anywhere in your car, anytime. Fast, easy, and convenient
- 【Full Access, No Hidden Costs】Unlike other detectors that charge extra for features, the ANCEL VD500 is 100% no extra additional charges, with no hidden costs. The full functionality is accessible, and the system upgrade is included, a favorite choice among customers
- 【Wide Compatibility for Volkswagen Cars】The VD500 diagnostic scanner for audi offering for Volkswagen vehicles covers the following vehicles: fits for VW (CC, EOS, Golf, GTI, Jetta, Passat, Phaeton, Polo, Rabbit, Sharan, Tiguan, Touran, Touareg); fits for Audi (A3, A4, A6, A7, A8, A5, Q3, Q5, Q7, R8, RS3, TT, RS, RS5, S4, S6); fits for Skoda (Octavia, Rapid, Yeti, Kodiaq, Fabio, Superb); fits for SEAT (Leon, Ateca, Ibiza, Altea, Cushion, Cord, Alhambra) Diagnostics
 Transmission Car Diagnostic Tool" title="Fuel (Gasoline) Filler Door (Flap) Does Not Open - 2015 Subaru WRX & STI 48">
- Comprehensive OBD2 Scanner with 15 Resets: The XTOOL D5S car code reader and vehicle reset tool provides an advanced diagnostic solution with 15 high demand reset functions, including Electronic Parking Brake Reset (EPB), SAS, BMS Reset, Throttle Body Relearn, TPMS Reset, ABS Bleeding, Injector Coding, Gearbox Match, Suspension Adjustment, Headlight, Window Initialization, Crank Sensor Relearn and more. Equipped with CAN FD Protocol and FAC AutoAuth, the D5S obdii scanner diagnostic tool ensures compatibility with a broad range of modern vehicles, allowing users to address common maintenance needs quickly.
- 4 Main System Car Diagnostic Scanner & Full OBD2 Diagnostics: The XTOOL D5S vehicle code reader is ideal for home mechanics, DIYers, and professionals, providing access to Transmission/Engine/ABS/SRS to read dtcs, and live data can be displayed in text or up to 4 pid data graphs, along with full OBD2 diagnostics to check the engine light on, other obd2 issues and routine maintenance. This scan tool ensures you can keep your vehicles in top condition, avoiding costly repairs or unexpected breakdowns. NOTE: Some vehicles display three systems after connection because the transmission and engine of some vehicles are integrated into one
- One-Tap W!Fi Updates + No Software Fees: Enjoy a 5.45” high-resolution touchscreen (1440x720) that’s easy to read, even in low light. Free lifetime software updates over Wi-Fi keep your D5S OBD2 Scanner Diagnostic Tool updated with the latest features—no hidden fees. Ample 32GB storage plus expandable memory ensures room for all your diagnostic data, while durable silicone grips provide comfortable, secure handling. This makes D5S a cost-effective, long-term investment for continuous diagnostic support, a reli~able automotive scanner diagnostic tool for your family
- Wide Compatibility Across 90+ Vehicle Brands: The XTOOL D5S Scanner for cars and trucks works with OBDII-equipped vehicles built after 1996, covering over 90 vehicle brands, including 12V diesel and SUVs, minivans, and light-duty trucks. It supports most of protocols include CAN FD for broad compatibility. For vehicle-specific compatibility, send us your vehicle information to check the compatibility before purchase
- Super Clear Navigation Display: The XTOOL D5S car scanner enhances your diagnostic workflow with a super clear navigation display, designed for convenience and speed. TOP Capability include a Voltage Display for real-time monitoring of your vehicle’s electrical system, a “My Vehicle” Menu for adding and managing vehicle information, and Quick Button Interfaces for both Auto Scan and OBD2 Diagnostics, ensuring you can quickly access the menu you need. These features streamline the diagnostic process, allowing you to focus on what matters most—Efficient vehicle maintenance
- 【Best Bang For Your Buck!-FOXWELL NT614 Elite】1. 2025 New software-faster than old one. 2. One click lifetime WIFI f-ree update, no need to use the annoying Micro SD card. 3. New Update-No need to register on the FOXWELL website before use, more convenient! 4. More intuitive viewing with new interface, you can find I/M, Battery Test, DTC Lookup directly.
- 【UPGRADE OF NT604-POWERFUL 5 RESETS】Wanna to do maintenance service for your car however the basic 4 system scanner tool can't do it? Then FOXWELL NT614 Elite-the upgraded version of nt604, was born for providing you with 5 special functions-ABS Bleeding/Oil Reset/SAS Calibration/EPB Reset/Throttle Reset. These functions are enough for your daily needs. No need to buy those 300-600 dollors obd2 scanner. Saving your unnecessary repair fee with FOXWELL nt614 car scanner diagnostic tool!
- 【ENGINE/ABS/SRS/TRANSMISSION CODE READER】Don't know what's wrong with your car when the warning light of ABS, transmission, SRS, Engine flashes? NT614 Elite obd2 scanner can pinpoint the problem components. It boasts many functions of engine, abs, srs and transmission such as read & erase fault codes and grapgh live data like engine temp, wheel speed sensor, read transmission temperature, etc. Compared with car repairs, using foxwell nt614 elite is more convenient and a-ffordable.
- 【ABS BLEEDING OBD SCANNER】Do you always feel the brake pedal was slowly sinking to floor or it's loose after doing a complete front & rear brake job? And then you need to take more time than normal to stop your car, which is very dangerous. That's because when you open the brake system to replace components, air gets inside. To get a firm brake pedal, the air need to be removed by bleeding the brakes. NT614 Elite odb2 scanner can do ABS BLEEDING perfectly for your cars.
- 【SMART AUTOVIN & LIFETIME F-REE WIFI UPDATE & PERFECT GIFT CHOICE】With the fantastic AUTOVIN function, this nt614 scan tool can get your VIN and vehicle info rapidly. No need to spend much time in finding your VIN and input it one by one. Also, the lifetime f-ree wifi update is provided for more vehicle coverage, bug fixes, newly added parameters. SAVE AT LEAST 1000+ PER YEAR. And this automotive scanner is a best gift for your Dad, Husband, Boyfriend and Handy Men.
SEOCONTENT-START
Service Information Number: 09-57-14R; Revised: 08/22/14 Page 1 INTRODUCTION This bulletin provides new part number information along with a service procedure to address a customer concern of the fuel filler door not opening when lifting the interior release lever. COUNTERMEASURE IN PRODUCTION The new part was incorporated into production May 30, 2014 starting with VIN F*811136. PART INFORMATION PART NUMBER DESCRIPTION 51478VA002 Saucer Complete 10024AA300 WRX Fuel Requirement Label 10024AA170 STI Fuel Requirement Label NOTE: Installation of this new assembly replaces the previous repair procedure which involved installation of a revised spring and a new ring clip. A change was made to the plastic material used in addition to incorporating the new style opener spring. NUMBER: 09-57-14R DATE: 06/11/14 REVISED: 08/22/14 APPLICABILITY: 2015MY WRX and STI Models SUBJECT: Fuel (Gasoline) Filler Door (Flap) Does Not Open SERVICE INFORMATION ATTENTION: GENERAL MANAGER q PARTS MANAGER q CLAIMS PERSONNEL q SERVICE MANAGER q IMPORTANT – All Service Personnel Should Read and Initial in the boxes provided, right. Continued… CAUTION: VEHICLE SERVICING PERFORMED BY UNTRAINED PERSONS COULD RESULT IN SERIOUS INJURY TO THOSE PERSONS OR TO OTHERS. Subaru Service Bulletins are intended for use by professional technicians ONLY. They are written to inform those technicians of conditions that may occur in some vehicles, or to provide information that could assist in the proper servicing of the vehicle. Properly trained technicians have the equipment, tools, safety instructions, and know-how to do the job correctly and safely. If a condition is described, DO NOT assume that this Service Bulletin applies to your vehicle, or that your vehicle will have that condition. SUBARU OF AMERICA, INC. IS ISO 14001 COMPLIANT ISO 14001 is the international standard for excellence in Environmental Management Systems. Please recycle or dispose of automotive products in a manner that is friendly to our environment and in accordance with all local, state and federal laws and regulations. ©2014 Subaru of America, Inc. All rights reserved. Service Information Number: 09-57-14R; Revised: 08/22/14 Page 2 SERVICE PROCEDURE / INFORMATION • Apply protective tape to the edge of the fuel filler door and the vehicle body to protect the finish as shown in the photo below. • Remove the fuel filler pipe protector (lock ring) by turning it CLOCKWISE. • CAREFULLY remove the retaining clips as necessary from the trunk threshold trim and the inner liner as shown in the illustrations below to provide access to the back side of the fuel filler area. Continued… EI-04374 EI-03461 Service Information Number: 09-57-14R; Revised: 08/22/14 Page 3 • As shown in the illustration below, rotate the housing of the fuel door release latch COUNTER-CLOCKWISE and remove it from the assembly. • Using a trim clip removal tool (or equivalent), pry up and remove the ring clip surrounding the fuel filler neck. There are 4 clips securing the ring clip. This part is a one-time use item as it will be broken during removal as shown in the photo below. REMINDER: Always take proper precautions to protect the vehicle’s finish. Continued… Back side view of ring clip Service Information Number: 09-57-14R; Revised: 08/22/14 Page 4 • Once the ring clip is removed, the fuel filler door assembly is ready to remove. Using a finger in the latch hole, pull the rear part of the assembly toward you to disloge it from the body. Once loose from the body, use another finger or a plastic trim tool to “unhook” the rubber insert portion from the front of the filler neck then remove completely as shown below. • Swap over the fuel cap / tether to the new saucer assembly. Release the tether retaining clip using a plastic trim tool as shown below. Continued… Service Information Number: 09-57-14R; Revised: 08/22/14 Page 5 • Remove the hex cap nut securing the outer body-color panel to the outside of the filler door. • Using a plastic trim tool, CAREFULLY work the trim tool in between the inner plastic filler door and the metal outer panel to release the 2 upper retaining clips. Once the upper 2 clips are released, the outer panel will be easy to remove from the door. A photo of the inner door with the outer panel removed showing the 4 clip locations is provided below to use as a reference. NOTE: Be careful not to drop or damage the outer panel while releasing the retaining clips. Adding a piece of masking tape to secure the outer panel to the plastic door is a good extra safety measure to prevent damage. Continued… Release with Trim Tool Service Information Number: 09-57-14R; Revised: 08/22/14 Page 6 • Transfer the outer panel to the new saucer’s filler door making sure all 4 retaining clips are reengaged. Reinstall the cap nut onto the outer panel’s mounting stud and torque to 5.5 ft. lbs. • Reinstall the new saucer assembly into the vehicle in the reverse order of removal. The new saucer assembly includes a new plastic ring clip. • Once the assembly is back in position, secure it in place using the new plastic ring clip. The ring clip can only be installed one way. Make sure the notch is positioned as shown below then make sure all 4 retaining clips lock into position properly. • The remainder of the reassembly is in the opposite order of disassembly. • Affix the appropriate fuel requirement label to the inside of the filler door. Notch Service Information Number: 09-57-14R; Revised: 08/22/14 Page 7 • Confirm proper operation of the fuel filler door release to complete the procedure. WARRANTY / CLAIM INFORMATION For vehicles within the Basic New Car Limited Warranty period, this repair may be claimed using the following information: LABOR DESCRIPTION LABOR OPERATION # FAIL CODE LABOR TIME WRX / STI FUEL FLAP REPAIR PROCEDURE A915-556 SGP-48 0.4
SEOCONTENT-END
Last update on 2025-05-08 / Affiliate links / Images from Amazon Product Advertising API
This product presentation was made with AAWP plugin.

