| “This site contains affiliate links for which OEMDTC may be compensated” |
NHTSA ID Number: 10150950
Manufacturer Communication Number: 16-94-15R
Summary
This bulletin provides a diagnosis and repair procedure for DTC P172A and / or P0B0B. When either of these DTCs is stored, a leaking o-ring which seals the electric oil pump relief valve may allow CVT fluid to enter the pump’s electric motor. Although current Service Manual diagnostic procedures instruct replacement of multiple components, this information will help isolate the actual failed component for a more cost-effective repair. NOTE: The relief valve is now available as an individual part. If there is no damage to the drive motor case assembly, refer to TSB 16-108-17R for the parts needed and Service Procedure for replacing just the relief valve.
NUMBER: 16-94-15R
DATE: 07/30/15
REVISED: 07/09/18
INTRODUCTION
This bulletin provides a diagnosis and repair procedure for DTC P172A and / or P0B0B. When either of these DTCs is stored, a leaking o-ring which seals the electric oil pump relief valve may allow CVT fluid to enter the pump’s electric motor. Although current Service Manual diagnostic procedures instruct replacement of multiple components, this information will help isolate the actual failed component for a more cost-effective repair. NOTE: The relief valve is now available as an individual part. If there is no damage to the drive motor case assembly, refer to TSB 16-108-17R for the parts needed and Service Procedure for replacing just the relief valve.
PRODUCTION CHANGE INFORMATION
A change to the drive motor relief valve o-ring was incorporated into production on June 16, 2015 starting with VIN F*298545.
ADDITIONAL TOOLS REQUIRED:
- Digital Voltage / Ohm Meter (DVOM) with test leads (1000v, CAT III)
- ¼” drive T-25 or T-30 TORX bit for battery cover screws
- Electrical tape to insulate power cable terminal ends (3- 2” long pieces of tape)
- Personal Protective Equipment (Hybrid Safety Kit J-51311, ALWAYS check the Expiration Date on Gloves)
DIAGNOSIS PROCEDURE / INFORMATION:
VERY IMPORTANT SAFETY WARNING: The HEV system includes a high-voltage circuit. Mishandling of HEV-related components may cause electric shock and serious personal injury. Technicians who have not received Subaru Hybrid training should NOT perform testing or repairs related to the HEV system. **See Subaru
 Technician Reference Booklet, Module 702 (MSA5P1702C) for more HEV information.
NOTE:
- Before starting the diagnosis procedure, use the SSMIII to confirm CVT fluid temperature is below 104 degrees F (40 C).
- Turn the ignition OFF.
IMPORTANT: The next steps require Personal Protective Equipment be worn.
- Remove the rear cargo area floor mat and the sub-trunk (storage tray).
- Remove the orange HEV Service Disconnect plug and put it in your
- Remove the TORX screws and necessary trim clips securing the aluminum battery
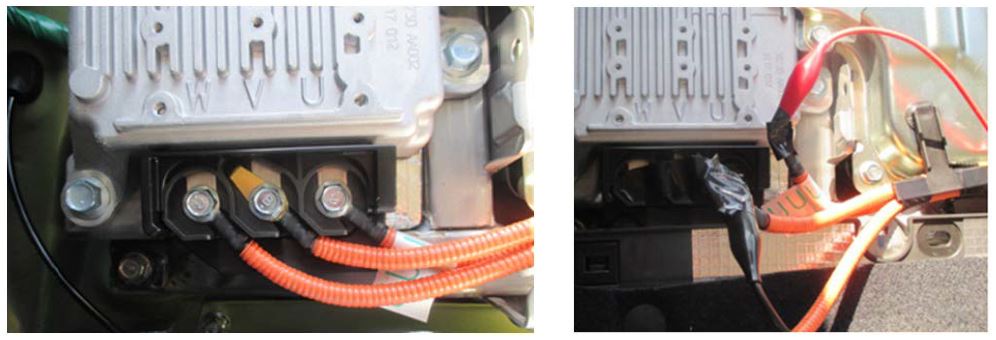
- ONE AT A TIME, remove the 3 bolts securing the orange “W”, “V”, and “U” cables to the electric oil pump inverter. As each cable is removed, cover each terminal end with one piece of electrical tape to insulate it. Connect the RED (+) test lead from the DVOM to the “U” cable end and BLACK (-) lead to the “V” cable end as shown. Confirm the “W” cable end is wrapped with insulating tape.
- Reinstall the orange HEV Service Disconnect
- Turn on the DVOM and set it to measure AC
- Start the engine and with the transmission in PARK, hold the engine at 1800
- Read the AC voltage on the DVOM display and record your
NOTES:
- The AT TEMP lamp will stay on because at this point, the power cables to the inverter are
- Confirm the DVOM is properly set so it can measure and display the correct AC voltage (e.g. select 1000 VAC or “Auto Range” depending on the DVOM being used).
IF THE DVOM SHOWS 0.5V OR MORE: the o-ring and drive motor are damaged. The drive motor / case assembly must be replaced. Remove the CVT assembly following the procedure in the applicable Service Manual.
IF THE DVOM SHOWS LESS THAN 0.5V: the root cause of the DTC is elsewhere. Continue with the DTC diagnostic procedure in the applicable Service Manual.
NOTES:
If the DTC display history shows DTC P0C79: “DRIVE MOTOR “A” INVERTER VOLTAGE TOO HIGH”, check and record the freeze frame data of both the DMCM and TCM . If P172A or P0B0B are also indicated during the same drive cycle, note that P0C79 is only indicated along with P172A and P0B0B. Therefore, the Drive Motor Inverter has no problem and is operating normally.
IMPORTANT: The next steps also require Personal Protective Equipment be worn.
REMINDER: Remove the (orange) Hybrid Service Disconnect plug again and put it in your pocket BEFORE reconnecting the Oil Pump Inverter power cables.
- Re-connect the inverter power cables ONE AT A TIME and torque the 10mm bolts to 5.5 ft.
- Replace the battery cover and torque the TORX screws to 5.5 ft.
- Reinstall the sub-trunk and rear cargo area floor mat.
- Reinstall the orange HEV Service Disconnect plug.
Required Parts List for Drive Motor Case Assembly Replacement:
| DESCRIPTION | QTY. | PART NUMBER |
| CVTFII Fluid | 13 | SOA635304* |
| ThreeBond 1217B (Pink) | 1 | SOA635068 |
| ThreeBond 1215 (Gray) | 1 | SOA635019 |
| O Ring | 1 | 806911080 |
| Case Assembly-Motor | 1 | 29019AA001 |
| Bolt Assembly-Seal | 2 | 31325KA151 |
| Clip-Transmission Harness | 1 | 31759AA060 |
| Ring-Seal | 2 | 31377AA600 |
| Gasket | 1 | 33295AA000 |
| O Ring | 5 | 806912200 |
| O Ring | 1 | 806912210 |
| O Ring | 2 | 806917100 |
| O Ring | 1 | 806929070 |
| Hose-ATF | 1 | 99079AA100 |
| Hose-ATF | 1 | 99079AA110 |
| Circlip-CVJ | 2 | 28333AG010 |
| Oil Seal | 1 | 806735300 |
| Oil Seal | 1 | 806735290 |
| Ring Seal | 1 | 31377AA490 |
| Ring Seal | 2 | 31377AA590 |
| O Ring | 1 | 806913250 |
*Warranty Claim Part Number (Not Orderable)
REPAIR PROCEDURE:
- Remove the CVT assembly following the procedure outlined in the applicable Service Manual.
- STOP HERE.
- If only the Oil Pump Relief Valve is being replaced, order the parts as listed in TSB 16-108-17R. (Always order the most up to date part numbers.) Proceed with the relief valve replacement Service Procedure as outlined in TSB 16-108-17R.
- If the drive motor case assembly is damaged and requires replacement, order the parts listed above (Always order the most up to date part numbers.) and proceed with the remainder of the Service Procedure outlined in this bulletin, 16-94-15R. • Remove the electric oil pump assembly,
NOTES:
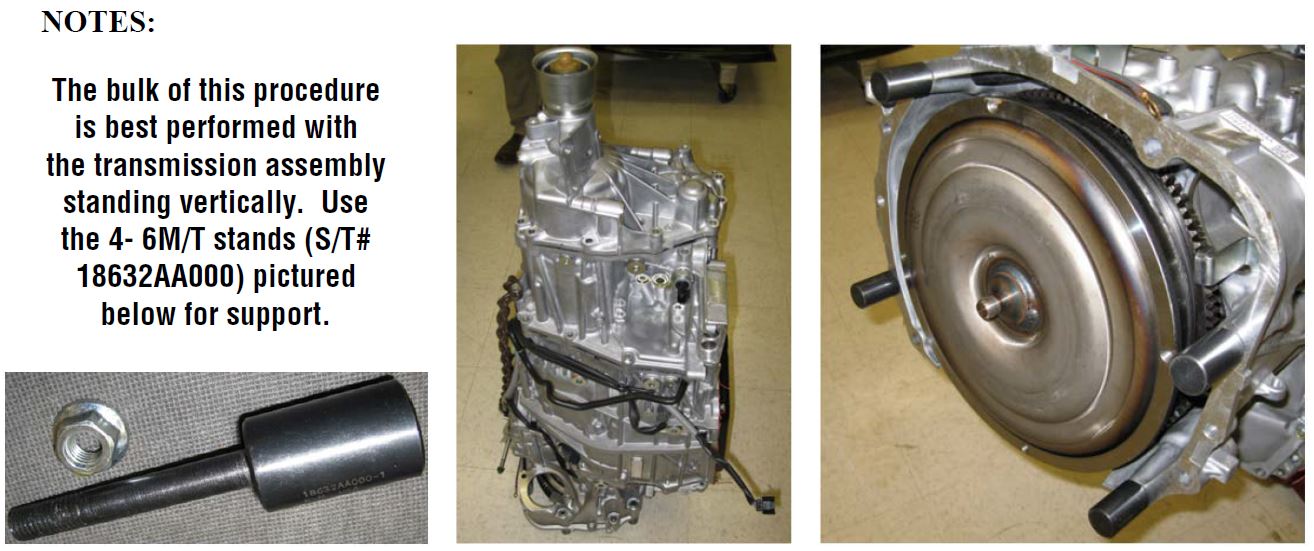
The bulk of this procedure is best performed with the transmission assembly standing vertically. Use the 4- 6M/T stands (S/T# 18632AA000) pictured below for support.
- The torque converter can also be left in place. Either support it from the underside after standing the unit up with a block of wood or use a retainer strap / bracket included with remanufactured and replacement transmission assemblies to keep the torque converter in place.
- It is NOT necessary to remove the internal parking pawl control rod or the inhibiter switch assembly to perform this
- There are 14 bolts securing the drive motor case assembly to the CVT main
- Use extra caution during removal and installation of the electric oil pump wiring harness to avoid damaging
- Always utilize a helper when removing and installing the drive motor case
- The drive motor input shaft and coupling sleeve must be swapped over to the new Drive Motor Case assembly.
IMPORTANT: Before reassembling the cases, the following 3 measurements must be performed to determine the required thicknesses for:
- Output clutch roller bearing shim (Note measurement of removed shim(s) here)
- Transfer drive gear shim (Note measurement of removed shim(s) here)
- Transfer driven gear shim (Note measurement of removed shim(s) here)
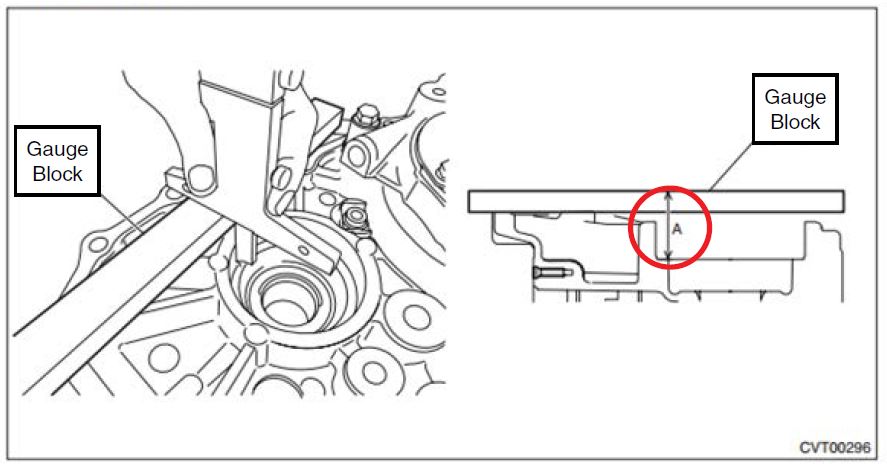
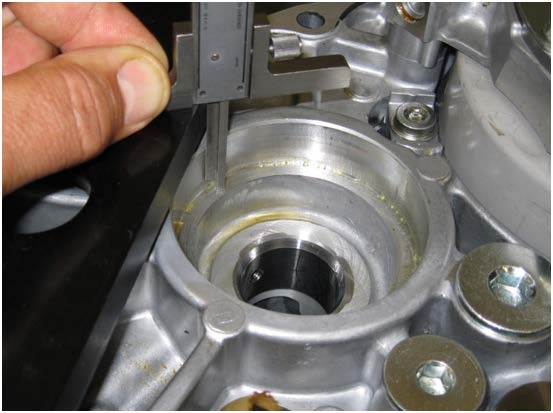
1. Output clutch roller bearing shim:
Steps 1 & 2:
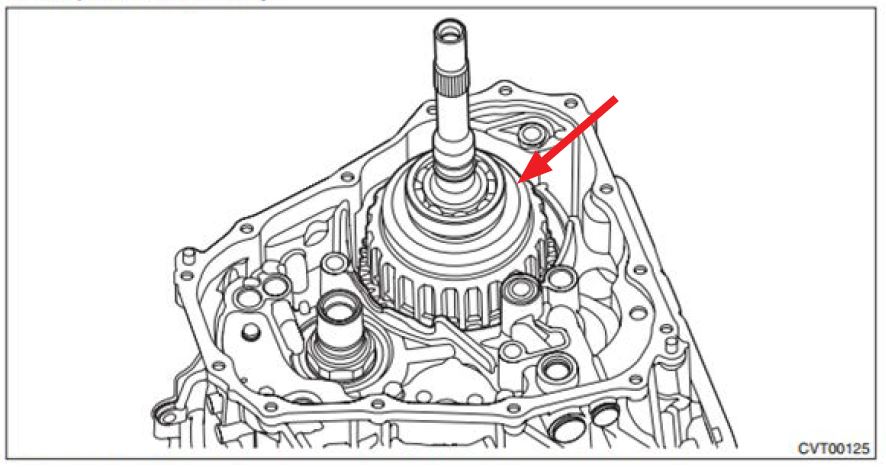
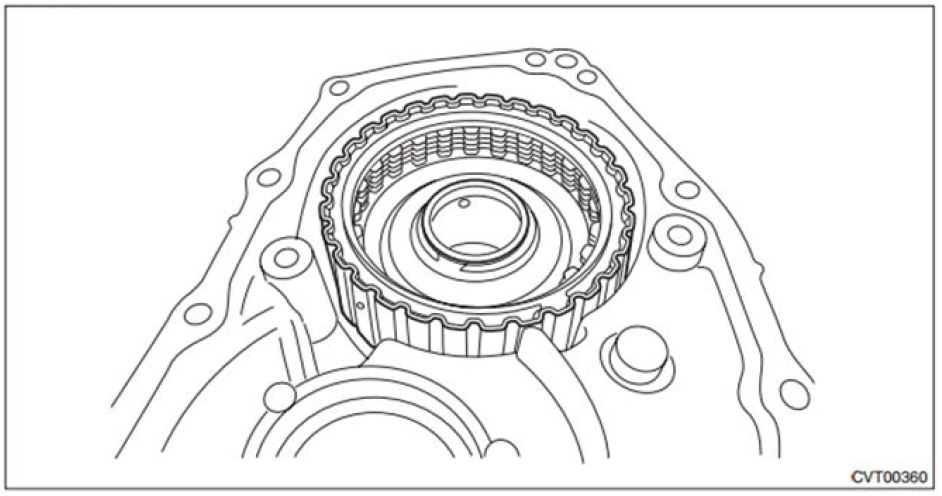
- Remove the output clutch assembly.
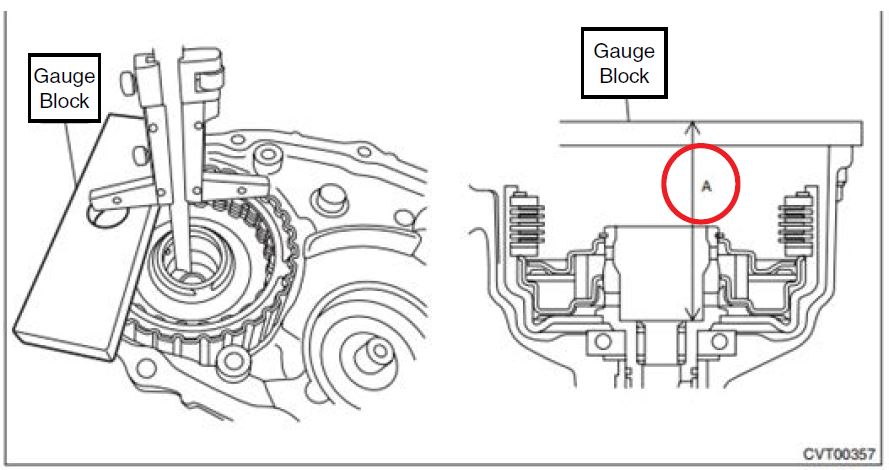
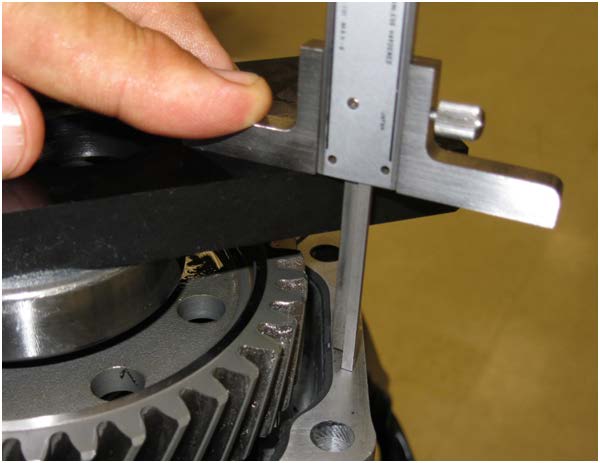
2) Measure the height “A” from the Gauge Block upper face to the ball bearing catch surface.
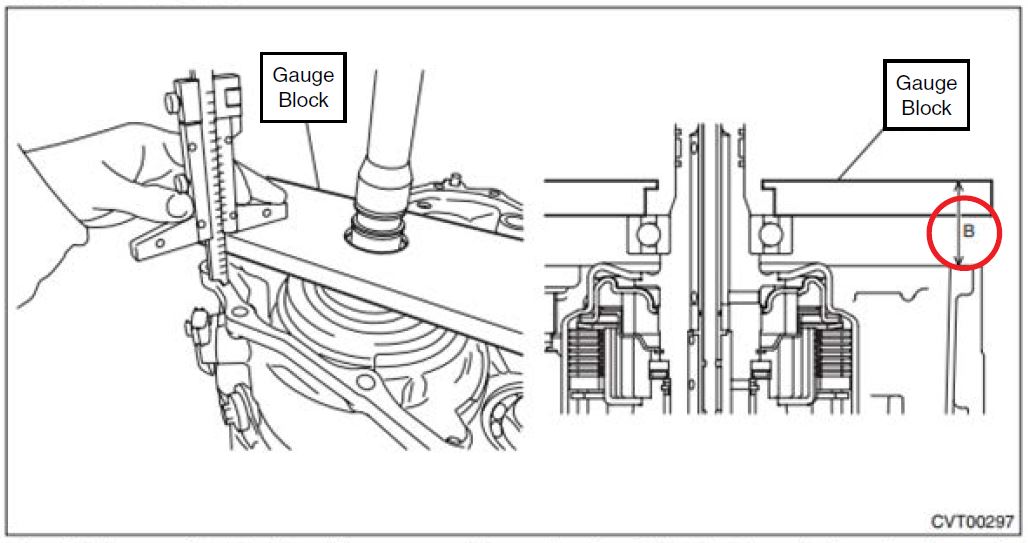
Steps 3:
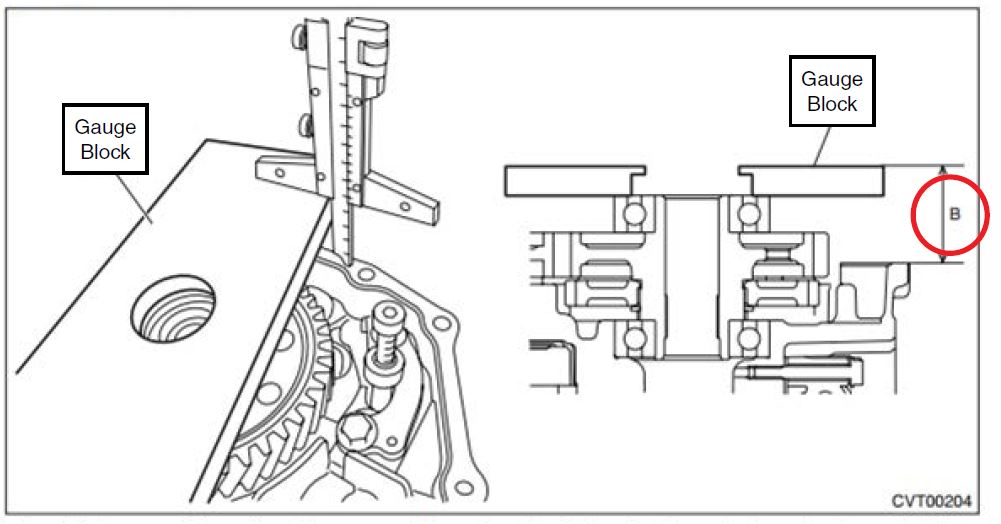
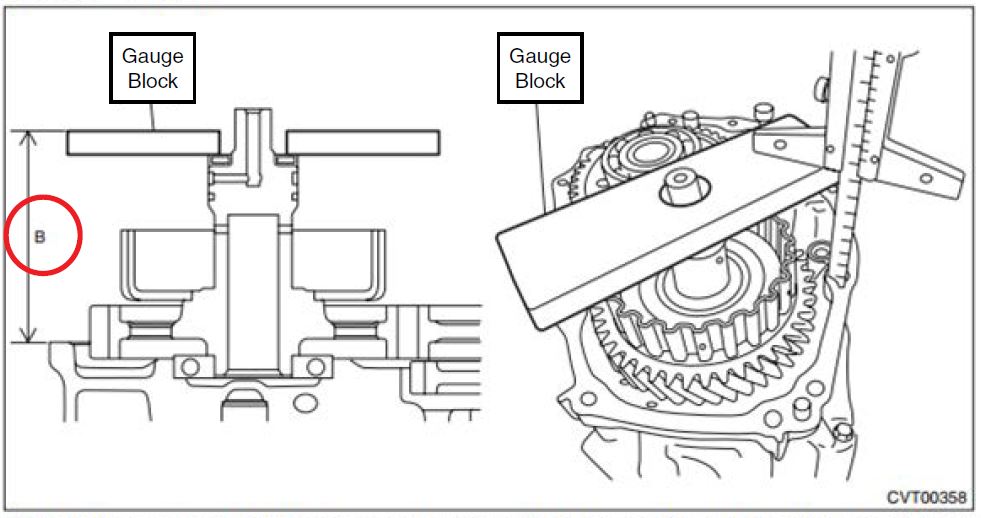
3) Reinstall the output clutch assembly then measure the height “B” from the Gauge Block to the mating surface of the transmission case.
4) Obtain the thickness of reduction driven gear shim using the following formula to select zero to three reduction driven gear shims.
T (mm) = A – B – (0.05 — 0.25)
[T (in) = A – B – (0.002 — 0.01)
T: Shim thickness
A: Height from the Gauge Block upper face to the ball bearing catch surface
B: Height from Gauge Block to transmission case mating surface
0.05 — 0.25 mm (0.002 — 0.01 in): Clearance
| Reduction driven gear shim | |
| Part No. | Thickness mm (in) |
33279AA090 | 0.3 (0.012) |
33279AA100 | 0.4 (0.016) |
33279AA110 | 0.5 (0.020) |
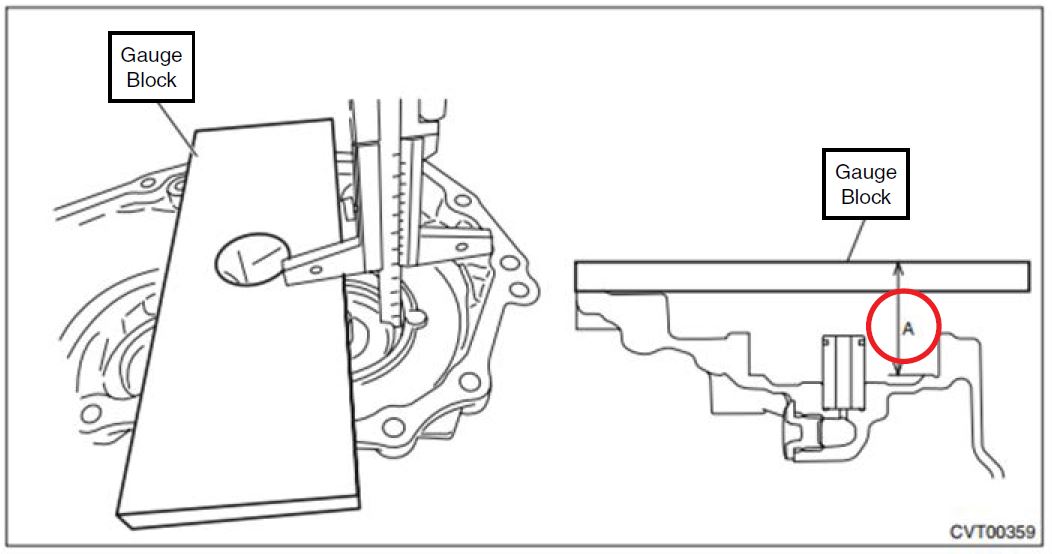
- Transfer drive gear shim:
Step 1:
1) Measure the height “A” from the Gauge Block upper face to the ball bearing catch surface.
Steps 2 and 3:
2) Measure the height “B” from the Gauge Block to the mating surface of the transmission case.
3) Obtain the thickness of transfer driven gear shim using the following formula to select zero to three transfer driven gear shims.
T (mm) = A – B – (0.05 — 0.25)
[T (in) = A – B – (0.002 — 0.01)
T: Shim thickness
A: Height from the Gauge Block upper face to the ball bearing catch surface
B: Height from Gauge Block to transmission case mating surface
0.05 — 0.25 mm (0.002 — 0.01 in): Clearance
| Reduction driven gear shim | |
| Part No. | Thickness mm (in) |
33279AA090 | 0.3 (0.012) |
33279AA100 | 0.4 (0.016) |
33279AA110 | 0.5 (0.020) |
- Transfer driven gear shim:
Step 1:
1) Install the transfer clutch assembly to the extension case with the transfer driven gear shims and thrust bearings removed.
Steps 2, 3, 4, and 5:
2) Install the thrust bearing to the transfer driven gear.
3) Using the Gauge Block, measure the height “A” from the ST end face to the thrust bearing catch surface of the transfer clutch assembly.
4) Using the Gauge Block, measure the height “B” from the transmission case mating surface to the end of the Gauge Block
5) Obtain the thickness of transfer driven gear shim using the following formula to select zero to three transfer driven gear shims.
T (mm) = A – B – (0.05 — 0.25)
[T (in) = A – B – (0.002 — 0.01)
T: Shim thickness
A: Height from the Gauge Block end face to the transfer clutch assembly thrust bearing catch surface
B: Height from mating surface of the transmission case to the end of the Gauge Block
0.05 — 0.25 mm (0.002 — 0.01 in): Clearance
| Reduction driven gear shim | |
| Part No. | Thickness mm (in) |
33279AA090 | 0.3 (0.012) |
33279AA100 | 0.4 (0.016) |
33279AA110 | 0.5 (0.020) |
Once all of the proper shim thicknesses have been determined, proceed with reassembly following the procedure outlined in the applicable Service Manual.
REASSEMBLY NOTES:
- When installing the secondary pressure sensor and inspection plugs, ALWAYS install a new o-ring (with some CVT fluid applied to it) and follow the proper torque specifications as they do
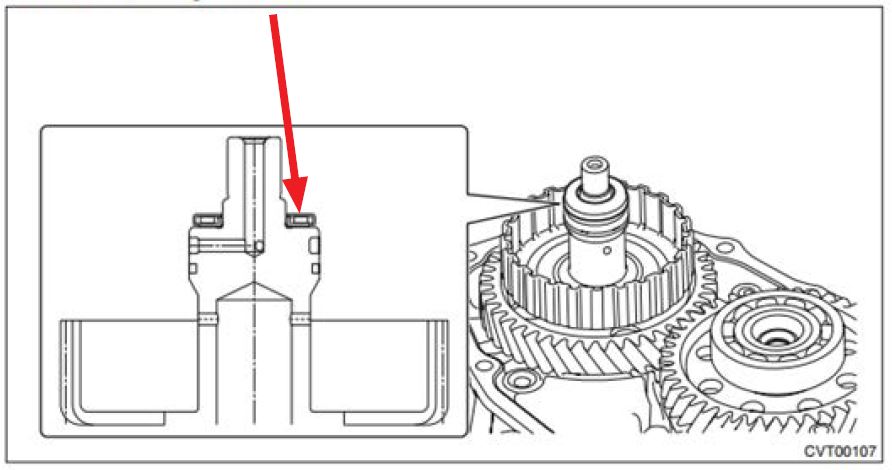
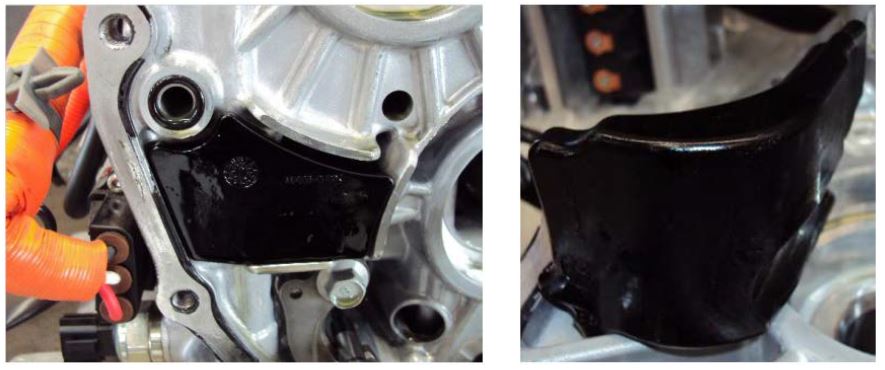
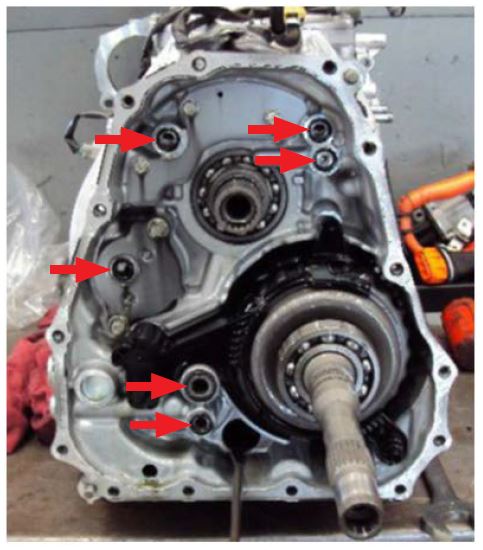
- Remember to transfer both of the oil baffles shown below over to the new assembly.
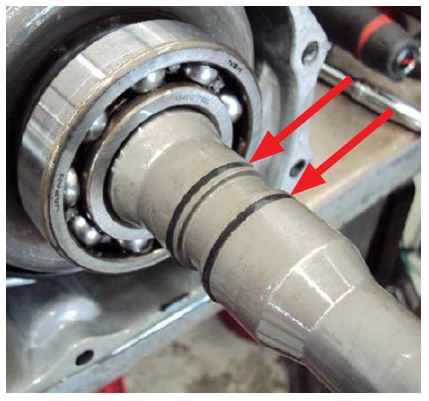
- Never expand the output clutch output shaft interlocked split sealing rings any more than necessary to get them onto the shaft. Use caution and patience as they can be tricky to install. NOTE: If these sealing rings become deformed during installation, they MUST be replaced.
IMPORTANT: BEFORE applying any sealer to the cases, always trial fit them together to confirm proper spline alignment between the coupling sleeve, the drive motor input shaft and the primary pulley. The cases are too close together to facilitate turning the primary pulley retaining nut to get the splines aligned properly, especially when there is fresh sealer applied.
- Once proper spline alignment is confirmed, use some CVT fluid to hold the 6 o-rings in place between the cases during reassembly.
- Use the GRAY ThreeBond sealer (004403007) to seal the case assemblies and the PINK (K0877YA020) sealer for the small output clutch control valve body fluid pan.
- Torque the 14 case bolts to 18.4 ft.
- Never twist the electric oil pump harness more than 360 degrees to avoid damaging it.
2 Affected Products
Vehicle
| MAKE | MODEL | YEAR |
SUBARU | CROSSTREK | 2014-2015 |
1 Associated Document
Manufacturer Communications
NUMBER: 16-94-15R
DATE: 07/30/15
REVISED: 07/09/18
MC-10150925-9999.pdf 2300.968KB
 Loading...
NHTSA ID Number: 10182591
Manufacturer Communication Number: 169415R
Summary
This bulletin provides a diagnosis and repair procedure for DTC P172A and/or P0B0B. When either of these DTCs is stored, a leaking o-ring which seals the electric oil pump relief valve may allow CVT fluid to enter the pump?s electric motor. Although current Service Manual diagnostic procedures instruct replacement of multiple components, this information will help isolate the actual failed component for a more cost-effective repair.
PRODUCTION CHANGE INFORMATION
A change to the drive motor relief valve o-ring was incorporated into production on June 16, 2015 starting with VIN F*298545.
1 Associated Document
Manufacturer Communications
NUMBER: 16-94-15R
DATE: 07/30/15
REVISED: 08/12/16
MC-10182591-9999.pdf 1260.281KB
 Loading...
NHTSA ID Number: 10150950
Manufacturer Communication Number: 16-94-15R
Summary
This bulletin provides a diagnosis and repair procedure for DTC P172A and / or P0B0B. When either of these DTCs is stored, a leaking o-ring which seals the electric oil pump relief valve may allow CVT fluid to enter the pump?s electric motor. Although current Service Manual diagnostic procedures instruct replacement of multiple components, this information will help isolate the actual failed component for a more cost-effective repair. NOTE: The relief valve is now available as an individual part. If there is no damage to the drive motor case assembly, refer to TSB 16-108-17R for the parts needed and Service Procedure for replacing just the relief valve.
1 Associated Document
Manufacturer Communications
NUMBER: 16-94-15R
DATE: 07/30/15
REVISED: 07/09/18
MC-10150950-9999.pdf 2300.968KB
 Loading...
| “This site contains affiliate links for which OEMDTC may be compensated” |
- 6 Quarts of genuine Subaru
 CVTF-II fluid
 - SOA427V1660 x6 This is green fluid
- 2013-2019 Crosstrek with CVT NON HYBRID, 2014-2016 Crosstrek CVT HYBRID
- 2014-2023 Forester 2.5 Naturally Aspirated with CVT NON TURBO (NOT FOR WILDERNESS)
- 2010-2019 Legacy 2.5 FB25 with CVT, 2010-2014 Legacy 3.6 with CVT, 2010-2019 Outback 2.5 FB25 with CVT, 2010-2014 Outback 3.6 with CVT, 2012-2023 Impreza 2.0 non turbo with CVT
- 8 Quarts of genuine Subaru
 CVTF-II fluid
 - SOA427V1660 x8 This is green fluid
- 2013-2019 Crosstrek with CVT non hybrid, 2014-2016 Crosstrek CVT hybrid
- 2014-2023 Forester 2.5 Naturally Aspirated with CVT non turbo (not for wilderness)
- 2010-2019 Legacy 2.5 FB25 with CVT, 2010-2014 Legacy 3.6 with CVT, 2010-2019 Outback 2.5 FB25 with CVT, 2010-2014 Outback 3.6 with CVT, 2012-2023 Impreza 2.0 non turbo with CVT
- Engineered for and meets requirements of Subaru
 Automatic Transmission with HP specifications
 - Precisely engineered frictional characteristics guarantee smooth shifting and outstanding anti-shudder performance
- Excellent resistance to oxidation and thermal breakdown provide long fluid life and extended protection
- Provides superior cleanliness, maintaining the transmission free of sludge and varnish deposits
- Advanced anti-wear technology provides maximum protection to gears and bearings
- genuine oem factory part
- exact fit
- durable
- best in quality
- this is not an aftermarket part
- 5 QUARTS OF GENUINE Subaru
 75w-90 High Performance Gear Oil
 - SOA427V1700
 X5
X5 - For use in MANUAL transmissions only.
- 5 & 6 Speed manual transmissions
- The extra S 5 gallon pail is no longer available and is now superseded by these quarts.
- 4 QUARTS OF GENUINE Subaru
 High Performance Transmission Fluid and Drain plug gasket.
 - HP Fluid SOA427V1500 X4 & Plug Gasket 11126AA000 X1
- FOR USE IN AUTOMATIC. NOT For use in CVT transmissions.
- 2005-2011 Impreza & 2005-2013 Forester & 2005-2014 Legacy
- 2005-2014 Outback & 2006-2014 Tribeca & 2005-2006 Baja (LEGACY AND TRIBECA LOOK TO TAKE 6 QUARTS )
- Genuine Genuine part that fits your specific vehicle
- Automatic Transmission Fluid
- Part Number: SOA427V1500
- Manufactured to meet specifications for fit, form, and function
- Formulated with full-synthetic base stocks and advanced additive technology to meet the challenging demands of automatic transmissions
- Enhanced anti-shudder protection for smooth shifting and maximum power transfer
- Developed with anti-wear technology to help improve transmission durability
- Engineered with a proprietary blend of base oils and advanced additives to provide better oil flow at low temperatures and greater film protection at higher temperatures
Last update on 2025-05-08 / Affiliate links / Images from Amazon Product Advertising API
This product presentation was made with AAWP plugin.
SEOCONTENT-START
Bulletin Number: 16-94-15R; Revise: 10/29/18 Page 1 of 11 INTRODUCTION This bulletin provides a diagnosis and repair procedure for DTC P172A and / or P0B0B. When either of these DTCs is stored, a leaking o-ring which seals the electric oil pump relief valve may allow CVT fluid to enter the pump’s electric motor. Although current Service Manual diagnostic procedures instruct replacement of multiple components, this information will help isolate the actual failed component for a more cost-effective repair. NOTE: The relief valve is now available as an individual part. If there is no damage to the drive motor case assembly, refer to TSB 16-108-17R for the parts needed and Service Procedure for replacing just the relief valve. PRODUCTION CHANGE INFORMATION A change to the drive motor relief valve o-ring was incorporated into production on June 16, 2015 starting with VIN F*298545. ADDITIONAL TOOLS REQUIRED: • Digital Voltage / Ohm Meter (DVOM) and test leads (1000v, CAT III) w/ alligator clips • ¼” drive T-25 or T-30 TORX® bit for battery cover screws • Electrical tape to insulate power cable terminal ends (3- 2” long pieces of tape) • Personal Protective Equipment (Hybrid Safety Kit J-51311, ALWAYS check the Expiration Date on Gloves) DIAGNOSIS PROCEDURE / INFORMATION: VERY IMPORTANT SAFETY WARNING: The HEV system includes a high-voltage circuit. Mishandling of HEV-related components may cause electric shock and serious personal injury. Technicians who have not received Subaru Hybrid training should NOT perform testing or repairs related to the HEV system. **See Subaru Technician Reference Booklet, Module 702 (MSA5P1702C) for more HEV information. NOTE: • Before starting the diagnosis procedure, use the SSMIII to confirm CVT fluid temperature is below 104 degrees F (40 C). • Turn the ignition OFF. NUMBER: 16-94-15R DATE: 07/30/15 REVISED: 07/09/18 APPLICABILITY: 2014-15MY XV Crosstrek Hybrid Electric Vehicle (HEV) SUBJECT: Diagnosis and Repair of DTCs P172A and P0B0B Continued… CAUTION: VEHICLE SERVICING PERFORMED BY UNTRAINED PERSONS COULD RESULT IN SERIOUS INJURY TO THOSE PERSONS OR TO OTHERS. Subaru Service Bulletins are intended for use by professional technicians ONLY. They are written to inform those technicians of conditions that may occur in some vehicles, or to provide information that could assist in the proper servicing of the vehicle. Properly trained technicians have the equipment, tools, safety instructions, and know-how to do the job correctly and safely. If a condition is described, DO NOT assume that this Service Bulletin applies to your vehicle, or that your vehicle will have that condition. SUBARU OF AMERICA, INC. IS ISO 14001 COMPLIANT ISO 14001 is the international standard for excellence in Environmental Management Systems. Please recycle or dispose of automotive products in a manner that is friendly to our environment and in accordance with all local, state and federal laws and regulations. SERVICE BULLETIN ATTENTION: GENERAL MANAGER q PARTS MANAGER q CLAIMS PERSONNEL q SERVICE MANAGER q IMPORTANT – All Service Personnel Should Read and Initial in the boxes provided, right. © 2016 Subaru of America, Inc. All rights reserved. Bulletin Number: 16-94-15R; Revise: 10/29/18 Page 2 of 11 IMPORTANT: The next steps require Personal Protective Equipment be worn. • Remove the rear cargo area floor mat and the sub-trunk (storage tray). • Remove the orange HEV Service Disconnect plug and put it in your pocket. • Remove the TORX screws and necessary trim clips securing the aluminum battery cover. • ONE AT A TIME, remove the 3 bolts securing the orange “W”, “V”, and “U” cables to the electric oil pump inverter. As each cable is removed, cover each terminal end with one piece of electrical tape to insulate it. Connect the RED (+) test lead from the DVOM to the “U” cable end and BLACK (-) lead to the “V” cable end as shown. Confirm the “W” cable end is wrapped with insulating tape. • Reinstall the orange HEV Service Disconnect plug. • Turn on the DVOM and set it to measure AC Voltage. • Start the engine and with the transmission in PARK, hold the engine at 1800 RPM. • Read the AC voltage on the DVOM display and record your result. NOTES: • The AT TEMP lamp will stay on because at this point, the power cables to the inverter are removed. • Confirm the DVOM is properly set so it can measure and display the correct AC voltage (e.g. select 1000 VAC or “Auto Range” depending on the DVOM being used). IF THE DVOM SHOWS 0.5V OR MORE (DVOM will usually display 10V): the o-ring and possibly the drive motor are damaged. If damaged, the drive motor / case assembly must be replaced. Remove the CVT assembly following the procedure in the applicable Service Manual. IF THE DVOM SHOWS LESS THAN 0.5V: the root cause of the DTC is elsewhere. Continue with the DTC diagnostic procedure in the applicable Service Manual. NOTES: If the DTC display history shows DTC P0C79: “DRIVE MOTOR “A” INVERTER VOLTAGE TOO HIGH”, check and record the freeze frame data of both the DMCM and TCM. If P172A or P0B0B are also indicated during the same drive cycle, note that P0C79 is only indicated along with P172A and P0B0B. Therefore, the Drive Motor Inverter has no problem and is operating normally. Continued… Bulletin Number: 16-94-15R; Revise: 10/29/18 Page 3 of 11 IMPORTANT: The next steps also require Personal Protective Equipment be worn. REMINDER: Remove the (orange) Hybrid Service Disconnect plug again and put it in your pocket BEFORE reconnecting the Oil Pump Inverter power cables. • Re-connect the inverter power cables ONE AT A TIME and torque the 10mm bolts to 5.5 ft. lbs. • Replace the battery cover and torque the TORX screws to 5.5 ft. lbs. • Reinstall the sub-trunk and rear cargo area floor mat. • Reinstall the orange HEV Service Disconnect plug. Required Parts List for Drive Motor Case Assembly Replacement: PART NUMBER DESCRIPTION QTY. SOA635304* CVTFII Fluid 13 SOA635068 ThreeBond 1217B (Pink) 1 SOA635019 ThreeBond 1215 (Gray) 1 806911080 O Ring 1 29019AA001 Case Assembly-Motor 1 31325KA151 Bolt Assembly-Seal 2 31759AA060 Clip-Transmission Harness 1 31377AA600 Ring-Seal 2 33295AA000 Gasket 1 806912200 O Ring 5 806912210 O Ring 1 806917100 O Ring 2 806929070 O Ring 1 99079AA100 Hose-ATF 1 99079AA110 Hose-ATF 1 28333AG010 Circlip-CVJ 2 806735300 Oil Seal 1 806735290 Oil Seal 1 31377AA490 Ring Seal 1 31377AA590 Ring Seal 2 806913250 O Ring 1 *Warranty Claim Part Number (Not Orderable) REPAIR PROCEDURE: • Remove the CVT assembly following the procedure outlined in the applicable Service Manual. • STOP HERE. 1) If only the Oil Pump Relief Valve is being replaced, order the parts as listed in TSB 16-108-17R. (Always order the most up to date part numbers.) Proceed with the relief valve replacement Service Procedure as outlined in TSB 16-108-17R. Continued… Bulletin Number: 16-94-15R; Revise: 10/29/18 Page 4 of 11 2) If the drive motor case assembly is damaged and requires replacement, order the parts listed above (Always order the most up to date part numbers.) and proceed with the remainder of the Service Procedure outlined in this bulletin, 16-94-15R. • Remove the electric oil pump assembly, output clutch control valve body, power connect cover and the secondary pressure sensor from the old drive motor case assembly. • The torque converter can also be left in place. Either support it from the underside after standing the unit up with a block of wood or use a retainer strap / bracket included with remanufactured and replacement transmission assemblies to keep the torque converter in place. • It is NOT necessary to remove the internal parking pawl control rod or the inhibiter switch assembly to perform this repair. • There are 14 bolts securing the drive motor case assembly to the CVT main case. • Use extra caution during removal and installation of the electric oil pump wiring harness to avoid damaging it. • Always utilize a helper when removing and installing the drive motor case assembly. • The drive motor input shaft and coupling sleeve must be swapped over to the new Drive Motor Case assembly. IMPORTANT: Before reassembling the cases, the following 3 measurements must be performed to determine the required thicknesses for: 1. Output clutch roller bearing shim (Note measurement of removed shim(s) here) 2. Transfer drive gear shim (Note measurement of removed shim(s) here) 3. Transfer driven gear shim (Note measurement of removed shim(s) here) NOTES: The bulk of this procedure is best performed with the transmission assembly standing vertically. Use the 4- 6M/T stands (S/T# 18632AA000) pictured to the right for support. Continued… Bulletin Number: 16-94-15R; Revise: 10/29/18 Page 5 of 11 1. Output clutch roller bearing shim: Steps 1 & 2: Remove 2) Measure the height “A” from the Gauge Block upper face to the ball bearing catch surface. Gauge Block Gauge Block 1) Remove the output clutch assembly Continued… Bulletin Number: 16-94-15R; Revise: 10/29/18 Page 6 of 11 Steps 3: 3) Reinstall the output clutch assembly then measure the height “B” from the Gauge Block to the mating surface of the transmission case. Gauge Block Gauge Block 4) Obtain the thickness of reduction driven gear shim using the following formula to select zero to three reduction driven gear shims. T (mm) = A – B – (0.05 — 0.25) [T (in) = A – B – (0.002 — 0.01) T: Shim thickness A: Height from the Gauge Block upper face to the ball bearing catch surface B: Height from Gauge Block to transmission case mating surface 0.05 — 0.25 mm (0.002 — 0.01 in): Clearance 2. Transfer drive gear shim: Step 1: 1) Measure the height “A” from the Gauge Block upper face to the ball bearing catch surface. Gauge Block Gauge Block Continued… Bulletin Number: 16-94-15R; Revise: 10/29/18 Page 7 of 11 Steps 2 and 3: 2) Measure the height “B” from the Gauge Block to the mating surface of the transmission case. Gauge Block Gauge Block 3) Obtain the thickness of transfer driven gear shim using the following formula to select zero to three transfer driven gear shims. T (mm) = A – B – (0.05 — 0.25) [T (in) = A – B – (0.002 — 0.01) T: Shim thickness A: Height from the Gauge Block upper face to the ball bearing catch surface B: Height from Gauge Block to transmission case mating surface 0.05 — 0.25 mm (0.002 — 0.01 in): Clearance 3. Transfer driven gear shim: Step 1: Continued… Bulletin Number: 16-94-15R; Revise: 10/29/18 Page 8 of 11 Steps 2, 3, 4, and 5: 3) Using the Gauge Block, measure the height “A” from the ST end face to the thrust bearing catch surface of the transfer clutch assembly. Gauge Block Gauge Block 4) Using the Gauge Block, measure the height “B” from the transmission case mating surface to the end of the Gauge Block Gauge Block Gauge Block Continued… Bulletin Number: 16-94-15R; Revise: 10/29/18 Page 9 of 11 5) Obtain the thickness of transfer driven gear shim using the following formula to select zero to three transfer driven gear shims. T (mm) = A – B – (0.05 — 0.25) [T (in) = A – B – (0.002 — 0.01) T: Shim thickness A: Height from the Gauge Block end face to the transfer clutch assembly thrust bearing catch surface B: Height from mating surface of the transmission case to the end of the Gauge Block 0.05 — 0.25 mm (0.002 — 0.01 in): Clearance Once all of the proper shim thicknesses have been determined, proceed with reassembly following the procedure outlined in the applicable Service Manual. REASSEMBLY NOTES: • When installing the secondary pressure sensor and inspection plugs, ALWAYS install a new o-ring (with some CVT fluid applied to it) and follow the proper torque specifications as they do vary. • Remember to transfer both of the oil baffles shown below over to the new assembly. Continued… Bulletin Number: 16-94-15R; Revise: 10/29/18 Page 10 of 11 • Never expand the output clutch output shaft interlocked split sealing rings any more than necessary to get them onto the shaft. Use caution and patience as they can be tricky to install. NOTE: If these sealing rings become deformed during installation, they MUST be replaced. IMPORTANT: BEFORE applying any sealer to the cases, always trial fit them together to confirm proper spline alignment between the coupling sleeve, the drive motor input shaft and the primary pulley. The cases are too close together to facilitate turning the primary pulley retaining nut to get the splines aligned properly, especially when there is fresh sealer applied. Primary Pulley Retaining Nut Coupling Sleeve Drive Motor Input Shaft Primary Pulley Spline • Once proper spline alignment is confirmed, use some CVT fluid to hold the 6 o-rings in place between the cases during reassembly. Bulletin Number: 16-94-15R; Revise: 10/29/18 Page 11 of 11 • Use the GRAY ThreeBond sealer (004403007) to seal the case assemblies and the PINK (K0877YA020) sealer for the small output clutch control valve body fluid pan. • Torque the 14 case bolts to 18.4 ft. lbs. • Never twist the electric oil pump harness more than 360 degrees to avoid damaging it. WARRANTY / CLAIM INFORMATION: For vehicles within the Basic New Car Limited, Powertrain Limited an applicable Emission Warranty period or covered by an active Subaru Added Security Powertrain, Classic or Gold plan, this repair may be submitted using the following claim information: LABOR DESCRIPTION LABOR OPERATION # FAIL CODE LABOR TIME HEV DRIVE MOTOR ASSY. R&R B302001 MTO-42 4.8 REPLACE DRIVE MOTOR ASSY. C302003 1.2 HEV TESTING & DIAGNOSIS C800201 .5 REMINDER: SOA strongly discourages the printing and/or local storage of service information as previously released information and electronic publications may be updated at any time. Always refer to STIS for the latest service information before performing any repairs.
**************************************************************************************************************
SEOCONTENT-END

