| “This site contains affiliate links for which OEMDTC may be compensated” |
NUMBER: 06-52-15
DATE: 09/23/15
| APPLICABILITY: | 2010-14MY Legacy and Outback Models |
| 2012-15MY Impreza 2.0L and XV Crosstrek Models | |
| SUBJECT: | Service Procedure for DTC C0075 |
INTRODUCTION
This bulletin provides an inspection and adjustment procedure to address a DTC C0075 which may be stored in the Vehicle Dynamics Control and Hydraulic Control Unit (VDCCM&HCU). The DTC relates to incorrect inputs to wheel cylinder pressure sensors due to air in the hydraulic brake lines. In addition, on Impreza and XV Crosstrek, an improperly adjusted brake light switch (BLS) may also cause the DTC.
SERVICE PROCEDURE / INFORMATION
- Connect SSMIII and check for any stored DTC(s).
- If Detail codes 5090 and / or 5101 are in memory, proceed with bleeding the braking system. The brake light switch adjustment must also be checked in addition to the bleeding procedure on Impreza and XV Crosstrek models.
BRAKE BLEEDING PROCEDURE:
- Fill the fluid reservoir of the master cylinder with brake fluid.
NOTE: While bleeding the brake system, always keep the reservoir tank filled to prevent entry of air back into the system.
- Always wear safety goggles.
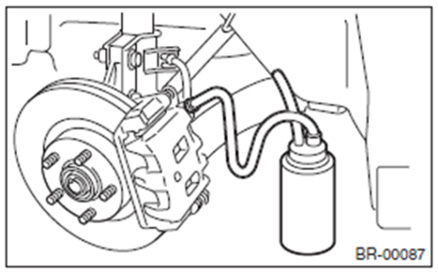
- Attach one end of a clear vinyl tube to the air bleeder and the other end to the brake fluid container as shown in the illustration below.
NOTES:
- The following steps (1-7 below) require either the use of a pressure-bleeder system or a helper.
- Perform air bleeding starting in order starting with the caliper / wheel cylinder farthest from the master cylinder first and work your way forward.
- Have a helper press the brake pedal several times then hold it down.
- Loosen the air bleeder screw to release the brake fluid pressure. Watch closely for air bubbles in the vinyl tube after loosening the bleeder. Tighten the air bleeder quickly and release the brake pedal.
- Repeat steps 1 and 2 until there are no more air bubbles in the vinyl tube.
REMINDER: While bleeding the brake system, always keep the reservoir tank filled to prevent entry of air back into the system.
- Using SSMIII, activate “ABS sequence control” one time.
- Bleed air from the brake line again following Steps 1-3
- Using SSMIII, activate “VDC sequence control” again.
- Bleed air from the brake line again following Steps 1-3
IMPORTANT: Repeat Steps 4-7 above at least 3 times, even if no air bubbles are found in the vinyl tube.
- When brake bleeding procedure is complete, securely tighten the air bleeder screws and top off the brake fluid in the master cylinder reservoir.
- On Impreza and XV Crosstrek models, perform the BLS inspection and adjustment procedure as outlined in TSB 06-46-14 and supplied below.
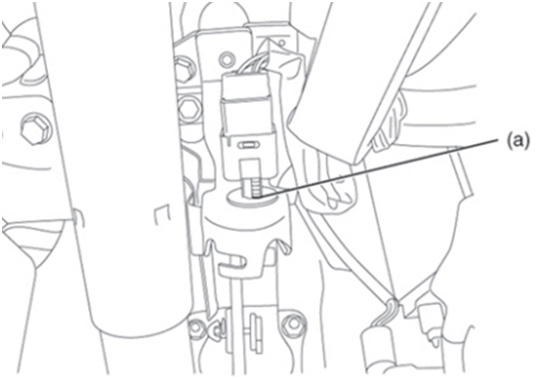
- Before removing or adjusting the BLS, put a reference mark (a) on the threaded/notched portion as shown in the illustration below.
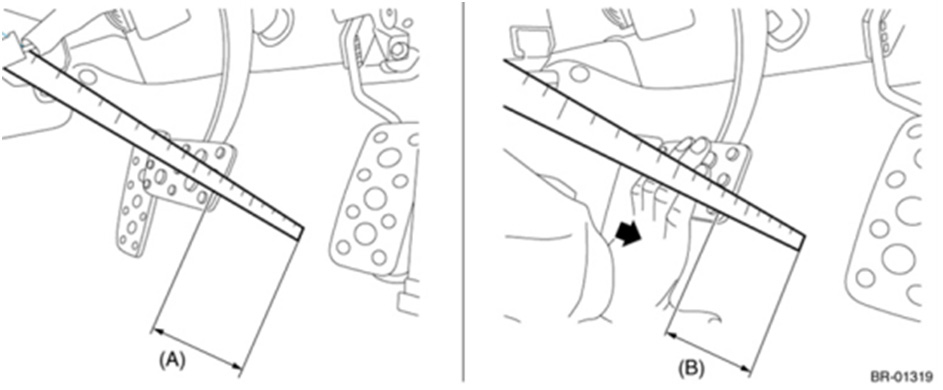
- As shown in the next illustrations, measure the brake pedal stroke by first measuring the distance “A” between the floor mat and the pedal. Depress the brake pedal slowly until the brake lights come on “B” then record the second measurement. Subtract “B” from “A” to obtain the pedal stroke measurement.
The specification for pedal stroke to activate the BLS is 5.5mm +/- 2.5mm (>3mm but <8mm).
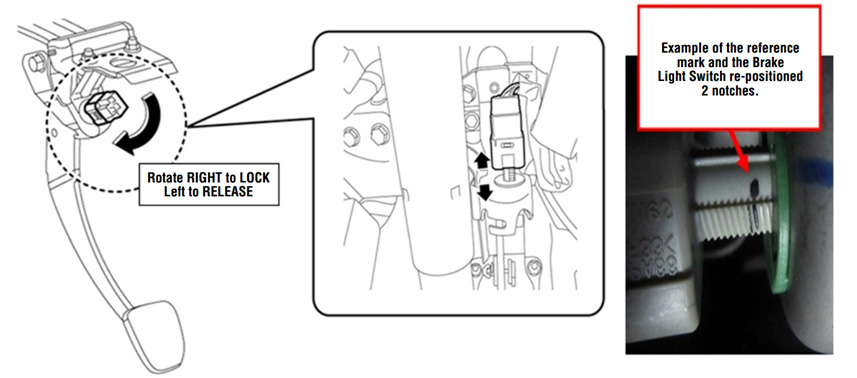
- If the measurement (switch activation) is out of specification, the BLS will need to be adjusted. When the brake lights come on too soon (not enough pedal stroke), the BLS needs to be adjusted “inward” toward the bulkhead but, if the pedal stroke is excessive before the brake lights come on, the BLS will need to be adjusted outward toward the steering wheel. The BLS adjustment is sensitive and in most cases, moving it just one notch should bring the operation into specification since one notch is equivalent to approximately 4mm of movement.
- If it is determined the BLS needs adjustment, rotate the switch approximately 45 degrees to the left (counter-clockwise) to release it from the pedal bracket. You will need to develop a “feel” for the adjustment notches along with how the BLS releases and locks back into place. Move the BLS inward or outward as required using your reference mark (see Step 1) as a guide then rotate the BLS to the right (clockwise) to lock it back into position. Re-measure the pedal stroke. If the switch operation is within the specified limits, the adjustment procedure is complete. If the switch operation is still out of range, repeat the adjustment procedure.
- Clear the ABS / VDC system memory and road test the vehicle to confirm no DTCs reset.
WARRANTY / CLAIM INFORMATION
For vehicles within the Basic New Car Limited Warranty period, this repair may be submitted using the following claim information:
| LABOR DESCRIPTION | VEHICLE MODEL | LABOR OPERATION # | FAIL CODE | LABOR TIME |
|---|---|---|---|---|
| C0075 BRAKE BLEEDING PROCEDURE | LEGACY & OUTBACK | A533-108 | QCV-42 | 0.7 |
| C0075 BRAKE BLEEDING PROCEDURE INCLUDING BLS CHECK / ADJUSTMENT | IMPREZA & XV CROSSTREK | 0.9 |
REMINDER: SOA strongly discourages the printing and/or local storage of service information as previously released information and electronic publications may be updated at any time.
Always refer to STIS for the latest service information before performing any repairs.


