| “This site contains affiliate links for which OEMDTC may be compensated” |
NHTSA ID Number: 10092495
Manufacturer Communication Number: 15-182-15R
Summary
THIS BULLETIN ANNOUNCES A PROCEDURE FOR UPDATING THE NAVIGATION / AUDIO UNITS OPERATING SYSTEM SOFTWARE. THE FOLLOWING LIST OF SYMPTOMS AND RELATED CHANGES PROVIDES A BRIEF DESCRIPTION OF WHICH CUSTOMER CONCERNS THE UPDATES ARE INTENDED TO ADDRESS. IF THE REPORTED CUSTOMER CONCERN IS NOT IDENTIFIED IN THE FOLLOWING INFORMATION, PERFORMING THE UPDATE PROCEDURE WILL NOT ADDRESS IT. IT IS IMPORTANT TO READ THROUGH AND UNDERSTAND THIS INFORMATION COMPLETELY BEFORE PROCEEDING.
NUMBER: 15-182-15R
DATE: 06/17/15
REVISED: 08/11/15
| APPLICABILITY: | 2015MY Legacy, Outback, Impreza & XV Crosstrek 2016MY WRX  Models with Fujitsu-Ten (F10) Navigation System |
|---|---|
| SUBJECT: | Procedures for Updating the Head Unit Operating Software |
This bulletin announces a procedure for updating the navigation / audio unit’s operating system software. The following list of symptoms and related changes provides a brief description of which customer concerns the updates are intended to address. If the reported customer concern is not identified in the following information, performing the update procedure will not address it. It is important to read through and understand this information completely before proceeding.
SYMPTOMS AND CHANGES:
- Symptom 1: Audio output is lost after a few minutes when listening to Sirius/XM satellite radio.
Change: Logic update to provide proper Sirius/XM satellite radio operation.
- Symptom 2: Bluetooth feature becomes inoperative.
Change: Logic update to provide proper Bluetooth feature operation.
- Symptom 3: HD Radio “freezes” after a few minutes of play.
Change: Logic update to provide proper Sirius/XM satellite radio operation.
- Symptom 4: Back-Up Camera “help lines” do not appear.
Change: Logic change to have the assist lines appear 8 seconds from engine start.
- Symptom 5: Map location is inconsistent between Navigation display and iPhone when using the iPhone’s Google Maps with the phone connected to the USB port in console.
Change: Logic update to show correct vehicle location on iPhone.
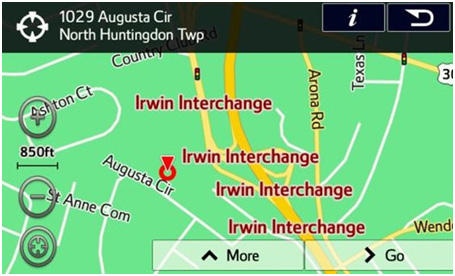
- Symptom 6: Roads or interchanges have the same name displayed multiple times.
Change: Logic change to show only one road or interchange name at the same time.
- Symptom 7: Navigation function is slow to start when selected.
Change: Logic change to eliminate Navigation system slow-starting condition.
- Symptom 8: No map display with key or ignition in “ACC” (accessory) position.
Change: Logic change to allow Navigation system operation in accessory ACC mode.
- Symptom 9: No voice guidance provided from Navigation system after selecting a route unless the ignition is cycled off and back on again.
Change: Logic change to stop voice guidance “Mute” function from defaulting to “ON”.
- Symptom 10: Steering wheel switch controls are inoperative with an iPod (MP3) player connected to the USB.
Change: Logic change to allow proper steering wheel (satellite) switch functionality.
- Symptom 11: Incorrect Umlaut characters are shown on StarLink display.
Change: Logic change to allow proper display of Umlaut letters.
- Symptom 12: No response from the soft touch keys on display.
Change: Logic change to improve communication between display and internal CPU.
- Symptom 13: Back-Up Camera is displayed with shifter in positions other than Reverse.
Change: Logic change to allow display with shifter in Reverse only.
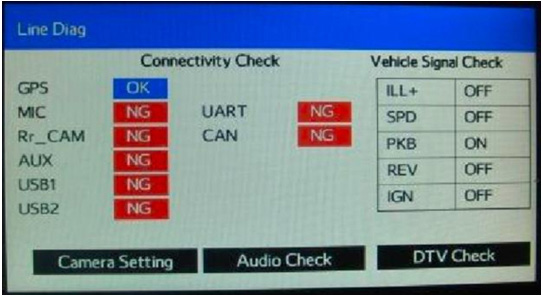
- Symptom 14: “Line Diag” screen is intermittently displayed while driving.
Change: Logic change to prevent display of the “Line Diag” screen.
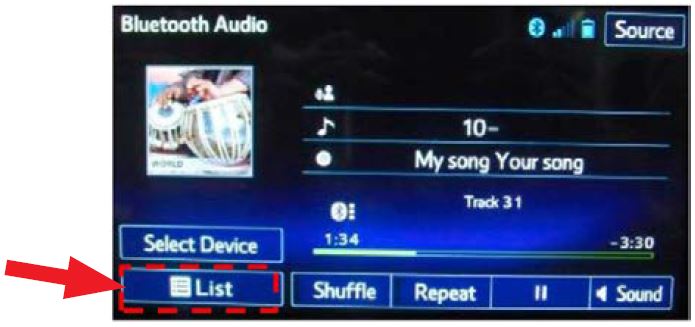
- Symptom 15: “LIST” soft touch key is not displayed on Bluetooth Audio screen while using Bluetooth audio feature with an Apple device utilizing iOS8 software version.
Change: Logic change to enhance compatibility with iOS8 software.
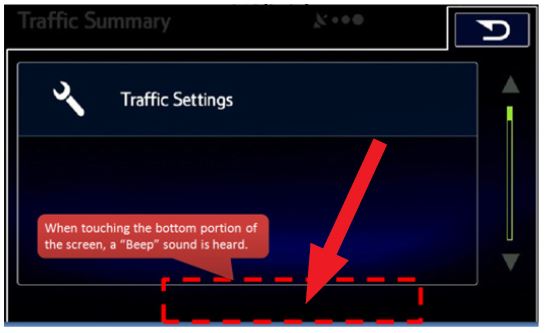
- Symptom 16: “Beep” sound heard when touching the bottom of the display screen where no function soft touch keys are displayed.
Change: Logic change to eliminate beeping sound from inactive soft touch key screen areas.
- Symptom 17: Sirius/XM caution message screen is displayed in English even when French language operation settings are selected.
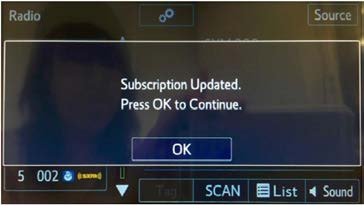
Change: Logic change to make all messages display in the selected operating language.
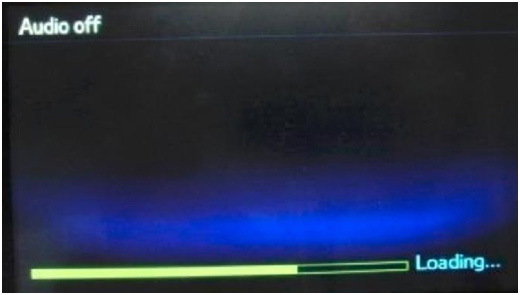
- Symptoms 18-22: The following symptoms are all related to the inability of the software to properly load. One or all of these 5 conditions may occur at the same time.. Logic changes have been included in the applicable update to address each of the following conditions:
- Repeated display of the “Loading” screen at initial unit start-up
- Bluetooth device pairing failure
- Inoperative steering wheel (satellite) switches
- Voice recognition feature inoperative
- Sirius/XM radio feature inoperative.
Loading Screen
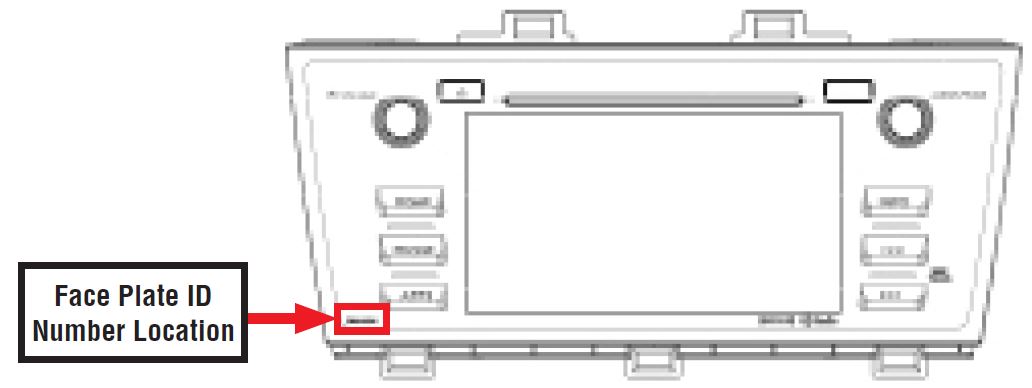
The following information provides procedures for verifying the current head unit operating software version number and when required, accessing and installation of the applicable update files. The affected F10 Navigation unit part numbers and Faceplate ID numbers are listed below.
| VEHICLE MODEL | HEAD UNIT PART NUMBER | FACE PLATE ID NUMBER |
| Legacy & Outback | 86271AL66A | FB664US |
86271AL64A | FB644US | |
| Impreza & XV Crosstrek | 86271FJ630 | FM634US |
WRX | 86271VA630 | FV631US |
COUNTERMEASURE IN PRODUCTION:
The new logic was incorporated into production according to the table below:
| FACE PLATE ID NUMBER | STARTING VIN | DATE | |
| LEGACY | OUTBACK | ||
FB664US | F3025503 | F3237248 | 9/29/2014 |
FB644US | F3027006 | F3240780 | 10/6/2014 |
| IMPREZA | XV CROSSTREK | ||
FM634US | F*011328 | F*248058 | N/A |
WRX | |||
FV631US | TBD | ||
MATERIALS REQUIRED:
2 empty 2GB, USB 2.0 storage devices (flash drives) will be needed to perform these updates. The devices should be dedicated to storing and transferring these updating files only. They also need to be no more than 4GB in size and contain a FAT32 file format before downloading update files onto them.
SERVICE PROCEDURE / INFORMATION:
IMPORTANT REMINDER: Read through and understand this procedure COMPLETELY before proceeding further.
Step 1: Version Check Procedure
Before proceeding with any updates, the currently installed software version must be determined. If the latest software version (or later) is already installed, no updates are necessary. The Version ID numbers for this procedure are found in the Version Check List table shown below. If the Version ID
numbers identified during the Version Check procedure are prior to (or lower than) those shown on the table, proceed with the remainder of the software update beginning with Step 3.
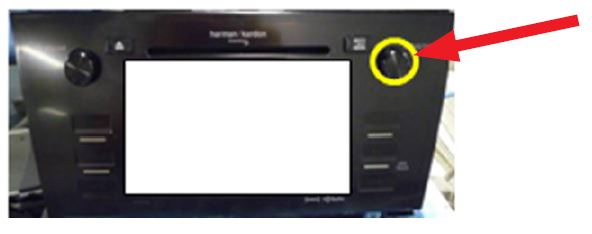
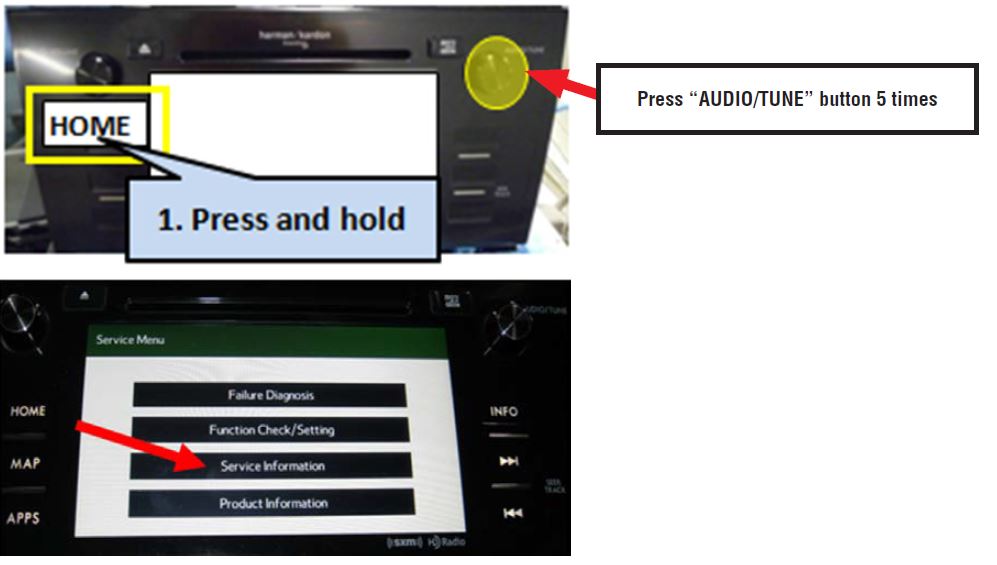
- Switch the unit into “Diagnosis Mode” by pressing and holding the HOME button while pressing the “AUDIO/TUNE” button 5 (five) times.
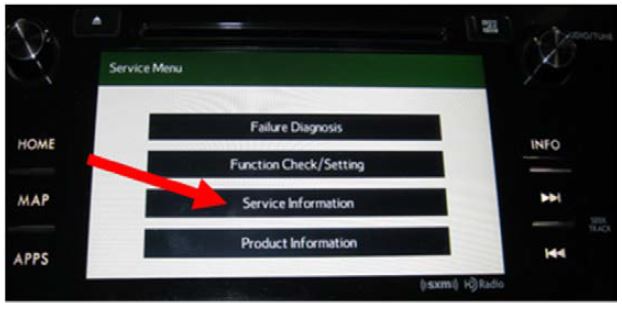
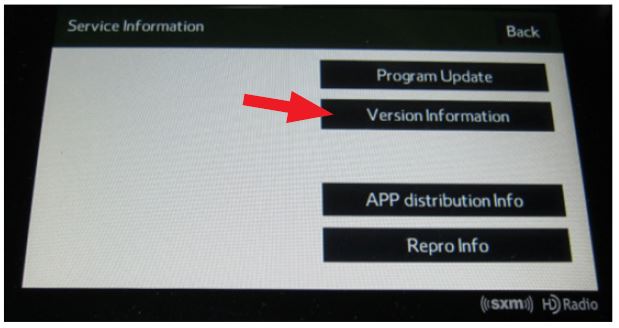
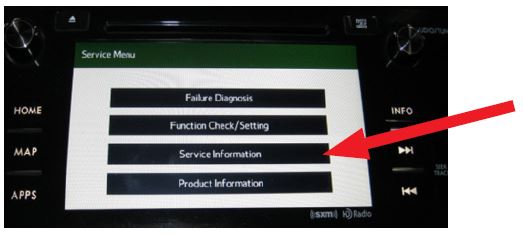
- Press “Service Information”
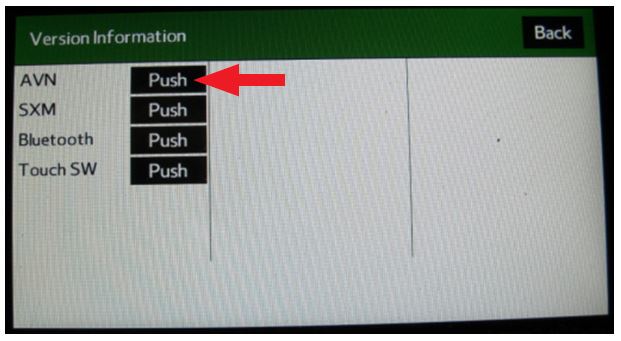
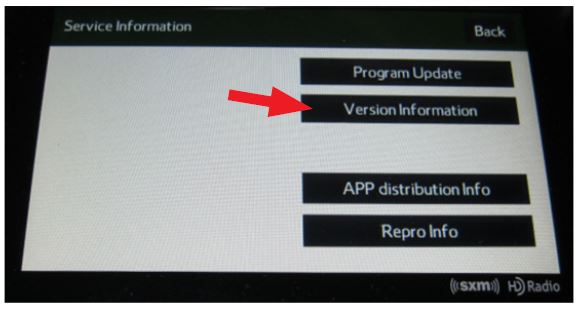
- Press “Version Information”
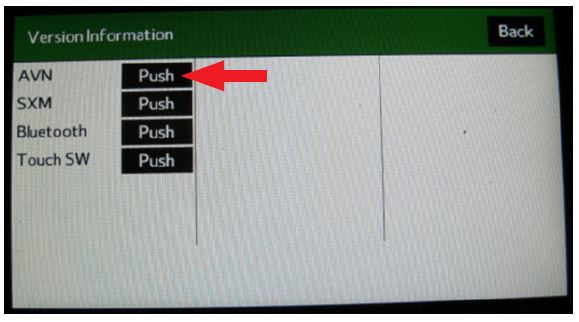
- Press “Push” next to AVN
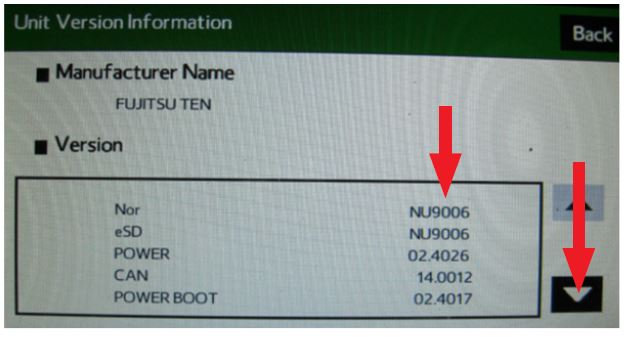
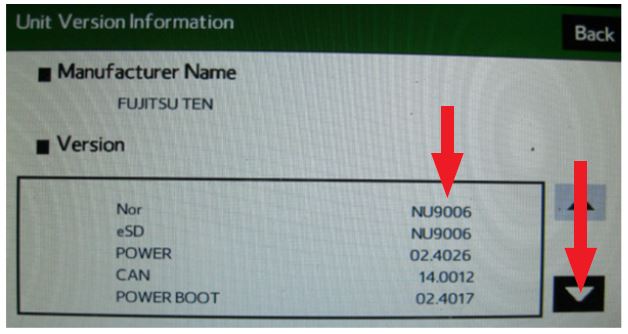
- Verify the current versions according to the “Version Check List” table shown below on page 6. Use the down arrow to scroll to the bottom of the list for complete verification.
- If the software version is current (NU9011 for Legacy/ Outback NU9106 or higher for Impreza/ Crosstrek or NU9203 for WRX
 ), press and HOLD the HOME button to exit the Diagnostic Mode to complete the procedure as no updates are necessary. If no updates are necessary then continue your diagnosis of the customer concern. If the Version ID numbers are prior to (lower than) those shown on the table below, proceed with Step 2, preparing the USB memory (Flash Drives) on page 7 then Step 3, the software update procedure on page 10.
NOTE: If you determine the updates are necessary, the Version Check procedure will need to be performed again after the update installation to confirm the procedure was successful (Step 5, pg. 17).
Version Check List
| LEGACY / OUTBACK | IMPREZA / XV CROSSTREK | WRX | |
| PRODUCT NUMBER | 86271AL64A & 86271AL66A & 86271AL66A | 86271FJ630 | 86271VA630 |
| NOR | NU9011 | NU9106 | NU9203 |
| eSD | NU9011 | NU9106 | NU9203 |
| POWER | 02.4026 | 02.4026 | 02.4026 |
| CAN | 14.0012 | n/a | n/a |
| POWER BOOT | 02.4017 | 02.4117 | 02.4117 |
| POWER VCL | 02.0103 | 63.0105 | 69.0105 |
| DB | NU9011 | NU9106 | NU9203 |
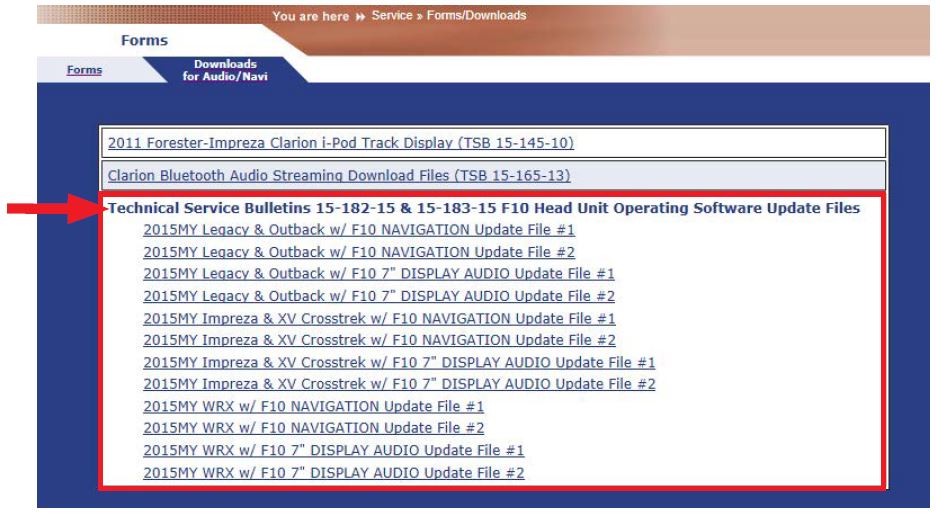
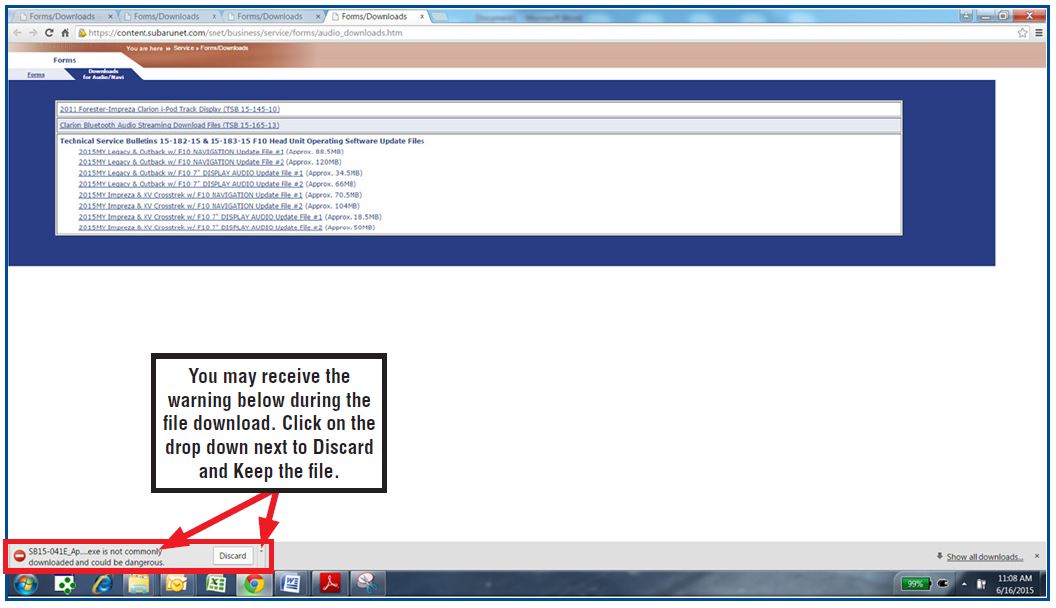
After performing the Version Check procedure, if updates are determined to be necessary, you will need the 2 USB flash drives referenced above to download the Update Files onto. All the F10 update files are accessible for downloading from Subarunet under:
Service>>Forms / Downloads>>Downloads for Audio/Navi page then clicking on the following hyperlink:
Click Here to Access the Downloads for Audio/Navigation Information on Subarunet
The Subarunet page shown above will display and contains links to the update files 1 & 2 for each model head unit.
NOTE: Do not download any files at this point. The file download procedures are supplied later in this bulletin. The flash drives must be formatted before the Update Files can be downloaded onto them. Proceed to Step 2 below for the flash drive formatting procedure.
Step 2: Prepare the USB Memory (flash drive)
VERY IMPORTANT: Before attempting to download any data files, confirm the PC and flash drives you are using are not infected with any virus. The flash drives will need to be formatted for FAT32 following the steps below.
USB Flash Drive Formatting Procedure:
- Install a flash drive into an available USB port on your PC.
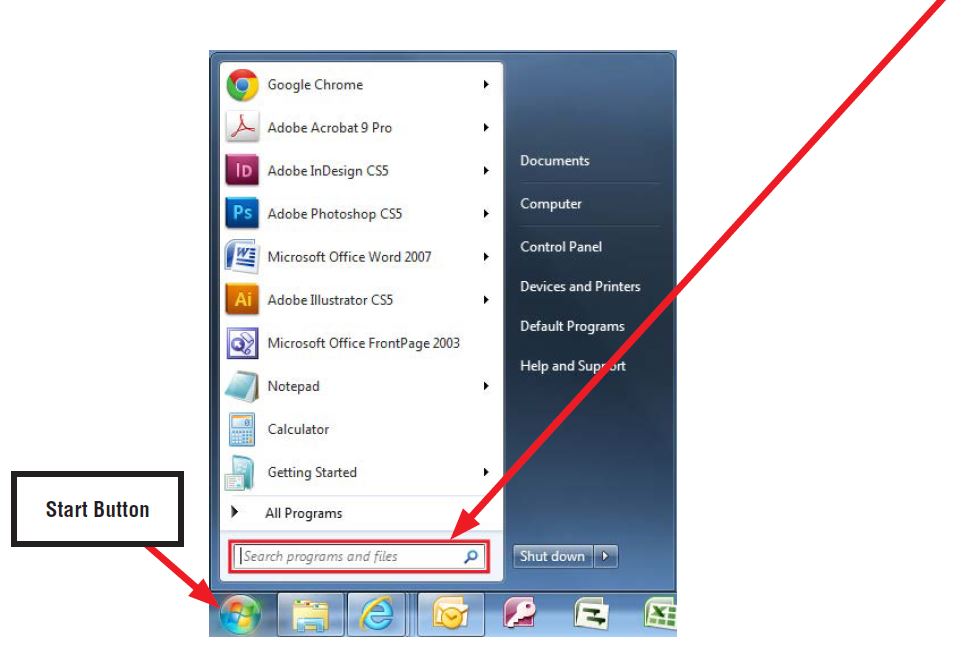
- Click Start (this is located in the lower left corner of the desktop screen) then, in the Search Search
programs and files box, type “explorer”.
NOTE: On SDS Notebook you may also press the My Documents button on the GUI Home Screen.
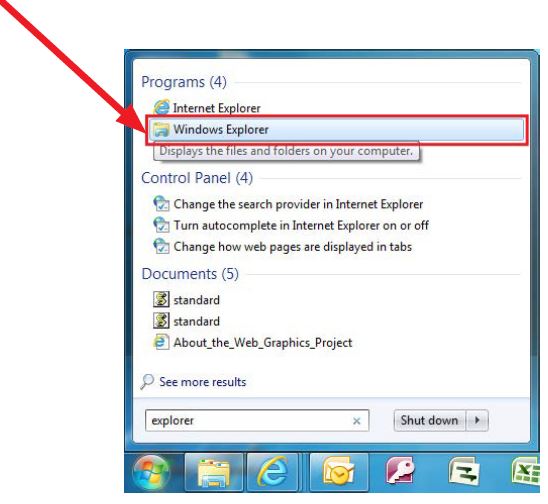
- As you type the word “explorer”, search results will start to appear. In the results, click on the “Windows Explorer” option under the Programs section.
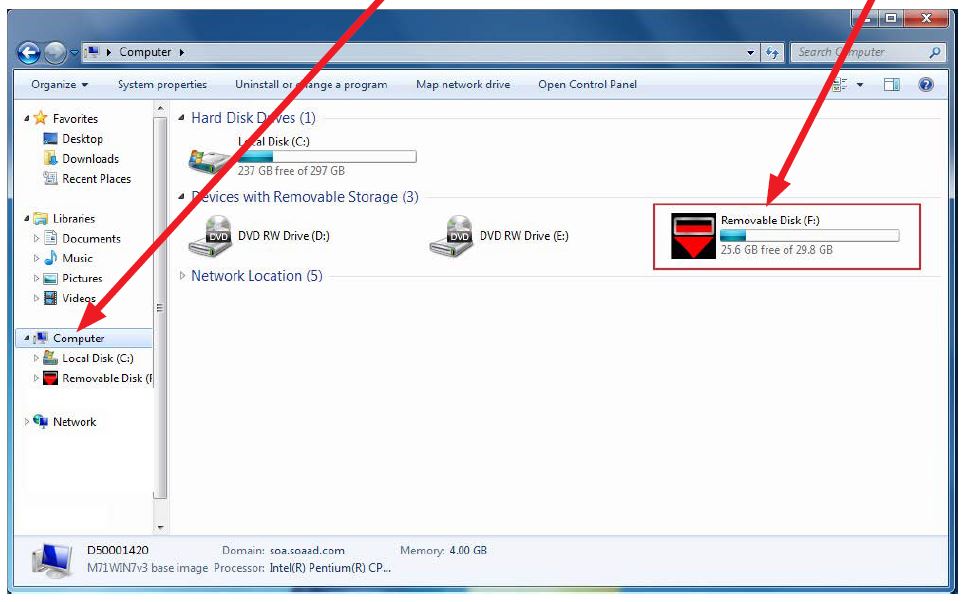
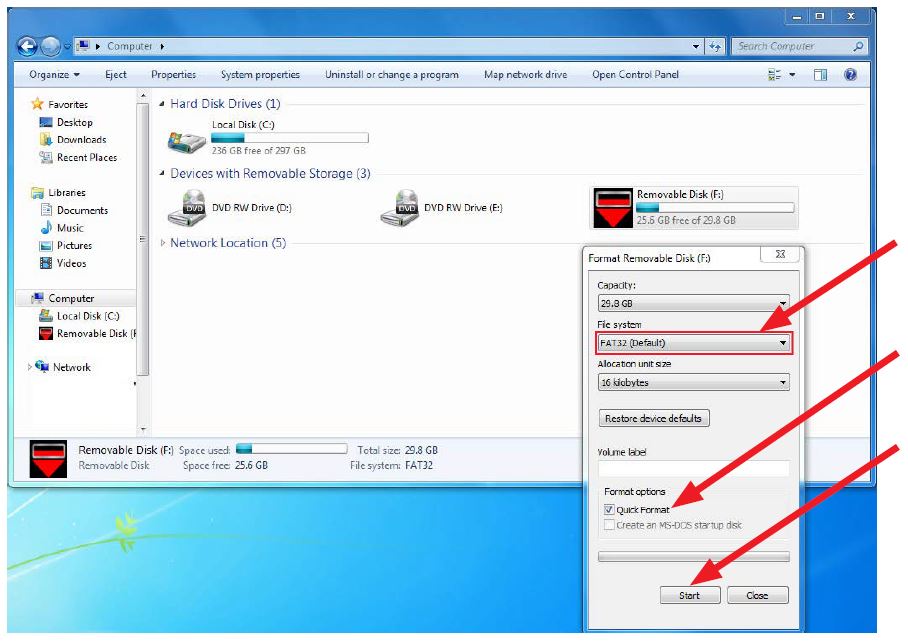
- In the next window, choose the Computer section on the left. Locate “Removable Disk”
NOTE: Always confirm the device you are formatting is the USB Flash Drive. This drive may have various names assigned to it by the manufacturer of the device and may not reflect the drive name given in this example.
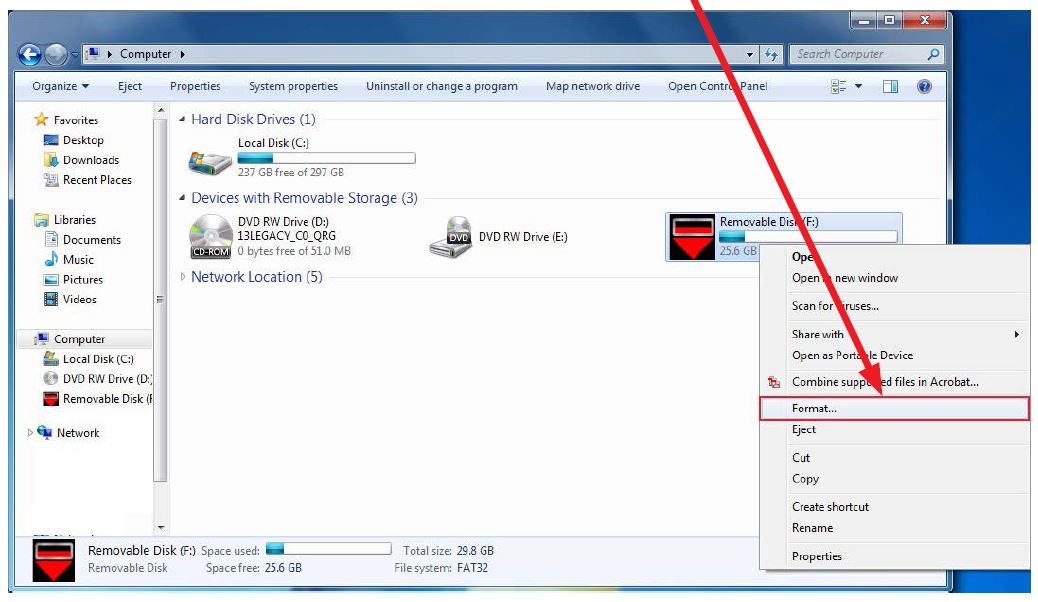
- Right click the picture for “Removable Disk” then select “Format”.
- When the “Format” dialog box appears, make sure that the option labeled “File System” is set to FAT32 and the Quick Format box is checked as well. Then, click the “Start” button.
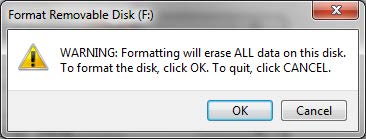
- Click “OK” when the following window appears.
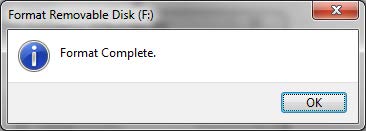
- The drive will start formatting and display this window when it is finished. Click “OK” to complete the process.
- Repeat the procedure above for the second flash drive.
Step 3: File Download Procedure:
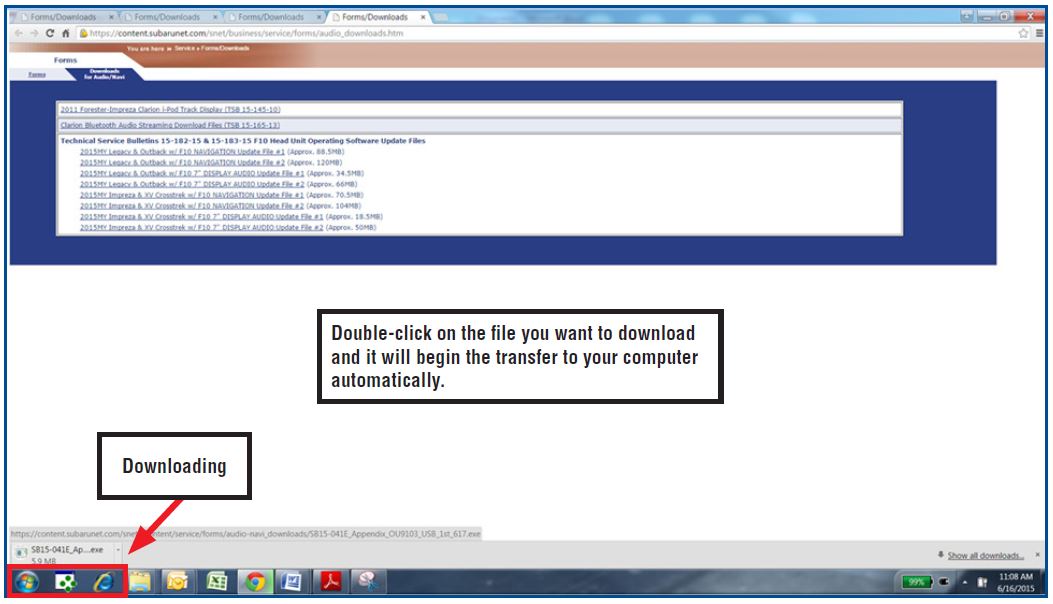
Now that the 2 flash drives have been formatted, the two Update Files must be downloaded, one to each flash drive as shown in the table below. Label the flash drives L/O1 and L/O2 for Legacy / Outback, I/X1 and I/X2 for Impreza / XV Crosstrek and W/1 and W/2 for WRX . Download the Update Files to your PC from the Subarunet links. The updates must be installed in order, drive “1” first followed by drive “2”. NOTE: Each downloaded Update File may contain 1 to 3 individual files.
The screenshots below will take you through the steps required to get the selected Update Files onto your flash drives and ready to use. Update File sizes are quite large and depending on the speed capabilities of the computer you are using, may take some time to complete the download.
PLEASE BE PATIENT!
Once the download is complete, you will need to locate the Update File, unzip it then save the unzipped version to your USB flash drive (Update File #1 onto drive “1”, Update File #2 onto drive “2”). NOTE: If you have not already done so, follow the procedure (Step 2 starting on page 7) for re-formatting (removing any existing files) your flash drive. Plug the “clean” flash drive into your computer.
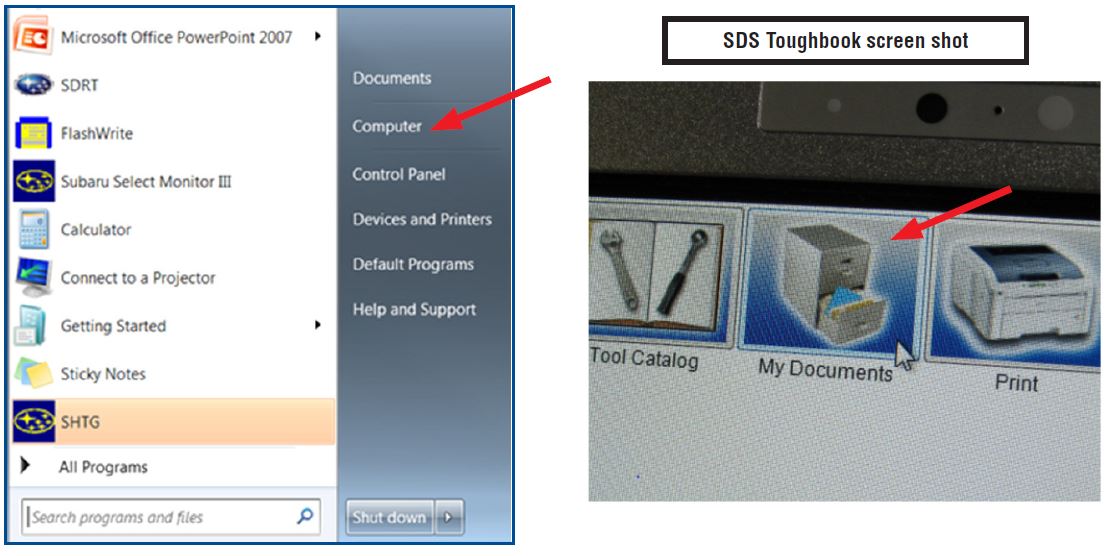
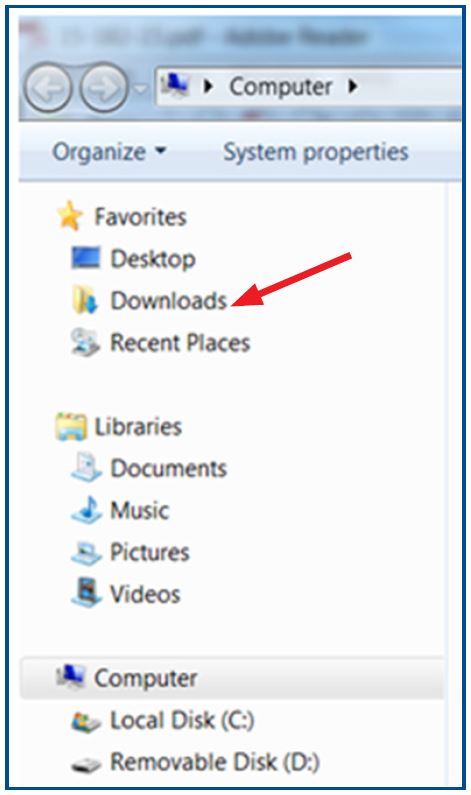
- Go to your Windows Start screen, select “Computer” (or click on My Documents if you are using the SDS Toughbook) then click on “Downloads”.
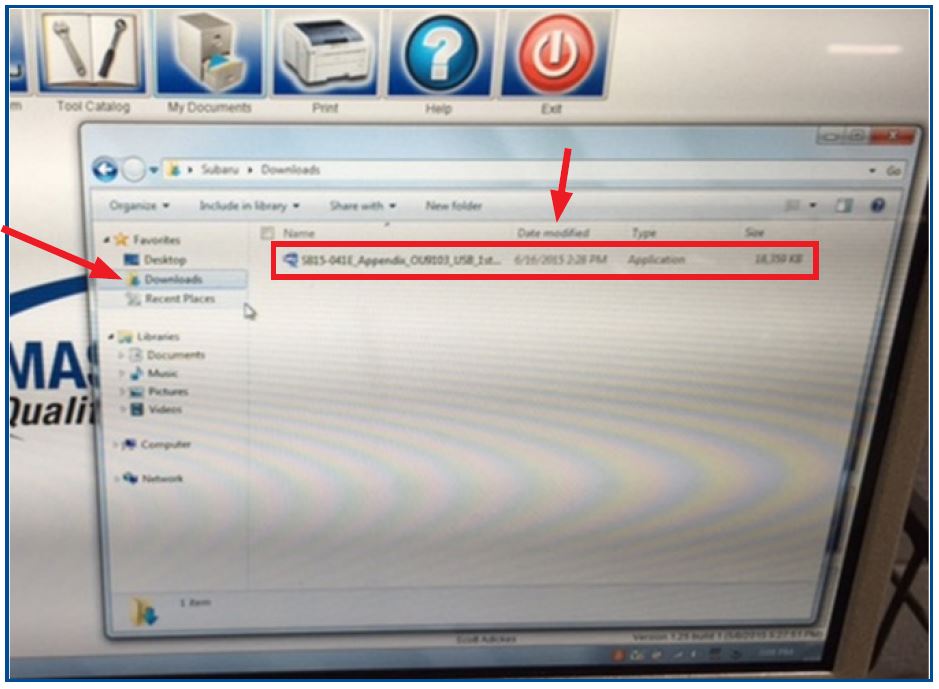
- Once your list of downloaded files opens, locate and click on the downloaded Update File (in this example, “OU9103_USB…”) you are looking for. TIP: If you click on Date Modified you can sort the downloaded files by the date they were added which will bring the newest file to the top.
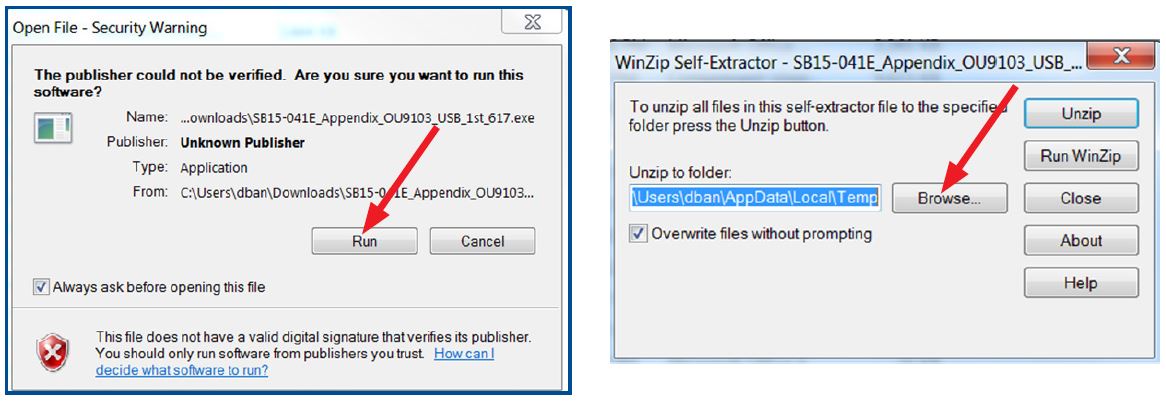
- Double clicking the Update File will bring up a dialogue box with a security warning. Click on “Run” to continue.
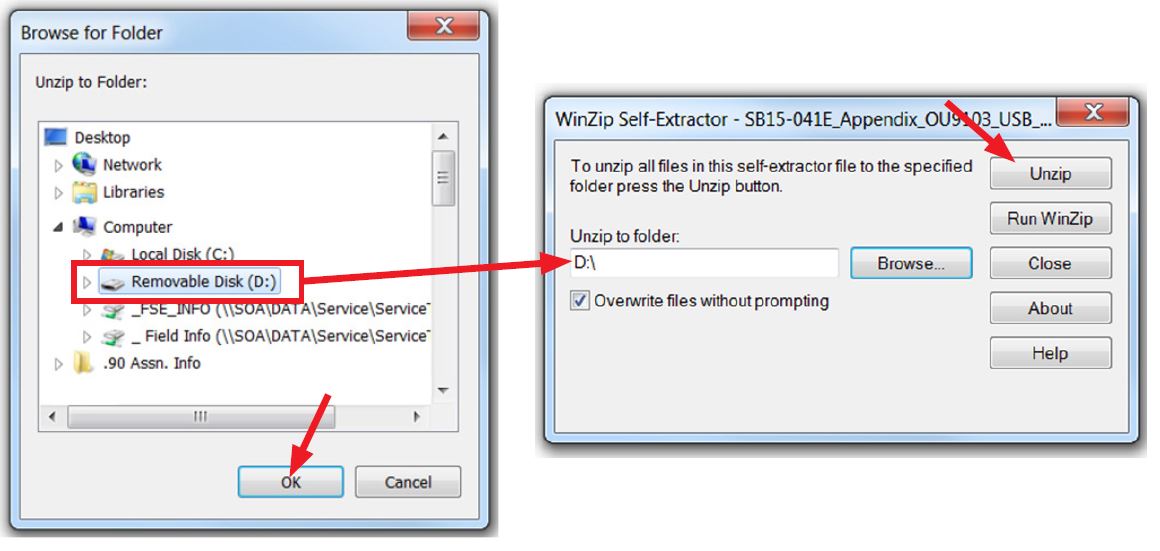
- As shown below, click on “Removable Disk” which is your USB flash drive where you want the unzipped file(s) to be saved. Click “OK” then click on “Unzip”.
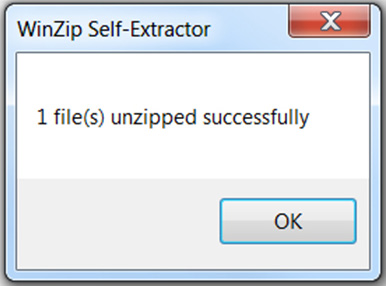
- The Update File will unzip and be saved to your flash drive.
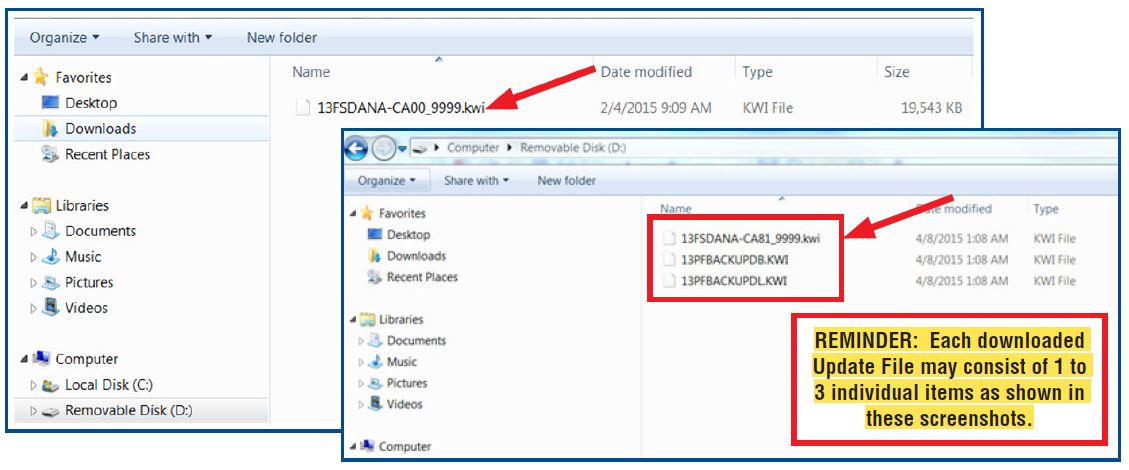
- Confirm the Update File (and flash drive) is ready to use by going back to Start > Computer (or My Documents on the SDS Toughbook) and double clicking on “Removable Disk” to display the drive’s contents as shown in the examples below. Some Update Files will consist of just 1 item but others may list 3. All of the files will have a “.kwi” extension at the end of their file name. If OK, proceed with Step 4: Update Software Installation below.
REMINDER: There can only be ONE Update File stored on each flash drive or the update procedure will not work. If you see more than one Update File stored, start over by re-formatting the flash drive again and reloading the Update File you are trying to install.
IMPORTANT NOTES:
- Do not change the Update File names after downloading them.
- Do not save any other version Update Files onto the flash drives.
| MODEL | FACE PLATE ID NUMBER | 1ST UPDATE SOFTWARE FILE NAME | 2ND UPDATE SOFTWARE FILE NAME |
| Legacy / Outback | FB664US | NU9011_USB_1st.exe | NU9011_USB_2nd.exe |
FB644US | |||
| Impreza / XV Crosstrek | FM634US | NU9106_USB_1st.exe | NU9106_USB_2nd.exe |
WRX | FV631US | NU9203_USB_1st.exe | NU9203_USB_2nd.exe |
Step 4: Update Software Installation
NOTE: Because of the time it takes to perform these updates, SOA recommends connecting the Midtronics GR8 Diagnostic Battery Charger to the vehicle and utilizing the Power Supply Mode
feature when performing these updates. Once the GR8 is connected to the vehicle, as long as the battery is fully charged, it takes less than 3 minutes to boot-up the charger, select the Power Supply Mode, and have the vehicle’s battery voltage stabilized and ready for updating.
VERY IMPORTANT: This information is applicable to the Midtronics GR8 Diagnostic Battery
Charger ONLY. It does not apply to any other brand / type of “generic” battery charger whatsoever. ONLY the GR8 and its Power Supply Mode feature has been tested and approved by Subaru of
of
America, Inc. (SOA). If the GR8 indicates the vehicle’s battery must be charged, charge the battery using the GR8 before proceeding to update the audio unit while using the Power Supply Mode.
Once the GR8 has been connected and Power Supply Mode initiated, insert the Drive “1” into the USB port and follow the steps below to install the Update File #1.
NOTE: Where applicable, record any radio station presets as they will be lost along with any mobile device pairing during this procedure.
Version Update Procedure
- Turn the ignition / key (ACC) “ON”.
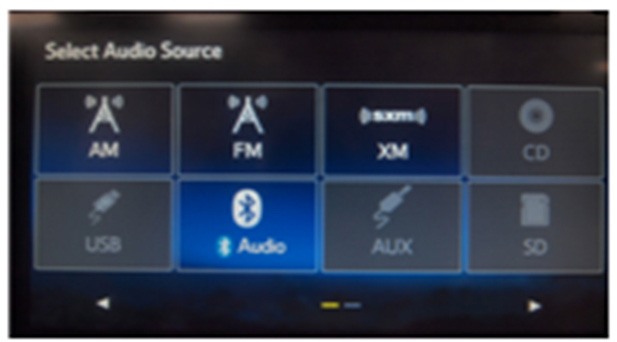
- Press the “AUDIO/TUNE” button.
The Select Audio Source screen will appear.
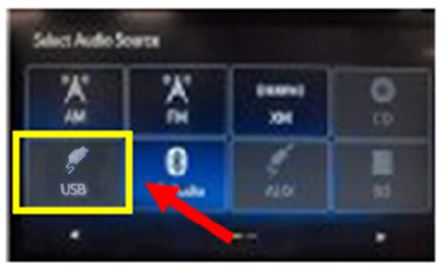
Install the flash drive into the vehicle’s USB port. After the flash drive is recognized, the USB icon will illuminate.
- Once the USB icon is illuminated, switch the unit into “Diagnosis Mode” by pressing and holding the HOME button while pressing the “AUDIO/TUNE” button 5 (five) times.
- Press “Service Information”
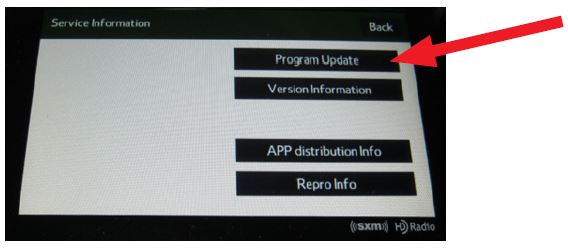
- Press “Program Update” then follow the sequence shown in the screen shots below
NOTE: The “OK” button will not activate (turn black) if the wrong Update File(s) are on the flash drive. Re-format the flash drive and reload the proper Update Files starting from the beginning of Step 2.
 | ||
| Press “OK” | Once the updating starts, the status bar may need to complete more than once and could take up to about 15 minutes. | Turn off ACC |
| If the progress bar stops, please wait 15 minutes. If the progress bar does not change even if after 15 minutes, turn ACC OFF and back ON again then, restart the update procedure from Step 4. |
IMPORTANT: Do not turn the ACC (ignition / key) off or disconnect the flash drive from the USB port during updating.
- Once the update completes successfully, turn the ACC off, WAIT 30 SECONDS then turn it back on again.
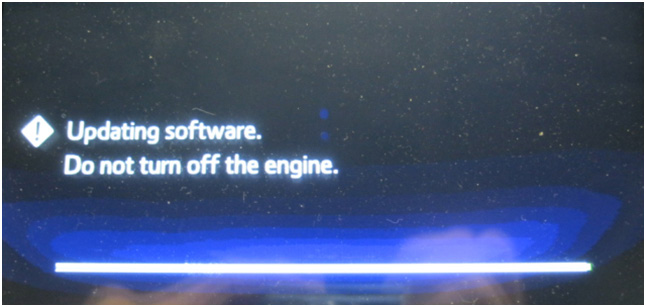
- After the unit boots back up, the “Updating software” screen and its status bar will be displayed. This update may take up to 5 minutes to complete.
When the Software Update completes, the unit will restart automatically. Once the STARLINK opening screen is displayed, remove the flash drive from the USB port and turn the ACC off. Before proceeding further perform Step 1 (Version Check Procedure) again to confirm the updated software installation “from Drive 1” was successful. When the update is successful, the software version (NOR) NU9011 for Legacy and Outback, NU9016 for Impreza and XV Crosstrek and NU9203 for WRX and the CAN version 14.0012 (Legacy and Outback only) will be displayed. If OK, proceed with installation of the Drive “2” update (repeat Step 4, Update Software Installation). If the updated versions are not displayed, Step 4 using Drive “1” must be repeated.
NOTE: If the CAN version displayed after the Drive “1” update is B2.0105, turn the ignition OFF, wait at least 1 minute, turn the ignition back ON and perform Step 1 (Version Check Procedure) again to confirm 14.002 is displayed.
Once the software and CAN version updates are confirmed, insert Drive “2” to install Update File #2 and repeat Step 4.
Step 5: Version Check Procedure
As mentioned earlier on page 6, once both update software installations are complete, the Version Check procedure must be performed again to confirm all of the updates have been installed successfully.
- Switch the unit into “Diagnosis Mode” by pressing and holding the HOME button while pressing the “AUDIO/TUNE” button 5 (five) times.
- Press “Service Information”
- Press “Service Information”
- Press “Push” next to AVN
- Verify the current versions according to the “Version Check List” table shown on page 6. Use the down arrow to scroll to the bottom of the list for complete verification.
Step 6: Memory Clear Procedure
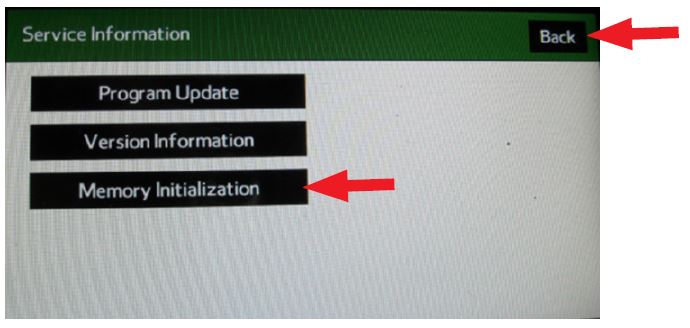
After confirming both software updates have been installed successfully, the Memory Clear procedure must be performed to complete the update procedure. After pressing “Back”, the following screen will be displayed:
NOTE: All presets will likely be lost and will need to reset after performing this procedure.
- Press “Memory Initialization”
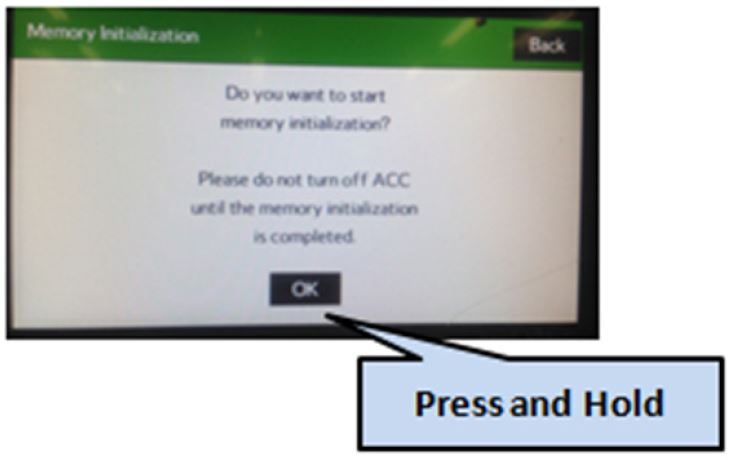
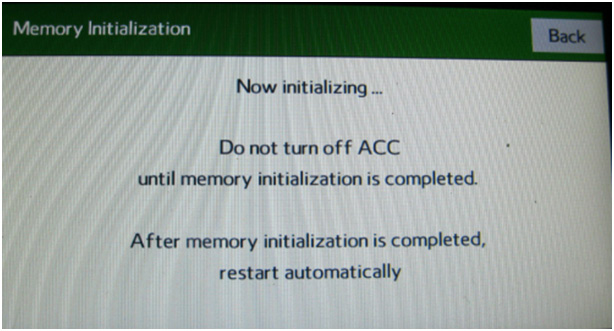
- Press and HOLD the “OK” button until the screen shown below is displayed (5 to 10 seconds).
This screen will be displayed for about 1 minute while the unit restarts. After restart, the Loading screen and its status bar will be displayed. After the status bar completes, the Main Menu screen will be displayed. To complete the updating procedure, you must go through the series of Initial Setup screens, reset the radio station presets and re-pair any mobile devices (where applicable). NOTE: After confirming the updates are complete, remove the labels and re-format both flash drives to clear any remaining files so they are ready for use the next time. This reduces the chances of inadvertently combining files the next time the drives are used. It also ensures that every repair receives the very latest software as these files will be updated from time to time whenever a newer version is released.
5 Affected Products
Vehicles
| MAKE | MODEL | YEAR |
| SUBARU | CROSSTREK | 2016 |
| SUBARU | IMPREZA | 2015 |
| SUBARU | LEGACY | 2015 |
| SUBARU | OUTBACK | 2015 |
| SUBARU | WRX | 2016 |
1 Associated Document
Service Bulletin Document
NUMBER: 15-182-15R
DATE: 06/17/15
REVISED: 08/11/15
SB-10092495-2280.pdf 2986.137KB
 Loading...
- High-speed USB 3.0 performance of up to 150MB/s(1) [(1) Write to drive up to 15x faster than standard USB 2.0 drives (4MB/s); varies by drive capacity. Up to 150MB/s read speed. USB 3.0 port required. Based on internal testing; performance may be lower depending on host device, usage conditions, and other factors; 1MB=1,000,000 bytes]
- Transfer a full-length movie in less than 30 seconds(2) [(2) Based on 1.2GB MPEG-4 video transfer with USB 3.0 host device. Results may vary based on host device, file attributes and other factors]
- Transfer to drive up to 15 times faster than standard USB 2.0 drives(1)
- Sleek, durable metal casing
- Easy-to-use password protection for your private files(3) [(3)Password protection uses 128-bit AES encryption and is supported by Windows 7, Windows 8, Windows 10, and Mac OS X v10.9 plus; Software download required for Mac, visit the SanDisk SecureAccess support page]
- What You Get - 2 pack 64GB genuine USB 2.0 flash drives, 12-month warranty and lifetime friendly customer service
- Great for All Ages and Purposes – the thumb drives are suitable for storing digital data for school, business or daily usage. Apply to data storage of music, photos, movies and other files
- Easy to Use - Plug and play USB memory stick, no need to install any software. Support Windows 7 / 8 / 10 / Vista / XP / Unix / 2000 / ME / NT Linux and Mac OS, compatible with USB 2.0 and 1.1 ports
- Convenient Design - 360°metal swivel cap with matt surface and ring designed zip drive can protect USB connector, avoid to leave your fingerprint and easily attach to your key chain to avoid from losing and for easy carrying
- Brand Yourself - Brand the flash drive with your company's name and provide company's overview, policies, etc. to the newly joined employees or your customers
- Transfer speeds up to 10x faster than standard USB 2.0 drives (4MB/s); up to 130MB/s read speed; USB 3.0 port required. Based on internal testing; performance may be lower depending upon host device. 1MB=1,000,000 bytes
- Backward compatible with USB 2.0
- Secure file encryption and password protection(2)
- USB 3.1 flash drive with high-speed transmission; store videos, photos, music, and more
- 128 GB storage capacity; can store 32,000 12MP photos or 488 minutes 1080P video recording, for example
- Convenient USB connection
- Read speed up to 130MB/s and write speed up to 30MB/s; 15x faster than USB 2.0 drives; USB 3.1 Gen 1 / USB 3.0 port required on host devices to achieve optimal read/write speed; backwards compatible with USB 2.0 host devices at lower speed
- High-quality NAND FLASH flash memory chips can effectively protect personal data security
- PLUG IN AND STAY: Expand your storage with the FIT Plus, a compact flash drive, seamless and unobtrusive; Instant storage for your laptops, tablets, TV’s, car audio systems, gaming consoles, and more
- STORE MORE, LEAVE IT IN: Extra storage in a seamlessly fitting design; Leave it in your devices with reduced risks of accidental bumps or removal; Enough capacity for your favorite tunes, irreplaceable photos/videos, work documents, and personal files
- SAVE TIME, ADD SPACE: Quick and convenient read speeds up to 400 MB/s* with the latest USB 3.1 standard to ensure transferring data never slows you down; Send a 3GB 4K UHD video file from your FIT Plus to your PC in just 10 seconds**
- TOUGH & TRUSTED: Files stay secure, anywhere you go; Samsung's leadership in flash memory makes the FIT Plus a trustworthy drive to store your valuable data; It works through it all with a waterproof, shock-proof³, temperature-proof⁴, magnet-proof, and X-ray-proof⁵ body
- WORLD'S #1 FLASH MEMORY BRAND: Experience the performance and reliability from the world's #1 brand for flash memory since 2003;****** All firmware & components, including Samsung's world-renowned DRAM & NAND, are produced in-house
- Performance/speed: Read speeds up to 100MB/s
- Compatibility: USB 3.0 and USB 2.0
- SanDisk Secure Access Software Keeps Files Private
- Operating temperature-32 - 113 degree Fahrenheit (0 – 45 degree Celsius)
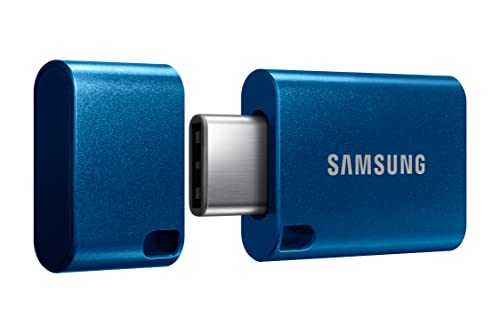
- USB-C STORAGE ON THE GO: This sleek drive is supported by Samsung NAND flash and is incredibly compact to fit in the palm of your hand; Count on reliable performance and fast transfer speeds while staying compact
- PERFORMANCE WITH SPEED: No need to choose between performance and reliability; Experience a fast, powerful flash drive that transfers 4GB files in just 11 seconds with up to 400MB/s USB 3.13 read speeds and is backward compatible with USB 3.0/2.0
- MODERN MEETS ICONIC: The ultra-sleek USB-C drive looks as good as it performs; Featuring a reversible plug, the Type-C inserts into your devices seamlessly every time; Transfer large files with style and ease
- ALWAYS CONNECTED: USB-C is compatible across devices, including laptops, tablets, phones and cameras, with enough space for 63,730 photos or maximum 12 hours of 4K video; With up to 256GB of storage space, this pocket-sized thumb drive comes in handy wherever you go
- TOUGH & TRUSTED: Files stay secure, no matter the terrain; Samsung's flash memory technology makes the Type-C a trustworthy drive to store your valuable data; It's waterproof, shock-proof, magnet-proof, temperature-proof, and X-ray-proof body, plus it's backed by a 5-year limited warranty
- [Great Value Package Offer]: 5 Pack USB 2.0 Flash Drive 8GB Available in 5 different colors - Black Blue Green Red Silver. The different colors can help you to store different content.
- [Plug and Play]: No need to install any software, Just plug in and use it. The metal clip rotates 360° round the ABS plastic body which. The capless design can avoid lossing of cap, and providing efficient protection to the USB port.
- [Compatibilty and Interface]: Supports Windows 7 / 8 / 10 / Vista / XP / 2000 / ME / NT Linux and Mac OS. Compatible with USB 2.0 and below. High speed USB 2.0, LED Indicator - Transfer status at a glance.
- [Suitable for All Uses and Data]: Suitable for storing digital data for school, business or daily usage. Apply to data storage of music, photos, movies, software, and other files.
- [Warranty Policy]: 12-month warranty, our products are of good quality and we promise that any problem about the product within one year since you buy, it will be guaranteed for free.
- 10 Pack USB Sticks: 10 pieces of USB flash drives are fit for a variety of scenarios. Whether the flash drives USB are used as school supplies for high school students to backup data storaged in USB jump drives or music USB flash drive for car, zip drive can meet the basic storage needs. USB drive pack of 10 has a higher cost performance. USB flash drive pack of 10 is suitable for ordinary users with appropriate needs, but also for special groups such as companies, schools or other organizations that need a large number of U disks. In short, thumb drives can meet the needs of different customers.
- Swivel Design: With the 360° swivel design, all the ports of the thumb drives 10 pack can be hidden inside the metal casing. When needed, simply swivel the casing gently and the ports will automatically expose, making it convenient for you to insert and remove. This design is not only fashionable and beautiful but also more user-friendly, whether you'd like your flash drive for photos, flash drive for video storage, or memory sticks for computers. In addition, the swivel design can effectively protect the interface from damage and pollution, increasing the service life of the flash USB drive.
- Portability: The small hole on the thumbdrive USB is designed for lanyards, which is convenient to carry. Besides, the USB flash drive keychain can also be tied through the small hole to prevent loss. This design is very thoughtful and reflects the humanized design concept of the memorias USB flash drive.
- Plug and Play: You can use the computer storage flash drive immediately for data storage or backup without any additional installation after inserting it into the computer. This plug and play feature makes the laptop storage drive a very convenient external ssd. You can copy the required data files to the external drive at any time without worrying about computer system compatibility issues. In addition, the design of the external flash drive enables it to be quickly recognized by the system after being inserted into the computer. Overall, the plug and play nature of USB memory stick has made them very popular portable ssd.
- FAT32 format: The default system format for 8GB flash drive is FAT32. FAT32 USB flash drive is widely applicable, such as in televisions, DVD players, vehicles, printers, embroidery machines, etc. Be patient if you have problems with system recognition. It may take some time for initial recognition, but it will happen.
- [Dual Flash Drive] This 2-in-1 USB flash drive is designed with a Type-C plug and a USB-A plug at each end, working across all your Type-C Android phones, iPhone 15/15 Pro/15 Pro Max, tablets, iPad Pro, Macs and USB-A computers, game consoles, car audios, and more
- [Fast Speed] Optimizing the USB 3.0 technology, this USB-C flash drive fast transfers and backs up your high-res photos, videos, music, and heavy files at a read speed of up to 70MB/s and a write speed of up to 20MB/, 10X faster than USB 2.0 flash drives
- [Wide Use] This Type-C flash drive supports Windows, Android, Linux, and Mac OS, and is backward compatible with USB 2.0 ports. Plug and play, no need to install any software, working seamlessly with USB-C and USB-A devices
- [Durable and Reliable] This dual USB 3.0 flash drive adopts superb memory chips thus ensuring extremely reliable performance, plus the premium plastic enclosure offers excellent heat dissipation. The cap protects the connectors from dust and damage, providing extended durability and security
- [Compact and Portable] Constructed in a mini size of 63.5x17.8x8.4mm/2.5x0.7x0.3inch, this slim USB-C thumb drive can fit into your pocket or backpack, letting you enjoy the instant large capacity at any time
SEOCONTENT-START
Bulletin Number: 15-182-15R; Revised: 08/11/15 Page 1 INTRODUCTION: This bulletin announces a procedure for updating the navigation / audio unit’s operating system software. The following list of symptoms and related changes provides a brief description of which customer concerns the updates are intended to address. If the reported customer concern is not identified in the following information, performing the update procedure will not address it. It is important to read through and understand this information completely before proceeding. SYMPTOMS AND CHANGES: • Symptom 1: Audio output is lost after a few minutes when listening to Sirius/XM satellite radio. Change: Logic update to provide proper Sirius/XM satellite radio operation. • Symptom 2: Bluetooth feature becomes inoperative. Change: Logic update to provide proper Bluetooth feature operation. • Symptom 3: HD Radio “freezes” after a few minutes of play. Change: Logic update to provide proper Sirius/XM satellite radio operation. • Symptom 4: Back-Up Camera “help lines” do not appear. Change: Logic change to have the assist lines appear 8 seconds from engine start. • Symptom 5: Map location is inconsistent between Navigation display and iPhone when using the iPhone’s Google Maps with the phone connected to the USB port in console. Change: Logic update to show correct vehicle location on iPhone. • Symptom 6: Roads or interchanges have the same name displayed multiple times. Change: Logic change to show only one road or interchange name at the same time. Continued… CAUTION: VEHICLE SERVICING PERFORMED BY UNTRAINED PERSONS COULD RESULT IN SERIOUS INJURY TO THOSE PERSONS OR TO OTHERS. Subaru Service Bulletins are intended for use by professional technicians ONLY. They are written to inform those technicians of conditions that may occur in some vehicles, or to provide information that could assist in the proper servicing of the vehicle. Properly trained technicians have the equipment, tools, safety instructions, and know-how to do the job correctly and safely. If a condition is described, DO NOT assume that this Service Bulletin applies to your vehicle, or that your vehicle will have that condition. SUBARU OF AMERICA, INC. IS ISO 14001 COMPLIANT ISO 14001 is the international standard for excellence in Environmental Management Systems. Please recycle or dispose of automotive products in a manner that is friendly to our environment and in accordance with all local, state and federal laws and regulations. NUMBER: 15-182-15R DATE: 06/17/15 REVISED: 08/11/15 APPLICABILITY: 2015MY Legacy, Outback, Impreza & XV Crosstrek 2016MY WRX Models with Fujitsu-Ten (F10) Navigation System SUBJECT: Procedures for Updating the Head Unit Operating Software SERVICE BULLETIN ATTENTION: GENERAL MANAGER q PARTS MANAGER q CLAIMS PERSONNEL q SERVICE MANAGER q IMPORTANT – All Service Personnel Should Read and Initial in the boxes provided, right. © 2014 Subaru of America, Inc. All rights reserved. Bulletin Number: 15-182-15R; Revised: 08/11/15 Page 2 • Symptom 7: Navigation function is slow to start when selected. Change: Logic change to eliminate Navigation system slow-starting condition. • Symptom 8: No map display with key or ignition in “ACC” (accessory) position. Change: Logic change to allow Navigation system operation in accessory ACC mode. • Symptom 9: No voice guidance provided from Navigation system after selecting a route unless the ignition is cycled off and back on again. Change: Logic change to stop voice guidance “Mute” function from defaulting to “ON”. • Symptom 10: Steering wheel switch controls are inoperative with an iPod (MP3) player connected to the USB. Change: Logic change to allow proper steering wheel (satellite) switch functionality. • Symptom 11: Incorrect Umlaut characters are shown on StarLink display. Change: Logic change to allow proper display of Umlaut letters. • Symptom 12: No response from the soft touch keys on display. Change: Logic change to improve communication between display and internal CPU. • Symptom 13: Back-Up Camera is displayed with shifter in positions other than Reverse. Change: Logic change to allow display with shifter in Reverse only. • Symptom 14: “Line Diag” screen is intermittently displayed while driving. Change: Logic change to prevent display of the “Line Diag” screen. • Symptom 15: “LIST” soft touch key is not displayed on Bluetooth Audio screen while using Bluetooth audio feature with an Apple device utilizing iOS8 software version. Change: Logic change to enhance compatibility with iOS8 software. Continued… Bulletin Number: 15-182-15R; Revised: 08/11/15 Page 3 • Symptom 16: “Beep” sound heard when touching the bottom of the display screen where no function soft touch keys are displayed. Change: Logic change to eliminate beeping sound from inactive soft touch key screen areas. • Symptom 17: Sirius/XM caution message screen is displayed in English even when French language operation settings are selected. Change: Logic change to make all messages display in the selected operating language. • Symptoms 18-22: The following symptoms are all related to the inability of the software to properly load. One or all of these 5 conditions may occur at the same time.. Logic changes have been included in the applicable update to address each of the following conditions: The following information provides procedures for verifying the current head unit operating software version number and when required, accessing and installation of the applicable update files. The affected F10 Navigation unit part numbers and Faceplate ID numbers are listed below. VEHICLE MODEL HEAD UNIT PART NUMBER FACE PLATE ID NUMBER Legacy & Outback 86271AL66A FB664US 86271AL64A FB644US Impreza & XV Crosstrek 86271FJ630 FM634US WRX 86271VA630 FV631US Face Plate ID Number Location Continued… Loading Screen • Repeated display of the “Loading” screen at initial unit start-up • Bluetooth device pairing failure • Inoperative steering wheel (satellite) switches • Voice recognition feature inoperative • Sirius/XM radio feature inoperative. Bulletin Number: 15-182-15R; Revised: 08/11/15 Page 4 COUNTERMEASURE IN PRODUCTION: The new logic was incorporated into production according to the table below: FACE PLATE ID NUMBER STARTING VIN DATE LEGACY OUTBACK FB664US F3025503 F3237248 9/29/2014 FB644US F3027006 F3240780 10/6/2014 IMPREZA XV CROSSTREK FM634US F*011328 F*248058 N/A WRX FV631US TBD MATERIALS REQUIRED: 2 empty 2GB, USB 2.0 storage devices (flash drives) will be needed to perform these updates. The devices should be dedicated to storing and transferring these updating files only. They also need to be no more than 4GB in size and contain a FAT32 file format before downloading update files onto them. SERVICE PROCEDURE / INFORMATION: IMPORTANT REMINDER: Read through and understand this procedure COMPLETELY before proceeding further. Step 1: Version Check Procedure Before proceeding with any updates, the currently installed software version must be determined. If the latest software version (or later) is already installed, no updates are necessary. The Version ID numbers for this procedure are found in the Version Check List table shown below. If the Version ID numbers identified during the Version Check procedure are prior to (or lower than) those shown on the table, proceed with the remainder of the software update beginning with Step 3. • Switch the unit into “Diagnosis Mode” by pressing and holding the HOME button while pressing the “AUDIO/TUNE” button 5 (five) times. Press “AUDIO/TUNE” button 5 times Continued… Bulletin Number: 15-182-15R; Revised: 08/11/15 Page 5 • Press “Service Information” • Press “Version Information” • Press “Push” next to AVN • Verify the current versions according to the “Version Check List” table shown below on page 6. Use the down arrow to scroll to the bottom of the list for complete verification. Continued… Bulletin Number: 15-182-15R; Revised: 08/11/15 Page 6 • If the software version is current (NU9011 for Legacy/ Outback NU9106 or higher for Impreza/ Crosstrek or NU9203 for WRX), press and HOLD the HOME button to exit the Diagnostic Mode to complete the procedure as no updates are necessary. If no updates are necessary then continue your diagnosis of the customer concern. If the Version ID numbers are prior to (lower than) those shown on the table below, proceed with Step 2, preparing the USB memory (Flash Drives) on page 7 then Step 3, the software update procedure on page 10. NOTE: If you determine the updates are necessary, the Version Check procedure will need to be performed again after the update installation to confirm the procedure was successful (Step 5, pg. 17). Version Check List LEGACY / OUTBACK IMPREZA / XV CROSSTREK WRX PRODUCT NUMBER 86271AL64A & 86271AL66A 86271FJ630 86271VA630 NOR NU9011 NU9106 NU9203 eSD NU9011 NU9106 NU9203 POWER 02.4026 02.4026 02.4026 CAN 14.0012 n/a n/a POWER BOOT 02.4017 02.4117 02.4117 POWER VCL 02.0103 63.0105 69.0105 DB NU9011 NU9106 NU9203 After performing the Version Check procedure, if updates are determined to be necessary, you will need the 2 USB flash drives referenced above to download the Update Files onto. All the F10 update files are accessible for downloading from Subarunet under: Service>>Forms / Downloads>>Downloads for Audio/Navi page then clicking on the following hyperlink: Click Here to Access the Downloads for Audio/Navigation Information on Subarunet The Subarunet page shown above will display and contains links to the update files 1 & 2 for each model head unit. NOTE: Do not download any files at this point. The file download procedures are supplied later in this bulletin. The flash drives must be formatted before the Update Files can be downloaded onto them. Proceed to Step 2 below for the flash drive formatting procedure. Continued… Bulletin Number: 15-182-15R; Revised: 08/11/15 Page 7 Step 2: Prepare the USB Memory (flash drive) VERY IMPORTANT: Before attempting to download any data files, confirm the PC and flash drives you are using are not infected with any virus. The flash drives will need to be formatted for FAT32 following the steps below. USB Flash Drive Formatting Procedure: • Install a flash drive into an available USB port on your PC. • Click Start (this is located in the lower left corner of the desktop screen) then, in the Search programs and files box, type “explorer”. NOTE: On SDS Notebook you may also press the My Documents button on the GUI Home Screen. • As you type the word “explorer”, search results will start to appear. In the results, click on the “Windows Explorer” option under the Programs section. Start Button Continued… Bulletin Number: 15-182-15R; Revised: 08/11/15 Page 8 • In the next window, choose the Computer section on the left. Locate “Removable Disk” NOTE: Always confirm the device you are formatting is the USB Flash Drive. This drive may have various names assigned to it by the manufacturer of the device and may not reflect the drive name given in this example. • Right click the picture for “Removable Disk” then select “Format”. Continued… Bulletin Number: 15-182-15R; Revised: 08/11/15 Page 9 • When the “Format” dialog box appears, make sure that the option labeled “File System” is set to FAT32 and the Quick Format box is checked as well. Then, click the “Start” button. • Click “OK” when the following window appears. • The drive will start formatting and display this window when it is finished. Click “OK” to complete the process. • Repeat the procedure above for the second flash drive. Continued… Bulletin Number: 15-182-15R; Revised: 08/11/15 Page 10 Step 3: File Download Procedure: Now that the 2 flash drives have been formatted, the two Update Files must be downloaded, one to each flash drive as shown in the table below. Label the flash drives L/O1 and L/O2 for Legacy / Outback, I/X1 and I/X2 for Impreza / XV Crosstrek and W/1 and W/2 for WRX. Download the Update Files to your PC from the Subarunet links. The updates must be installed in order, drive “1” first followed by drive “2”. NOTE: Each downloaded Update File may contain 1 to 3 individual files. The screenshots below will take you through the steps required to get the selected Update Files onto your flash drives and ready to use. Update File sizes are quite large and depending on the speed capabilities of the computer you are using, may take some time to complete the download. PLEASE BE PATIENT! Double-click on the file you want to download and it will begin the transfer to your computer automatically. Downloading You may receive the warning below during the file download. Click on the drop down next to Discard and Keep the file. Continued… Bulletin Number: 15-182-15R; Revised: 08/11/15 Page 11 Once the download is complete, you will need to locate the Update File, unzip it then save the unzipped version to your USB flash drive (Update File #1 onto drive “1”, Update File #2 onto drive “2”). NOTE: If you have not already done so, follow the procedure (Step 2 starting on page 7) for re-formatting (removing any existing files) your flash drive. Plug the “clean” flash drive into your computer. • Go to your Windows Start screen, select “Computer” (or click on My Documents if you are using the SDS Toughbook) then click on “Downloads”. SDS Toughbook screen shot Continued… Bulletin Number: 15-182-15R; Revised: 08/11/15 Page 12 • Once your list of downloaded files opens, locate and click on the downloaded Update File (in this example, “OU9103_USB…”) you are looking for. TIP: If you click on Date Modified you can sort the downloaded files by the date they were added which will bring the newest file to the top. • Double clicking the Update File will bring up a dialogue box with a security warning. Click on “Run” to continue. • Click on “Browse” • As shown below, click on “Removable Disk” which is your USB flash drive where you want the unzipped file(s) to be saved. Click “OK” then click on “Unzip”. Continued… Bulletin Number: 15-182-15R; Revised: 08/11/15 Page 13 The Update File will unzip and be saved to your flash drive. • Confirm the Update File (and flash drive) is ready to use by going back to Start > Computer (or My Documents on the SDS Toughbook) and double clicking on “Removable Disk” to display the drive’s contents as shown in the examples below. Some Update Files will consist of just 1 item but others may list 3. All of the files will have a “.kwi” extension at the end of their file name. If OK, proceed with Step 4: Update Software Installation below. REMINDER: There can only be ONE Update File stored on each flash drive or the update procedure will not work. If you see more than one Update File stored, start over by re-formatting the flash drive again and reloading the Update File you are trying to install. Continued… REMINDER: Each downloaded Update File may consist of 1 to 3 individual items as shown in these screenshots. Bulletin Number: 15-182-15R; Revised: 08/11/15 Page 14 IMPORTANT NOTES: • Do not change the Update File names after downloading them. • Do not save any other version Update Files onto the flash drives. MODEL FACE PLATE ID NUMBER 1ST UPDATE SOFTWARE FILE NAME 2ND UPDATE SOFTWARE FILE NAME Legacy / Outback FB664US NU9011_USB_1st.exe NU9011_USB_2nd.exe FB644US Impreza / XV Crosstrek FM634US NU9106_USB_1st.exe NU9106_USB_2nd.exe WRX FV631US NU9203_USB_1st.exe NU9203_USB_2nd.exe Step 4: Update Software Installation NOTE: Because of the time it takes to perform these updates, SOA recommends connecting the Midtronics GR8 Diagnostic Battery Charger to the vehicle and utilizing the Power Supply Mode feature when performing these updates. Once the GR8 is connected to the vehicle, as long as the battery is fully charged, it takes less than 3 minutes to boot-up the charger, select the Power Supply Mode, and have the vehicle’s battery voltage stabilized and ready for updating. VERY IMPORTANT: This information is applicable to the Midtronics GR8 Diagnostic Battery Charger ONLY. It does not apply to any other brand / type of “generic” battery charger whatsoever. ONLY the GR8 and its Power Supply Mode feature has been tested and approved by Subaru of America, Inc. (SOA). If the GR8 indicates the vehicle’s battery must be charged, charge the battery using the GR8 before proceeding to update the audio unit while using the Power Supply Mode. Once the GR8 has been connected and Power Supply Mode initiated, insert the Drive “1” into the USB port and follow the steps below to install the Update File #1. NOTE: Where applicable, record any radio station presets as they will be lost along with any mobile device pairing during this procedure. Version Update Procedure • Turn the ignition / key (ACC) “ON”. • Press the “AUDIO/TUNE” button. The Select Audio Source screen will appear. Continued… Bulletin Number: 15-182-15R; Revised: 08/11/15 Page 15 Install the flash drive into the vehicle’s USB port. After the flash drive is recognized, the USB icon will illuminate. • Once the USB icon is illuminated, switch the unit into “Diagnosis Mode” by pressing and holding the HOME button while pressing the “AUDIO/TUNE” button 5 (five) times. • Press “Service Information” • Press “Program Update” then follow the sequence shown in the screen shots below NOTE: The “OK” button will not activate (turn black) if the wrong Update File(s) are on the flash drive. Re-format the flash drive and reload the proper Update Files starting from the beginning of Step 2. Wait for “OK” to activate (turn black) Continued… Press “OK” Press “SELECT” Bulletin Number: 15-182-15R; Revised: 08/11/15 Page 16 IMPORTANT: Do not turn the ACC (ignition / key) off or disconnect the flash drive from the USB port during updating. • Once the update completes successfully, turn the ACC off, WAIT 30 SECONDS then turn it back on again. • After the unit boots back up, the “Updating software” screen and its status bar will be displayed. This update may take up to 5 minutes to complete. When the Software Update completes, the unit will restart automatically. Once the STARLINK opening screen is displayed, remove the flash drive from the USB port and turn the ACC off. Before proceeding further perform Step 1 (Version Check Procedure) again to confirm the updated software installation “from Drive 1” was successful. When the update is successful, the software version (NOR) NU9011 for Legacy and Outback, NU9016 for Impreza and XV Crosstrek and NU9203 for WRX and the CAN version 14.0012 (Legacy and Outback only) will be displayed. If OK, proceed with installation of the Drive “2” update (repeat Step 4, Update Software Installation). If the updated versions are not displayed, Step 4 using Drive “1” must be repeated. NOTE: If the CAN version displayed after the Drive “1” update is B2.0105, turn the ignition OFF, wait at least 1 minute, turn the ignition back ON and perform Step 1 (Version Check Procedure) again to confirm 14.002 is displayed. Once the software and CAN version updates are confirmed, insert Drive “2” to install Update File #2 and repeat Step 4. Continued… If the progress bar stops, please wait 15 minutes. If the progress bar does not change even if after 15 minutes, turn ACC OFF and back ON again then, restart the update procedure from Step 4. Press “OK” Once the updating starts, the status bar may need to complete more than once and could take up to about 15 minutes. Turn off ACC Bulletin Number: 15-182-15R; Revised: 08/11/15 Page 17 Step 5: Version Check Procedure As mentioned earlier on page 6, once both update software installations are complete, the Version Check procedure must be performed again to confirm all of the updates have been installed successfully. • Switch the unit into “Diagnosis Mode” by pressing and holding the HOME button while pressing the “AUDIO/TUNE” button 5 (five) times. • Press “Service Information” • Press “Version Information” • Press “Push” next to AVN Press “AUDIO/TUNE” button 5 times Continued… Bulletin Number: 15-182-15R; Revised: 08/11/15 Page 18 • Verify the current versions according to the “Version Check List” table shown on page 6. Use the down arrow to scroll to the bottom of the list for complete verification. Step 6: Memory Clear Procedure After confirming both software updates have been installed successfully, the Memory Clear procedure must be performed to complete the update procedure. After pressing “Back”, the following screen will be displayed: NOTE: All presets will likely be lost and will need to reset after performing this procedure. • Press “Memory Initialization” • Press and HOLD the “OK” button until the screen shown below is displayed (5 to 10 seconds). Continued… Bulletin Number: 15-182-15R; Revised: 08/11/15 Page 19 This screen will be displayed for about 1 minute while the unit restarts. After restart, the Loading screen and its status bar will be displayed. After the status bar completes, the Main Menu screen will be displayed. To complete the updating procedure, you must go through the series of Initial Setup screens, reset the radio station presets and re-pair any mobile devices (where applicable). NOTE: After confirming the updates are complete, remove the labels and re-format both flash drives to clear any remaining files so they are ready for use the next time. This reduces the chances of inadvertently combining files the next time the drives are used. It also ensures that every repair receives the very latest software as these files will be updated from time to time whenever a newer version is released. WARRANTY / CLAIM INFORMATION: For vehicles within the Basic New Car Limited Warranty period or with an active Added Security Gold Service Agreement, this repair may be claimed using the following information: LABOR DESCRIPTION LABOR OPERATION # FAIL CODE LABOR TIME F10 AUDIO/NAVIGATION HEAD UNIT UPDATE A031-128 ZQL-48 0.6 NOTE: Up to $12.00 may be claimed ONE TIME in sublet to cover the cost for the 2 USB Flash Drives ($6.00 each). REMINDER: SOA strongly discourages the printing and/or local storage of service information as previously released information and electronic publications may be updated at any time. Always refer to STIS for the latest service information before performing any repairs.
**************************************************************************************************************
SEOCONTENT-END
Last update on 2025-05-08 / Affiliate links / Images from Amazon Product Advertising API
This product presentation was made with AAWP plugin.











Hi all,
I need help ASAP.
I have Subaru XV 2019 from Canada.
Head unit model G31 MID of HARMAN company.
The head unit have FM frequency for North America.
How I can change the factory setting for support FM frequency of Europa ?
Hi did You found solution to change frequdnces to Eu?
I can not find the link to download the update for updating the Head Unit Operating Software – 2015-2016 Subaru. On the page it states “Click Here to Access the Downloads for Audio/Navigation Information on Subarunet” but it sends me to Amazon. Any help is appreciated
You need a Subaru subscription to get the updates now.
Is there a specific Subaru webpage to get the subscription?
https://techinfo.subaru.com
i have registered and purchased a subscription but still cannot find the firmware.
This is the website you can download the files
https://content.subarunet.com/snet/secure/business/service/forms/audio_downloads.htm
login with the registered user name and password