| “This site contains affiliate links for which OEMDTC may be compensated” |
NHTSA ID Number: 10232532
Manufacturer Communication Number: 1217214R
Summary
Paint Chipping Due To Trunk Lid Movement
NUMBER: 12-172-14R
DATE: 07/11/14
REVISED: 07/15/14
INTRODUCTION
This bulletin provides a procedure for how to address a customer concern of side-to-side trunk panel movement and possible contact with the corresponding top edges of the quarter panels. In some cases, this contact may result in chipping of the vehicle finish.
COUNTERMEASURE IN PRODUCTION
- The new trunk weatherstrip was incorporated into production starting with VIN F*811343.
- The longer (BRZ) trunk stoppers were incorporated into production starting with VIN F*811136.
- A new design WRX
 / STI
/ STI trunk stopper (p.n. 57533FE050) is scheduled to be incorporated into production during mid-July, 2014 starting with VIN F*812458.
PART INFORMATION
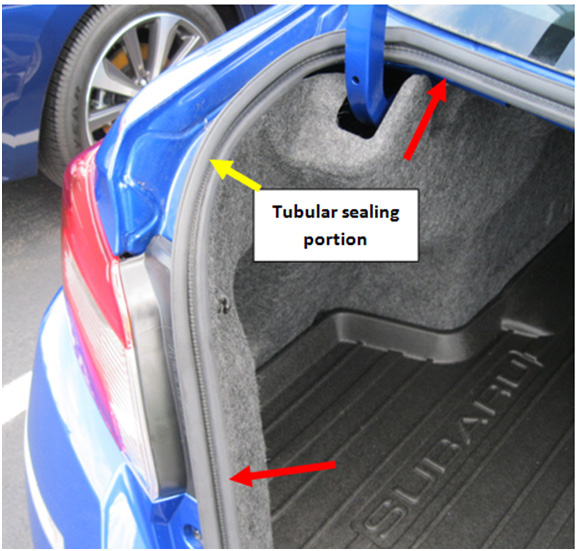
For STI models, in addition to the longer trunk stoppers, the trunk weatherstrip’s tubular sealing portion now has internal reinforcement in the area between the red arrows shown in the photo below. This reinforcement serves to stabilize the trunk panel and eliminate the chipping.
Tubular Sealing portion
- Updated trunk weatherstrip, p.n. 57532VA002-1
- Replacement Trunk Lid Stoppers – Qty. 2
(NOTE: currently, these are BRZ trunk stoppers, p.n. 57533FE040)
SERVICE PROCEDURE / INFORMATION
There are 2 procedures to follow depending on the model of vehicle being serviced. To summarize:
- WRX
 Models – Replacement of the trunk stoppers only followed by a check of the trunk panel adjustment.
 - STI
 Models – Replacement of the trunk weatherstrip and trunk stoppers followed by a check of the trunk panel adjustment.
IMPORTANT NOTES:
- BE CAREFUL to not tear the rubber material of the trunk weatherstrip when removing or re-positioning the replacement part.
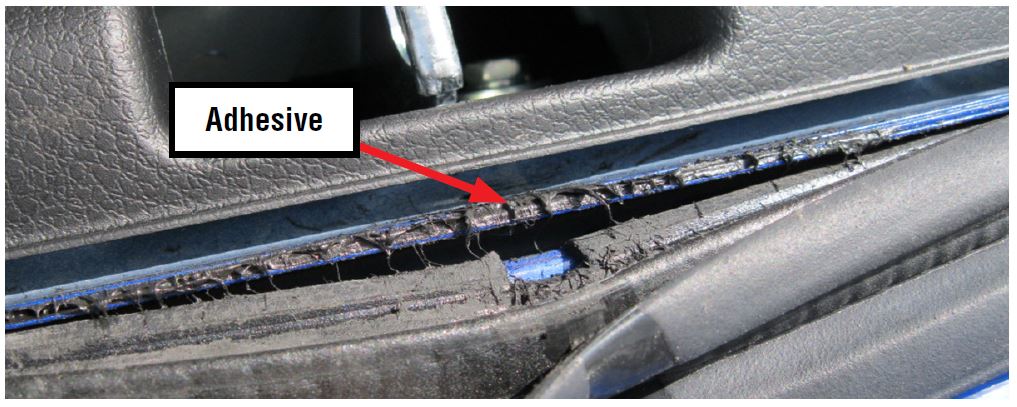
- When removing the original weatherstrip, be careful to not get any of the adhesive as shown below on the trunk liner trim panels.
- There should be no extra effort or force (“slamming”) required to properly close the trunk lid after the replacement parts are installed.
STEP 1: (Both WRX and STI
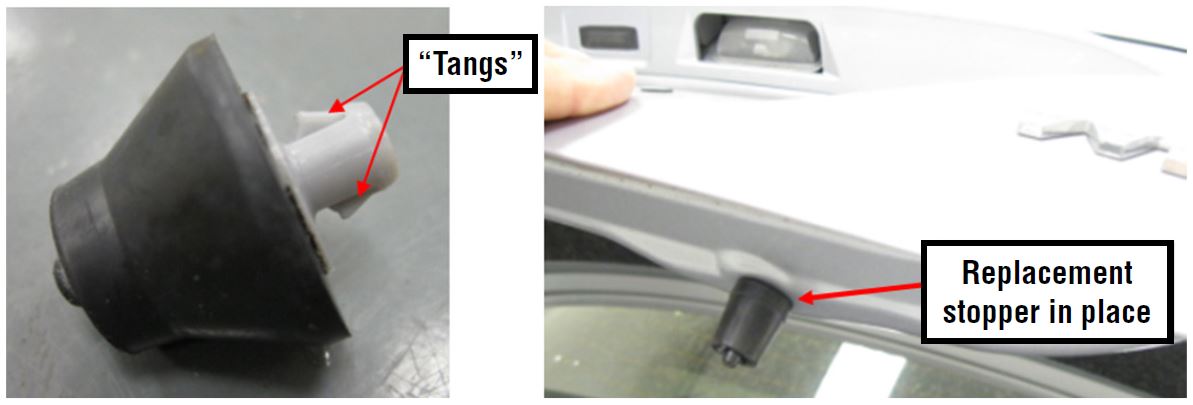
 Models) Replace both the rubber trunk stoppers with the longer version (currently used on BRZ, p. n. 57533FE040). The photos show the current stopper on the left and the replacement longer version installed in position on the right. Use a plastic trim tool between the stopper and the trunk panel to release the 2 “tangs” holding the original stoppers in place.
STEP 2: (STI Models ONLY) Replace the trunk weatherstrip and trunk stoppers.
REMINDER: always be careful to not get any of the residual weatherstrip adhesive on any of the trunk liner trim panels.
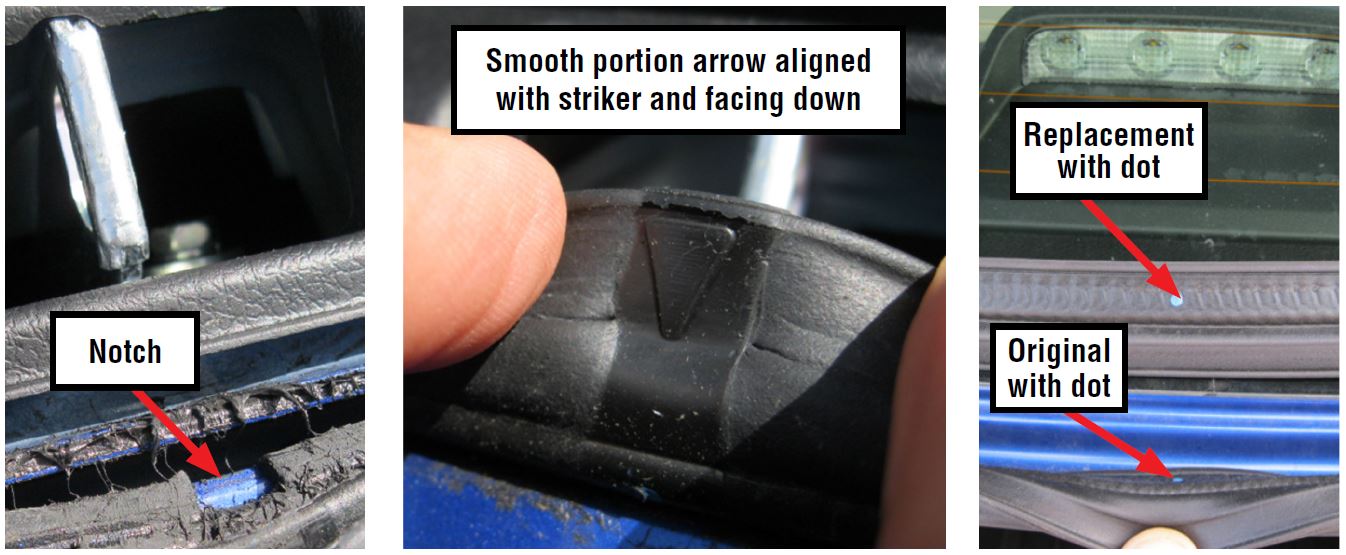
As shown in the photos below, align the square notch with the trunk latch striker. The arrow molded into the short, smooth portion of the trunk weatherstrip faces down toward the bumper cover. On the top section (closest to the back glass), the blue dot should align with the center of the third brake light.
STEP 3: After the trunk stoppers (and weatherstrip on STI models ONLY) have been installed, close the trunk lid while paying close attention to the points listed below.
REMINDER: There should be no extra effort or force (“slamming”) required to properly close the trunk lid.
- After the trunk lid is closed, look closely for any excessive, insufficient or uneven gap(s) around the complete perimeter of the trunk lid.
- Make sure the trunk height is correct and that it fits “flush” with the corresponding edges of the rear quarter panels.
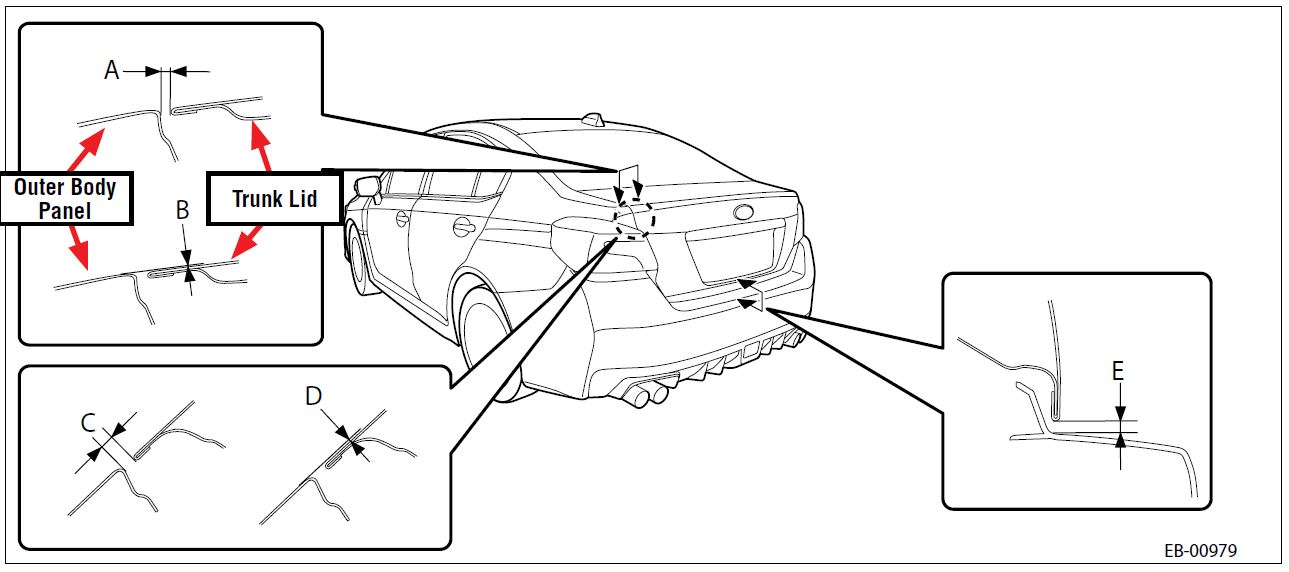
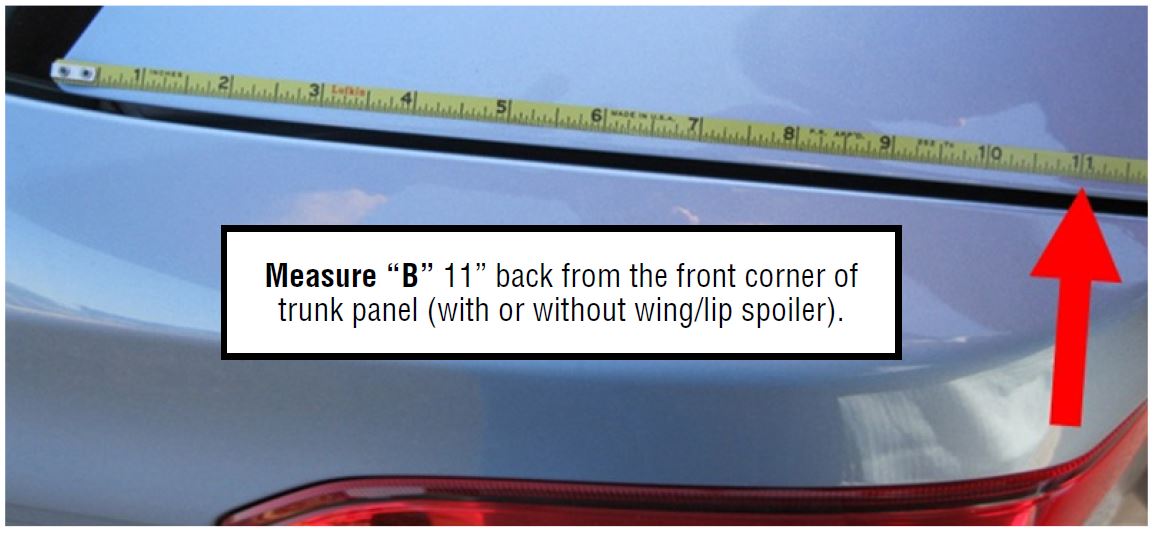
- In most cases, there should be only minor adjustment needed to the trunk lid, if any at all. Pay close attention to the adjustment for “B” as shown in the table below. If after close inspection, it is determined adjustment of the trunk lid is necessary for proper fit, use the Service Manual specifications supplied below EXCEPT FOR “B” which has been recently revised (shown in RED). The Service Manual will be updated with the revised specifications in the near future.
FOR STI MODELS:
| Part | Standard | |
|---|---|---|
| A | Trunk lid COMPL and Panel – side outer | 3.5±1.0 mm (0.14±0.04 in) |
| B | Surface level gap between Trunk lid COMPL and Panel – side outer (Difference in height) | 0+.5 mm (.020”) by adjusting the striker –STI |
| C | Trunk lid COMPL and Panel – side outer | 3.5±1.0 mm (0.14±0.04 in) |
| D | Surface level gap between Trunk lid COMPL and Panel – side outer | –0.5±0.7 mm (0.02±0.03 in) |
| E | Trunk lid COMPL to Bumper face – rear | 7.5±1.0 mm (0.3±0.04 in) |
FOR WRX MODELS:
| Part | Standard | |
|---|---|---|
| A | Trunk lid COMPL and Panel – side outer | 3.5±1.0 mm (0.14±0.04 in) |
| B | Surface level gap between Trunk lid COMPL and Panel – side outer (Difference in height) | -1.0 mm (.040”) by adjusting the striker –WRX |
| C | Trunk lid COMPL and Panel – side outer | 3.5±1.0 mm (0.14±0.04 in) |
| D | Surface level gap between Trunk lid COMPL and Panel – side outer | –0.5±0.7 mm (0.02±0.03 in) |
| E | Trunk lid COMPL to Bumper face – rear | 7.5±1.0 mm (0.3±0.04 in) |
NOTES:
Do not make any adjustments until AFTER the trunk stoppers (and weatherstrip on STI models ONLY) have been installed.
- Clearance “A” and “C” must be the same left to right.
- If “D” and “E” are within the specifications listed in the tables above, no adjustments are necessary.
2 Affected Products
Vehicles
1 Associated Document
Manufacturer Communications
NUMBER: 12-172-14R
DATE: 07/11/14
REVISED: 07/15/14
MC-10232532-9999.pdf 1070.579KB
 Loading...
NHTSA ID Number: 10068325
Manufacturer Communication Number: 12-172-14R
Summary
SUMMARY TO BE PROVIDED ON A FUTURE DATE.
1 Associated Document
Service Bulletin Document
NUMBER: 12-172-14R
DATE: 07/11/14
REVISED: 07/15/14
SB-10068325-0699.pdf 1070.579KB
 Loading...
- [Excellent Color Match] The car touch-up paint(Crystal Black Silicae(D4S)) is specially designed for the SUBARU
 series, including 2025 Outback/2024 Crosstek/2025 Forester/2024 Ascent/2024 Impreza/2025 Legacy/2024 WRX
 /2024 BRZ. It is meticulously crafted to minimize color differences and make scratches invisible. Before use, please try it on paper to confirm that the color matches your vehicle's paint.
 - [High-quality Touch-Up Paint] This car scratch repair paint has strong adhesion, anti-rust, and waterproof properties that protect your car surface from further damage. Each bottle of car paint comes with a pen pin and brush, ensuring a hassle-free application. The additional 1mm fine brush lets you easily touch up your vehicle precisely and conveniently.
- [Quick & Easy Scratch Repair] Simply clean the scratched area and shake the car paint for 10-20 seconds to mix the paint fully. Use the built-in mini paintbrush to carefully apply a few thin coats of paint (If it is a small area, it is recommended to use the included 1mm fine brush for better results). Wait 5 to 10 minutes for the paint to dry, remix the car touch-up paint, and repeat until the damaged area is completely covered.
- [Must-have for SUBARU Owners] This 12ml car touch-up paint can cover an area of 0.08 square meters, so whether you are dealing with small spots or larger areas, COSLAKE car touch-up paint is an ideal choice. The high cost-effectiveness and ease of use of car paint make it a must-have for SUBARU
 owners, saving you a lot of money and time, and it is the perfect choice for quick touch-ups.
 - [Warm Tips] 1. You can practice on some scrap metal when first using it to master steadying your hand and the correct amount of paint you need to apply to get the best refinishing results; 2. Please shake the bottle vigorously for 10-20 seconds to mix well before use. COSLAKE provides 12 months of service, don't hesitate to contact us with any questions.
- 【Easy Scratch Repair】This touch-up pen is specifically designed for Subaru
 vehicles, making it ideal for addressing paint chips and scratches. It works to restore your car's original shine, providing a seamless fix that matches your vehicle’s existing paint color precisely. The pen ensures a flawless repair, effectively blending with the surrounding paint to make those blemishes disappear.
 - 【Perfect Color Match】 Our Touch Up Paint Compatible with Subaru
 features an exact color match for any Subaru
 model,ensuring a seamless and professional finish. No more worrying about mismatched shades.
 - 【Crafted With Durability】The high-quality metallic paint is engineered to endure both high and low temperatures, making it suitable for any climate.It also prevents the paint from fading over time, ensuring a long-lasting and durable finish.
- 【Hassle-Free Repair】 With this touch-up paint for Subaru
 , you won’t need to mix paints.Just need three steps to process(1.Clean the surface;2.Shake 30s before use;3.Apply the paint).
 - 【Warm Tips】Before using, check that the color &color code on the pen cap to make sure right color.For the best touch-up results, Test your color on a scrap piece of metal,apply paint with a "connect the dots" technique to avoid blobs. A little goes a long way, and you can always come back for a second coat,dabbing is recommended as it does not leave stroke marks.
- Genuine OEM
- High quality
- Dependability
- Make Scratches Disappear:This pen is compatible with Subaru
 models and is designed to repair various paint chips and scratches, restoring your car's original allure.With its precise color matching, the pen seamlessly blends with your car's existing paint, delivering a flawless repair.
 - Perfect Color Match: Its universal compatibility makes it compatible with Subaru
 model, including Ascent-models/BRZ/Crosstrek/Forester-models/Impreza/Legacy-models/Outback/Tribeca/WRX
 /XV-Crosstrek .etc, for various touch-up needs.
 - Crafted With Durability:The high-quality metallic paint is engineered to endure both high and low temperatures, making it suitable for any climate.
- Easy to Process: With this touch-up paint, you won’t need to mix paints.Just need three steps to process(1.Clean the surface;2.Shake 30s before use;3.Apply the paint).
- Genuine OEM
- High quality
- Dependability
- 【Ideal For All Kinds Of Chips And Scratches】The RSACET touch-up paint for Subaru
 is the absolute go-to tool for repairing scratches and chips. It comes with a pen tip for regular scratches, a super-fine-tipped touch up brush for extremely thin scratches, and a putty for deep ones.
 - 【OEM Perfect Color Match】 For Subaru
 Touch Up Paint features an exact color match tested and approved by vehicle manufacturers for a perfect match to the original factory finish.ensuring a seamless and professional finish. No more worrying about mismatched shades.
 - 【Crafted With Durability】The high-quality metallic paint is engineered to endure both high and low temperatures, making it suitable for any climate.It also prevents the paint from fading over time, ensuring a long-lasting and durable finish.
- 【Quick & Easy Scratch Repair】 With this touch-up paint for Subaru
 , you won’t need to mix paints.Just need three steps to process(1.Clean the surface;2.Shake 30s before use;3.Apply the paint).
 - 【Warm Tips】Before using, check that the color &color code on the pen cap to make sure right color.For the best touch-up results, Test your color on a scrap piece of metal,apply paint with a "connect the dots" technique to avoid blobs. A little goes a long way, and you can always come back for a second coat,dabbing is recommended as it does not leave stroke marks.
- Perfect Match for Subaru
 Crystal White Pearl: Specifically designed for Subaru
 vehicles, this touch up paint kit perfectly matches Crystal White Pearl (codes: K1X) for flawless scratch and chip repairs. Restore your car's original shine with this premium automotive paint kit.
 - Easily Fix Mistakes with Correct N Clear: Made a mistake? No problem! The included Correct N Clear solution allows you to remove any errors and reapply the paint effortlessly, ensuring a professional finish every time. Ideal for beginners and pros alike.
- 100% Color Match Guarantee with Satisfaction Assurance: We stand behind the quality of our Subaru
 Crystal White Pearl touch up paint. Our kit ensures a precise color match to restore your car's original finish. If you're not satisfied, we are here to make it right—your satisfaction is our priority.
 - All-In-One Kit for Stone Chips and Scratches: This complete kit includes everything you need to repair stone chips and scratches: Crystal White Pearl Touch Up Paint (30ml / 1.01 fl oz), Correct N Clear (50ml / 1.69 fl oz), Paste (25ml / 0.84 fl oz), Wax (25ml / 0.84 fl oz), Brushes, Microfiber cloths, Sponges, Gloves, and more. Restore your car's finish in just a few steps!
- Premium Automotive Paint for Lasting Results: Engineered for lasting durability, this touch up paint kit protects your car against rust and damage. Trusted by automotive enthusiasts, it's the ultimate solution for scratch repair and paint chip restoration.
- CAR PAINT SCRATCH REPAIR – Dupli-Color Scratch Fix Automotive Paint is the all-in-1 tool for all your touch-up repairs. Featuring an abrasive tip to remove loose paint/rust and a clear coat to seal, protect, and ensure a perfect factory-matched finish.
- EXACT COLOR MATCH - Dupli-Color car color matching paint codes are tied directly to the color codes on your car ID tag/sticker. For Subaru
 vehicles, you can typically find it on the driver’s door jamb.
 - EASY TO USE – The convenient, ergonomically designed Scratch Fix All-in-1 is the first touch-up car paint repair tool of its kind to combine both paint and clear protective top coat in a single package.
- IDEAL USES – Ideal for use on all OEM paint surfaces, this Dupli-Color car paint pen tool helps you fix it easy and fix it right…in your garage! The pen tip is perfect for fine scratches and the brush end works for larger chips.
- DUPLI-COLOR PAINT – Since 1938, Dupli-Color has been the trusted brand leader in providing easy-to-use, innovative, products to restore, restyle and protect vehicle appearance.
- [Scratch Repair] If you park sideways, the wheels are easily scratched, this touch up paint pen can help you repair the scratches, for car enthusiasts and drivers, repairing some small scratches is necessary, and it can save a lot of time and money.
- [Easy to Operate] Our touch up paint pen is easy to apply and usually dries within 10 minutes, just clean the scratched area and remove the loose paint, shake the paint pen for about 1 minute to mix it well and it can be used. When you finish the first layer, it will dry very quickly, if the scratch is deep, then you can apply the second and third layers until the scratch is completely filled.
- [Effective Protection] Scratches on cars are not only annoying, but can even cause rust on the metal under the paint. Our touch up paint for cars can quickly repair these unsightly areas and seal the scratches, keeping the car paint beautiful and preventing future rust.
- [Usage Suggestions] If you are using our product for the first time, you can practice on metal or cardboard first to make sure there is no difference in color and paint before repairing.
- [Durable] Paint pen With anti-rust and waterproof performance, the protective layer is durable, long-term use does not fade, making repair more accurate and easier.
SEOCONTENT-START
Service Bulletin Number: 12-172-14R; Date: 07/15/14 Page 1 INTRODUCTION This bulletin provides a procedure for how to address a customer concern of side-to-side trunk panel movement and possible contact with the corresponding top edges of the quarter panels. In some cases, this contact may result in chipping of the vehicle finish. COUNTERMEASURE IN PRODUCTION • The new trunk weatherstrip was incorporated into production starting with VIN F*811343. • The longer (BRZ) trunk stoppers were incorporated into production starting with VIN F*811136. • A new design WRX / STI trunk stopper (p.n. 57533FE050) is scheduled to be incorporated into production during mid-July, 2014 starting with VIN F*812458. PART INFORMATION For STI models, in addition to the longer trunk stoppers, the trunk weatherstrip’s tubular sealing portion now has internal reinforcement in the area between the red arrows shown in the photo below. This reinforcement serves to stabilize the trunk panel and eliminate the chipping. • Updated trunk weatherstrip, p.n. 57532VA002- Qty. 1 • Replacement Trunk Lid Stoppers – Qty. 2 (NOTE: currently, these are BRZ trunk stoppers, p.n. 57533FE040) NUMBER: 12-172-14R DATE: 07/11/14 REVISED: 07/15/14 APPLICABILITY: 2015MY WRX and STI Models SUBJECT: Paint Chipping Due To Trunk Lid Movement SERVICE BULLETIN ATTENTION: GENERAL MANAGER q PARTS MANAGER q CLAIMS PERSONNEL q SERVICE MANAGER q IMPORTANT – All Service Personnel Should Read and Initial in the boxes provided, right. Continued… CAUTION: VEHICLE SERVICING PERFORMED BY UNTRAINED PERSONS COULD RESULT IN SERIOUS INJURY TO THOSE PERSONS OR TO OTHERS. Subaru Service Bulletins are intended for use by professional technicians ONLY. They are written to inform those technicians of conditions that may occur in some vehicles, or to provide information that could assist in the proper servicing of the vehicle. Properly trained technicians have the equipment, tools, safety instructions, and know-how to do the job correctly and safely. If a condition is described, DO NOT assume that this Service Bulletin applies to your vehicle, or that your vehicle will have that condition. SUBARU OF AMERICA, INC. IS ISO 14001 COMPLIANT ISO 14001 is the international standard for excellence in Environmental Management Systems. Please recycle or dispose of automotive products in a manner that is friendly to our environment and in accordance with all local, state and federal laws and regulations. ©2014 Subaru of America, Inc. All rights reserved. Tubular Sealing portion Service Bulletin Number: 12-172-14R; Date: 07/15/14 Page 2 SERVICE PROCEDURE / INFORMATION There are 2 procedures to follow depending on the model of vehicle being serviced. To summarize: • WRX Models – Replacement of the trunk stoppers only followed by a check of the trunk panel adjustment. • STI Models – Replacement of the trunk weatherstrip and trunk stoppers followed by a check of the trunk panel adjustment. IMPORTANT NOTES: • BE CAREFUL to not tear the rubber material of the trunk weatherstrip when removing or re-positioning the replacement part. • When removing the original weatherstrip, be careful to not get any of the adhesive as shown below on the trunk liner trim panels. • There should be no extra effort or force (“slamming”) required to properly close the trunk lid after the replacement parts are installed. STEP 1: (Both WRX and STI Models) Replace both the rubber trunk stoppers with the longer version (currently used on BRZ, p. n. 57533FE040). The photos show the current stopper on the left and the replacement longer version installed in position on the right. Use a plastic trim tool between the stopper and the trunk panel to release the 2 “tangs” holding the original stoppers in place. Continued… Adhesive “Tangs” Replacement stopper in place Service Bulletin Number: 12-172-14R; Date: 07/15/14 Page 3 STEP 2: (STI Models ONLY) Replace the trunk weatherstrip and trunk stoppers. REMINDER: always be careful to not get any of the residual weatherstrip adhesive on any of the trunk liner trim panels. As shown in the photos below, align the square notch with the trunk latch striker. The arrow molded into the short, smooth portion of the trunk weatherstrip faces down toward the bumper cover. On the top section (closest to the back glass), the blue dot should align with the center of the third brake light. STEP 3: After the trunk stoppers (and weatherstrip on STI models ONLY) have been installed, close the trunk lid while paying close attention to the points listed below. REMINDER: There should be no extra effort or force (“slamming”) required to properly close the trunk lid. • After the trunk lid is closed, look closely for any excessive, insufficient or uneven gap(s) around the complete perimeter of the trunk lid. • Make sure the trunk height is correct and that it fits “flush” with the corresponding edges of the rear quarter panels. • In most cases, there should be only minor adjustment needed to the trunk lid, if any at all. Pay close attention to the adjustment for “B” as shown in the table below. If after close inspection, it is determined adjustment of the trunk lid is necessary for proper fit, use the Service Manual specifications supplied below EXCEPT FOR “B” which has been recently revised (shown in RED). The Service Manual will be updated with the revised specifications in the near future. Notch Smooth portion arrow aligned with striker and facing down Replacement with dot Original with dot Service Bulletin Number: 12-172-14R; Date: 07/15/14 Page 4 FOR STI MODELS: FOR WRX MODELS: Continued… EB-00979 E A B C D Part Standard A Trunk lid COMPL and Panel – side outer 3.5±1.0 mm (0.14±0.04 in) B Surface level gap between Trunk lid COMPL and Panel – side outer (Difference in height) 0+.5 mm (.020”) by adjusting the striker -STI C Trunk lid COMPL and Panel – side outer D Surface level gap between Trunk lid COMPL and Panel – side outer –0.5±0.7 mm (0.02±0.03 in) E Trunk lid COMPL to Bumper face – rear 7.5±1.0 mm (0.3±0.04 in) 3.5±1.0 mm (0.14±0.04 in) Part Standard A Trunk lid COMPL and Panel – side outer 3.5±1.0 mm (0.14±0.04 in) B Surface level gap between Trunk lid COMPL and Panel – side outer (Difference in height) -1.0 mm (.040”) by adjusting the striker -WRX C Trunk lid COMPL and Panel – side outer D Surface level gap between Trunk lid COMPL and Panel – side outer –0.5±0.7 mm (0.02±0.03 in) E Trunk lid COMPL to Bumper face – rear 7.5±1.0 mm (0.3±0.04 in) 3.5±1.0 mm (0.14±0.04 in) Measure “B” 11” back from the front corner of trunk panel (with or without wing/lip spoiler). Outer Body Panel Trunk Lid Service Bulletin Number: 12-172-14R; Date: 07/15/14 Page 5 NOTES: Do not make any adjustments until AFTER the trunk stoppers (and weatherstrip on STI models ONLY) have been installed. • Clearance “A” and “C” must be the same left to right. • If “D” and “E” are within the specifications listed in the tables above, no adjustments are necessary. WARRANTY / CLAIM INFORMATION For vehicles within the Basic New Car Limited Warranty period, this repair may be claimed using the following information: FOR WRX MODELS: LABOR DESCRIPTION LABOR OPERATION # FAIL CODE LABOR TIME Trunk Stopper Replacement and Trunk Lid Gap Adjustment B914-745 WBD-48 0.3 Trunk Lid Movement Paint Touch-Up C981-021 0.2 Trunk Lid Movement Spot Repair Clear / Color Coat One Panel C981-020 0.8 Trunk Lid Movement Spot Repair Clear / Color Coat Each Additional Panel C981-053 0.6 Sublet Repair, Administrative Expenses C101-108 0.3 FOR STI MODELS: LABOR DESCRIPTION LABOR OPERATION # FAIL CODE LABOR TIME Trunk Stopper, Weatherstrip Replacement and Trunk Lid Gap Adjustment B914-740 WBC-48 0.4 Trunk Lid Movement Paint Touch-Up C981-021 0.2 Trunk Lid Movement Spot Repair Clear / Color Coat One Panel C981-020 0.8 Trunk Lid Movement Spot Repair Clear / Color Coat Each Additional Panel C981-053 0.6 Sublet Repair, Administrative Expenses C101-108 0.3 NOTES: • Up to $12.00 can be claimed in Sublet to cover the cost for touch-paint. • Should additional repair beyond touch-up be necessary, use the spot repair claim coding information provided in the table above. • If the required repair exceed these spot repair guidelines, DPSM review is required.
SEOCONTENT-END
Last update on 2025-05-08 / Affiliate links / Images from Amazon Product Advertising API
This product presentation was made with AAWP plugin.
